Woodworker's Journal 1994-18-6, страница 76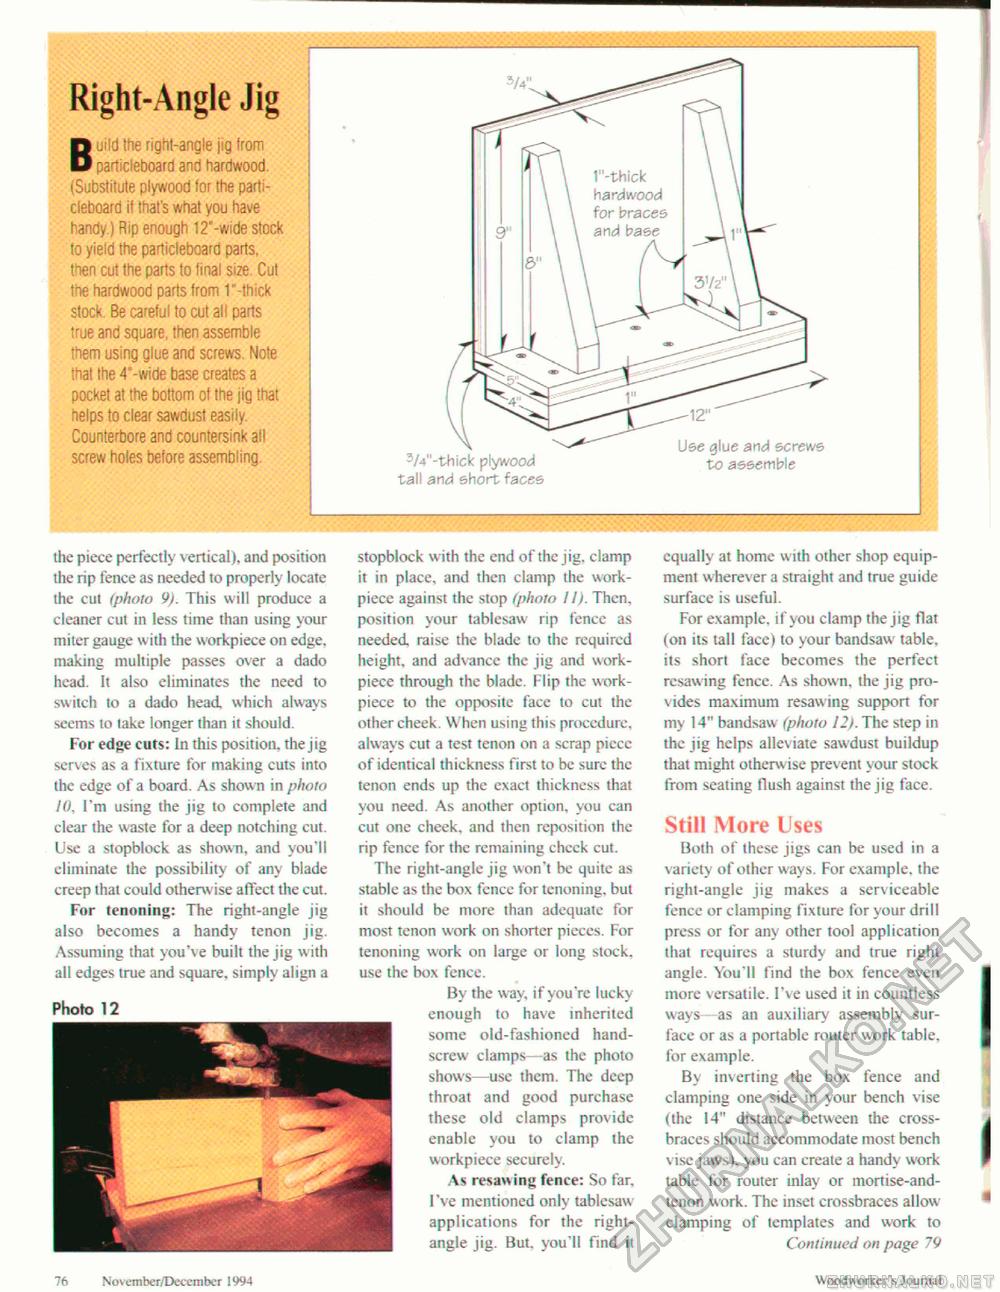
Right-Angle Jig Build the right-angle jig !rom particleboard and hardwood. (Substitute plywood for the particleboard if that's what you have handy.) Rip enough 12"-wide stock to yield the particleboard parts, then cut the parts to final size. Cut the hardwood parts from 1"-tbick stock. Be careful to cut all parts true and square, then assemble them using glue and screws. Note that the 4"-wide base creates a pocket at the bottom of the jig that helps to clear sawdust easily. Counterbore and countersink all screw holes before assembling. z/4"-thick plywood tall and short faces Use glue and screws to assemble the piece perfectly vertical), and position the rip fence as needed to properly locate the cut (photo 9). This will produce a cleaner cut in less time than using your miter gauge with the workpiece on edge, making multiple passes over a dado head. It also eliminates the need to switch to a dado head which always seems to take longer than it should. For edge cuts: In this position, the jig serves as a fixture for making cuts into the edge of a board. As shown in photo 10, I'm using the jig to complete and clear the waste for a deep notching cut. Use a stopblock as shown, and you'll eliminate the possibility of any blade creep that could otherwise affect the cut. For tenoning: The right-angle jig also becomes a handy tenon jig. Assuming that you've built the jig with all edges true and square, simply align a stopblock w ith the end of the jig, clamp it in place, and then clamp the work-piece against the stop (photo II). Then, position your tablesaw rip fencc as needed raise the blade to the required height, and advance the jig and work-piece through the blade. Flip the work-piece to the opposite face to cut the other cheek. When using this procedure, always cut a test tenon on a scrap piccc of identical thickness first to be sure the tenon ends up the exact thickness that you need. As another option, you can cut one cheek, and then reposition the rip fence for the remaining chcck cut. The right-angle jig won't be quite as stable as the box fence for tenoning, but it should be more than adequate for most tenon work on shorter pieces. For tenoning work on large or long stock, use the box fence. By the way, if you're lucky enough to have inherited some old-fashioned hand-screw clamps—as the photo shows—use them. The deep throat and good purchase these old clamps provide enable you to clamp the workpiece securely. As resawing fence: So far, I've mentioned only tablesaw applications for the right-angle jig. But. you'll find it equally at home with other shop equipment wherever a straight and true guide surface is useful. For example, if you clamp the jig flat (on its tall face) to your bandsaw table, its short face becomes the perfect resawing fence. As shown, the jig provides maximum resawing support for my 14" bandsaw (photo 12). The step in the jig helps allev iate sawdust buildup that might otherwise prevent your stock from sealing flush against the jig face. Still More Uses Both of these jigs can be used in a variety of other ways. For example, the right-angle jig makes a serviceable fence or clamping fixture for your drill press or for any other tool application that requires a sturdy and true right angle. You'll find the box fence even more versatile. I've used it in countless ways as an auxiliary assembly surface or as a portable router work table, for example. By inverting the box fence and clamping one side in your bench vise (the 14" distance between the cross-braces should accommodate most bench vise jaws), you can create a handy work table for router inlay or mortise-and-tenon work. The inset crossbraces allow clamping of templates and work to Continued on page 79 Photo 12 76 Novemher/December 1994 Wixxiworkcr's Journal |


