Woodworker's Journal 2004-Winter, страница 57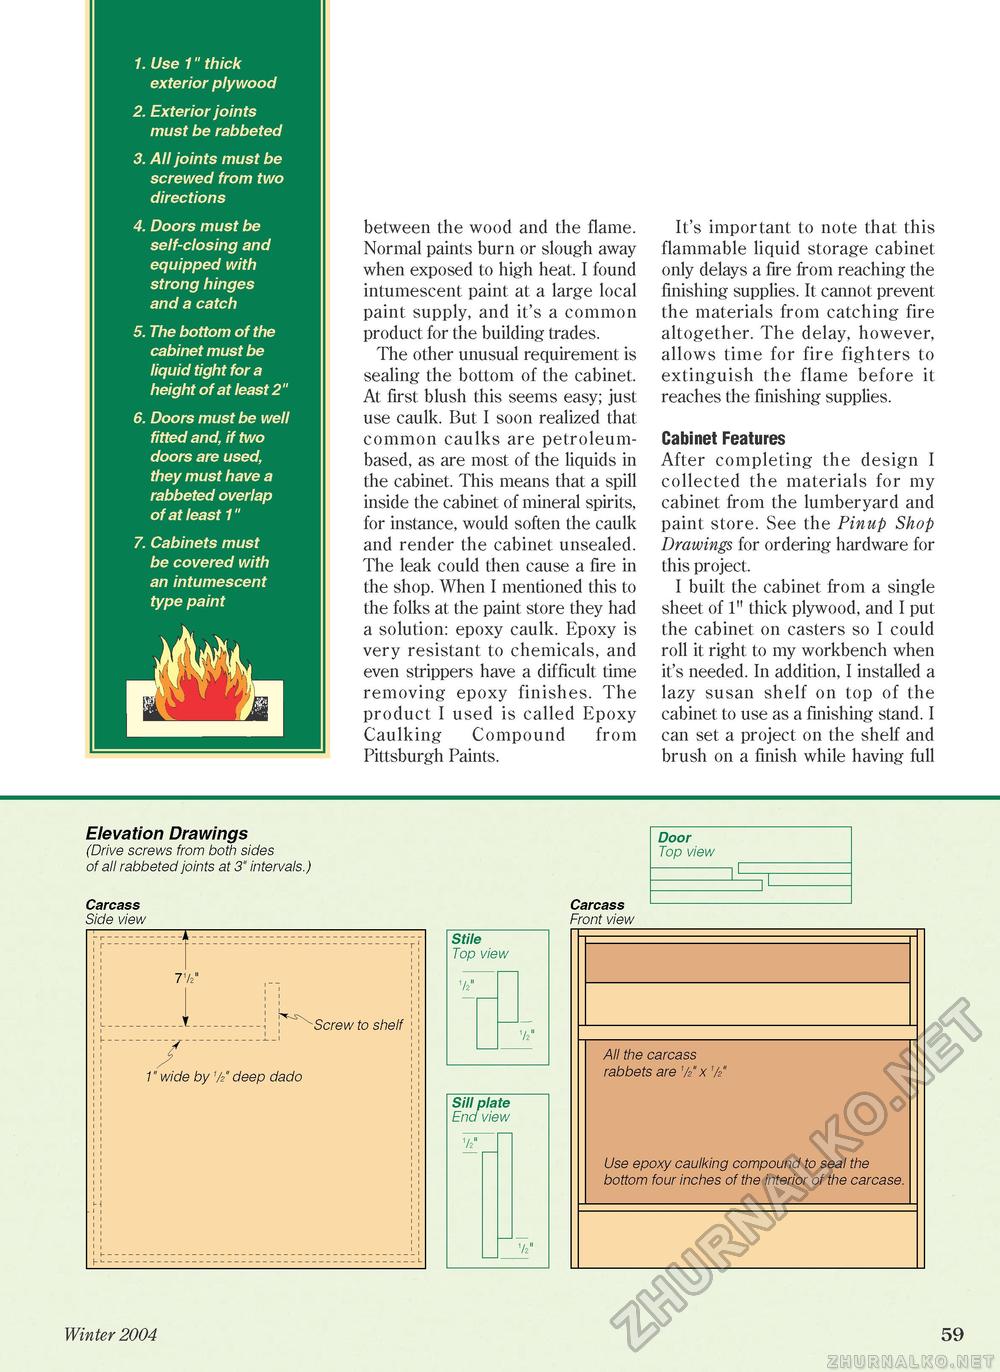
1. Use 1" thick exterior plywood 2. Exterior joints must be rabbeted 3. All joints must be screwed from two directions 4. Doors must be self-closing and equipped with strong hinges and a catch 5. The bottom of the cabinet must be liquid tight for a height of at least 2" 6. Doors must be well fitted and, if two doors are used, they must have a rabbeted overlap of at least 1" 7. Cabinets must be covered with an intumescent type paint between the wood and the flame. Normal paints burn or slough away when exposed to high heat. I found intumescent paint at a large local paint supply, and it's a common product for the building trades. The other unusual requirement is sealing the bottom of the cabinet. At first blush this seems easy; just use caulk. But I soon realized that common caulks are petroleum-based, as are most of the liquids in the cabinet. This means that a spill inside the cabinet of mineral spirits, for instance, would soften the caulk and render the cabinet unsealed. The leak could then cause a fire in the shop. When I mentioned this to the folks at the paint store they had a solution: epoxy caulk. Epoxy is very resistant to chemicals, and even strippers have a difficult time removing epoxy finishes. The product I used is called Epoxy Caulking Compound from Pittsburgh Paints. It's important to note that this flammable liquid storage cabinet only delays a fire from reaching the finishing supplies. It cannot prevent the materials from catching fire altogether. The delay, however, allows time for fire fighters to extinguish the flame before it reaches the finishing supplies. Cabinet Features After completing the design I collected the materials for my cabinet from the lumberyard and paint store. See the Pinup Shop Drawings for ordering hardware for this project. I built the cabinet from a single sheet of 1" thick plywood, and I put the cabinet on casters so I could roll it right to my workbench when it's needed. In addition, I installed a lazy susan shelf on top of the cabinet to use as a finishing stand. I can set a project on the shelf and brush on a finish while having full Elevation Drawings (Drive screws from both sides of all rabbeted joints at 3" intervals.) Carcass Side view Carcass Front view Door Top view Screw to shelf 1" wide by 1/2' deep dado Sill plate End view 1/2" All the carcass rabbets are 1// x1// Use epoxy caulking compound to seal the bottom four inches of the interior of the carcase. Winter 2004 59 |


