Woodworker's Journal 2006-30-Winter, страница 53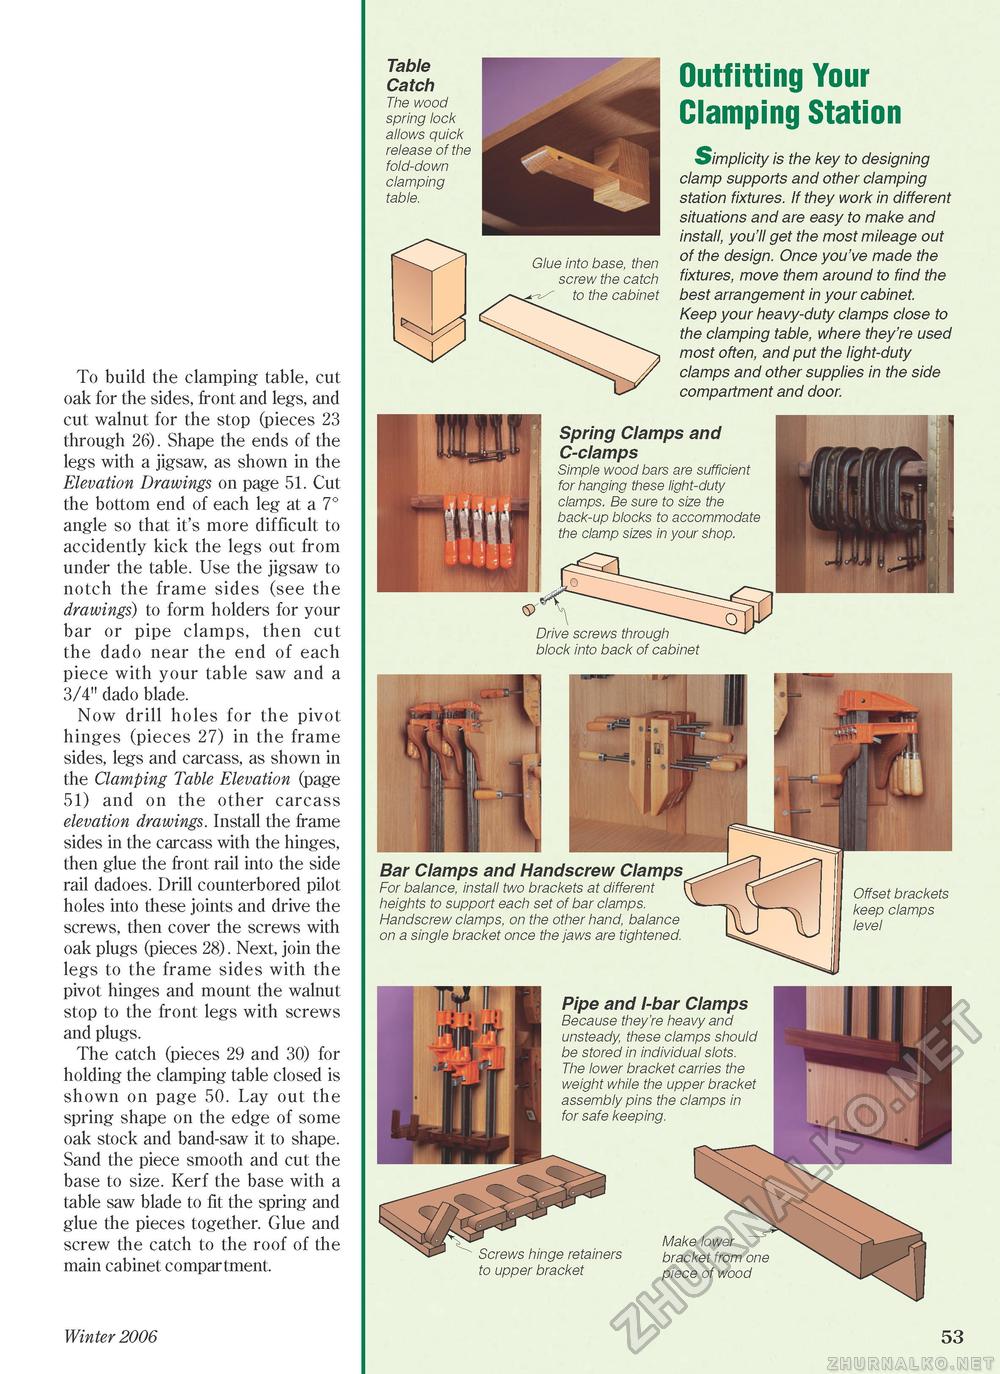
To build the clamping table, cut oak for the sides, front and legs, and cut walnut for the stop (pieces 23 through 26). Shape the ends of the legs with a jigsaw, as shown in the Elevation Drawings on page 51. Cut the bottom end of each leg at a 7° angle so that it's more difficult to accidently kick the legs out from under the table. Use the jigsaw to notch the frame sides (see the drawings) to form holders for your bar or pipe clamps, then cut the dado near the end of each piece with your table saw and a 3/4" dado blade. Now drill holes for the pivot hinges (pieces 27) in the frame sides, legs and carcass, as shown in the Clamping Table Elevation (page 51) and on the other carcass elevation drawings. Install the frame sides in the carcass with the hinges, then glue the front rail into the side rail dadoes. Drill counterbored pilot holes into these joints and drive the screws, then cover the screws with oak plugs (pieces 28). Next, join the legs to the frame sides with the pivot hinges and mount the walnut stop to the front legs with screws and plugs. The catch (pieces 29 and 30) for holding the clamping table closed is shown on page 50. Lay out the spring shape on the edge of some oak stock and band-saw it to shape. Sand the piece smooth and cut the base to size. Kerf the base with a table saw blade to fit the spring and glue the pieces together. Glue and screw the catch to the roof of the main cabinet compartment. Table Catch The wood spring lock allows quick release of the fold-down clamping table. Glue into base, then screw the catch to the cabinet Outfitting Your Clamping Station Simplicity is the key to designing clamp supports and other clamping station fixtures. If they work in different situations and are easy to make and install, you'll get the most mileage out of the design. Once you've made the fixtures, move them around to find the best arrangement in your cabinet. Keep your heavy-duty clamps close to the clamping table, where they're used most often, and put the light-duty clamps and other supplies in the side compartment and door. Spring Clamps and C-clamps Simple wood bars are sufficient for hanging these light-duty clamps. Be sure to size the back-up blocks to accommodate the clamp sizes in your shop. Drive screws through block into back of cabinet Bar Clamps and Handscrew Clamps For balance, install two brackets at different heights to support each set of bar clamps. Handscrew clamps, on the other hand, balance on a single bracket once the jaws are tightened Pipe and I-bar Clamps Because they're heavy and unsteady, these clamps should be stored in individual slots. The lower bracket carries the weight while the upper bracket assembly pins the clamps in for safe keeping. Offset brackets keep clamps level Screws hinge retainers to upper bracket Make lower bracket from one piece of wood Winter 2006 53 |


