Woodworker's Journal 2010-34-1, страница 38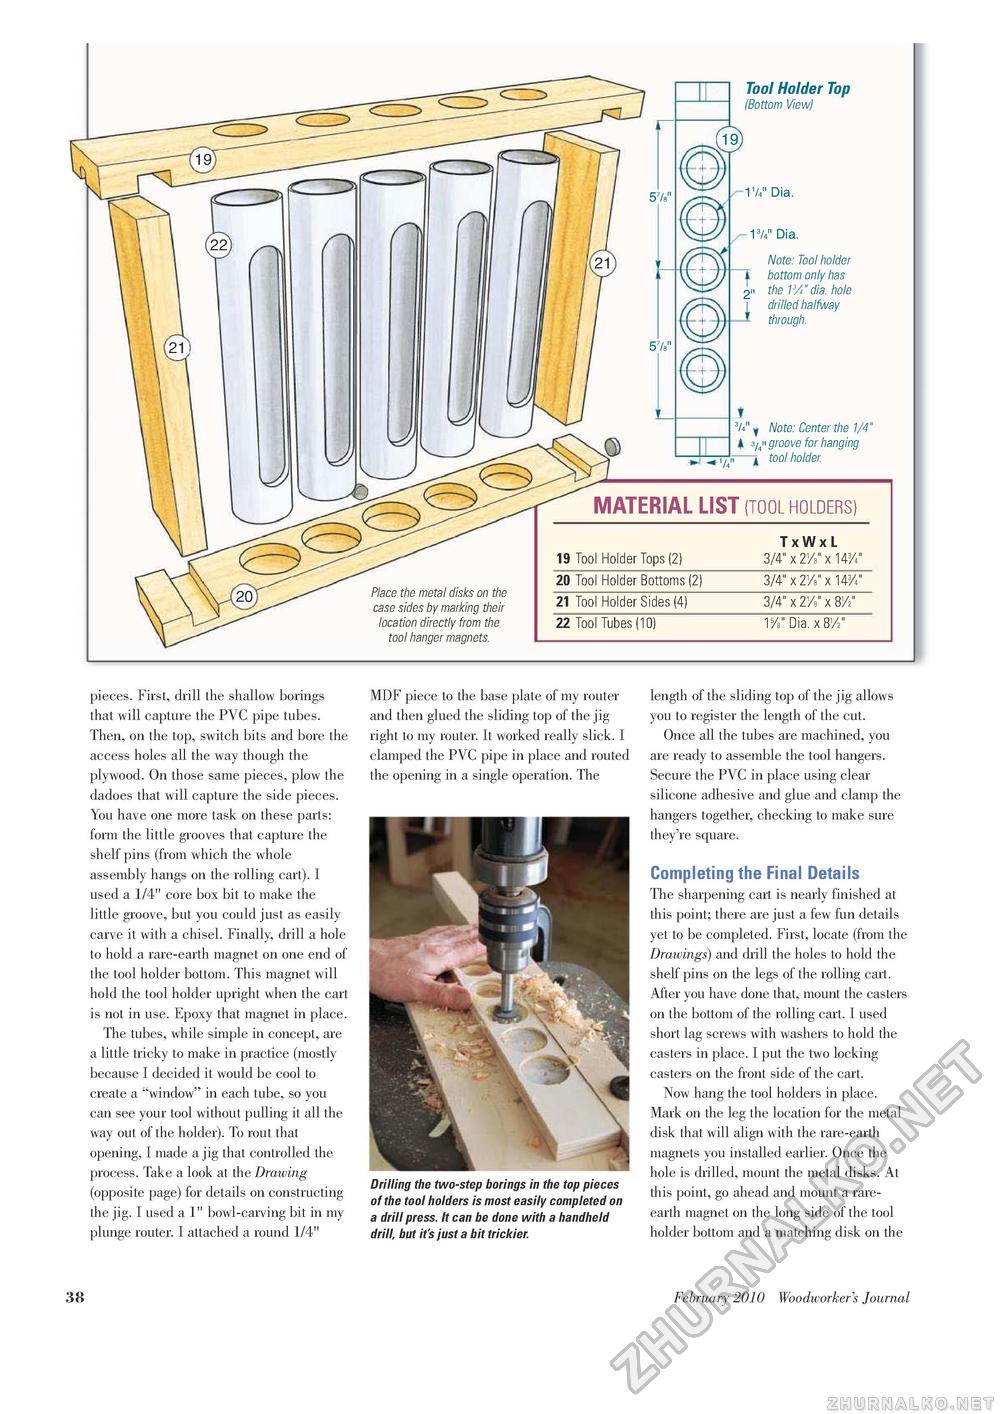
pieces. First, drill the shallow borings that will capture the PVC pipe tubes. Then, on the top, switch bits and bore the access holes all the way though the plywood. On those same pieces, plow the dadoes that will capture the side pieces. You have one more task on these parts: form the little grooves that capture the shelf pins (from which the whole assembly hangs on the rolling cart). I used a 1/4" core box bit to make the little groove, but you could just as easily carve it with a chisel. Finally, drill a hole to hold a rare-earth magnet on one end of the tool holder bottom. This magnet will hold the tool holder upright when the cart is not in use. Epoxy that magnet in place. The tubes, while simple in concept, are a little tricky to make in practice (mostly because I decided it would be cool to create a "window" in each tube, so you can see your tool without pulling it all the way out of the holder). To rout that opening, I made a jig that controlled the process. Take a look at the Drawing (opposite page) for details on constructing the jig. I used a 1" bowl-carving bit in my plunge router. I attached a round 1/4" MDF piece to the base plate of my router and then glued the sliding top of the jig right to my router. It worked really slick. I clamped the PVC pipe in place and routed the opening in a single operation. The Drilling the two-step borings in the top pieces of the tool holders is most easily completed on a drill press. It can be done with a handheld drill, but it's just a bit trickier. length of the sliding top of the jig allows you to register the length of the cut. Once all the tubes are machined, you are ready to assemble the tool hangers. Secure the PVC in place using clear silicone adhesive and glue and clamp the hangers together, checking to make sure they're square. Completing the Final Details The sharpening cart is nearly finished at this point; there are just a few fun details yet to be completed. First, locate (from the Drawings) and drill the holes to hold the shelf pins on the legs of the rolling cart. After you have done that, mount the casters on the bottom of the rolling cart. I used short lag screws with washers to hold the casters in place. I put the two locking casters on the front side of the cart. Now hang the tool holders in place. Mark on the leg the location for the metal disk that will align with the rare-earth magnets you installed earlier. Once the hole is drilled, mount the metal disks. At this point, go ahead and mount a rare-earth magnet on the long side of the tool holder bottom and a matching disk on the 38 February 2010 Woodworker's Journal |


