Woodworker's Journal fall-2008, страница 65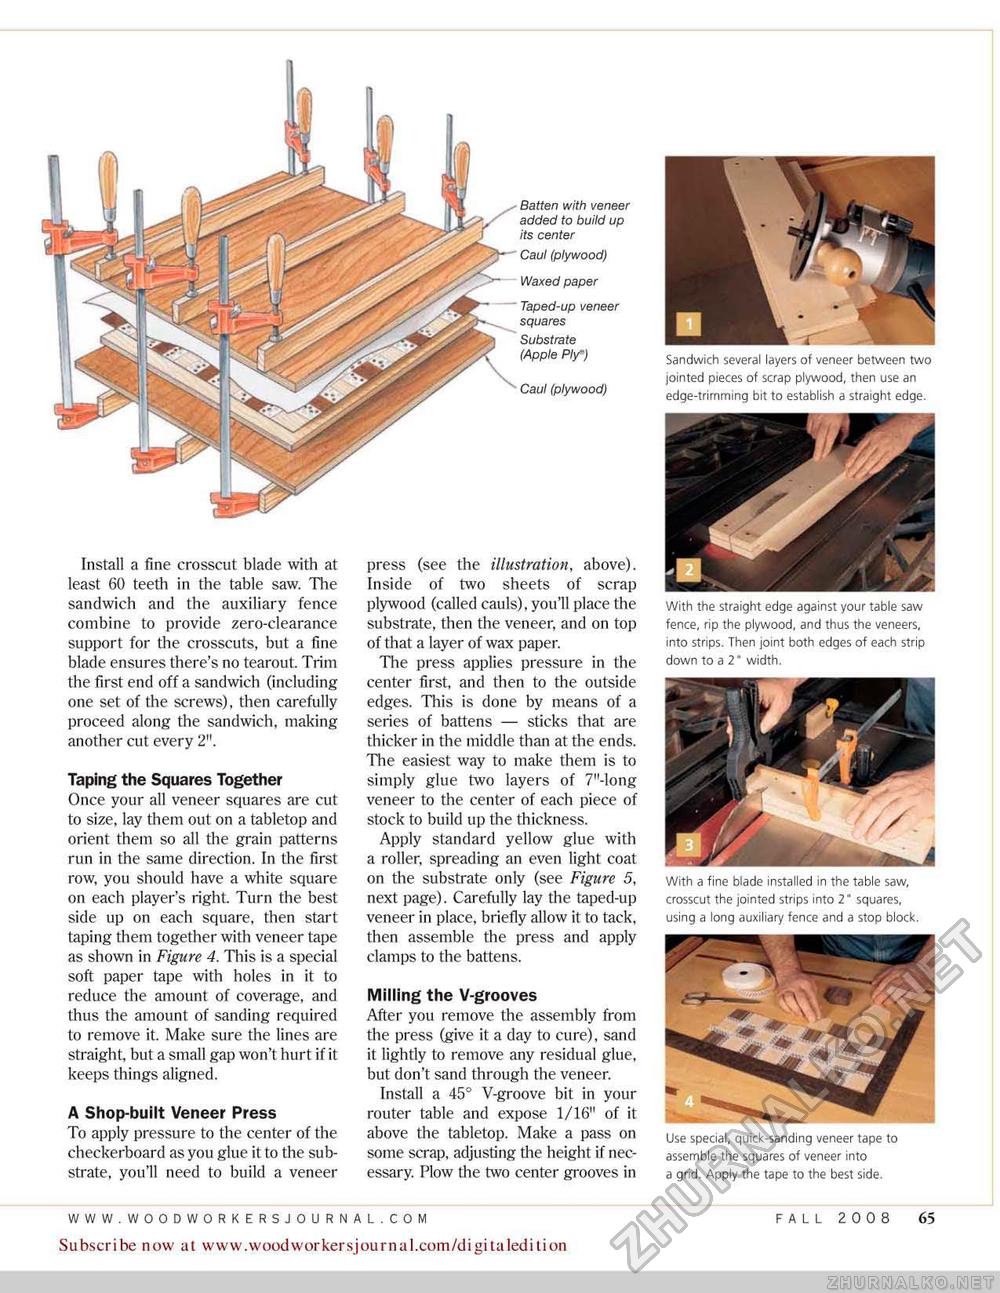
Batten with veneer added to build up its center Caul (plywood) Waxed paper Taped-up veneer squares Substrate (Apple Ply"J Caul (plywood) Install a fine crosscut blade with at least 60 teeth in the table saw. The sandwich and the auxiliary fence combine to provide zero-clearance support for the crosscuts, but a fine blade ensures there's no tearout Trim the first end off a sandwich (including one set of the screws), then carefully proceed along the sandwich, making another cut every 2". Taping the Squares Together Once your all veneer squares are cut to size, lay them out on a tabletop and orient them so all the grain patterns run in the same direction. In the first row, you should have a white square on each player's right. Turn the best side up on each square, then start taping them together with veneer tape as shown in Figure 4. This is a special soft paper tape with holes in it to redtice the amount of coverage, and thus the amount of sanding required to remove it. Make sure the lines are straight, but a small gap won't hurt if it keeps things aligned. A Shop-built Veneer Press To apply pressure to the center of the checkerboard as you glue it to the substrate, you'll need to build a veneer press (see the illustration, above). Inside of two sheets of scrap plywood (called cauls), you'll place the substrate, then the veneer, and on top of that a layer of wax paper. The press applies pressure in the center first, and then to the outside edges. This is done by means of a series of battens — sticks that are thicker in the middle than at the ends. The easiest way to make them is to simply glue two layers of 7"-long veneer to the center of each piece of stock to build up the thickness. Apply standard yellow glue with a roller, Spreading an even light coat on the substrate only (see Figure 5, next page). Carefully lay the taped-up veneer in place, briefly allow it to tack, then assemble the press and apply clamps to the battens. Milling the V-grooves After you remove the assembly from the press (give it a day to cure), sand it lightly to remove any residual glue, but don't sand through the veneer. Install a 45° V-groove bit in your router table and expose 1/10" of it above the tabletop. Make a pass on some scrap, adjusting the height if necessary. Plow the two center grooves in Sandwich several layers of veneer between two jointed pieces of scrap plywood, then use an edge-trimming bit to establish a straight edge. With the straight edge against your table saw fence, rip the plywood, and thus the veneers, into strips. Then joint both edges of each strip down to a 2" width. With a fine bsade installed in the table saw, crosscut the jointed strips into 2 squares, using a long auxiliary fence and a stop block. Use special, quick-sanding veneer tape to assemble the squares of veneer into a grid. Apply the tape to the best side. Subscribe now at www.woodwoirkersjournal.com/digitaledition FALL 2008 65 |


