Woodworker's Journal fall-2010, страница 26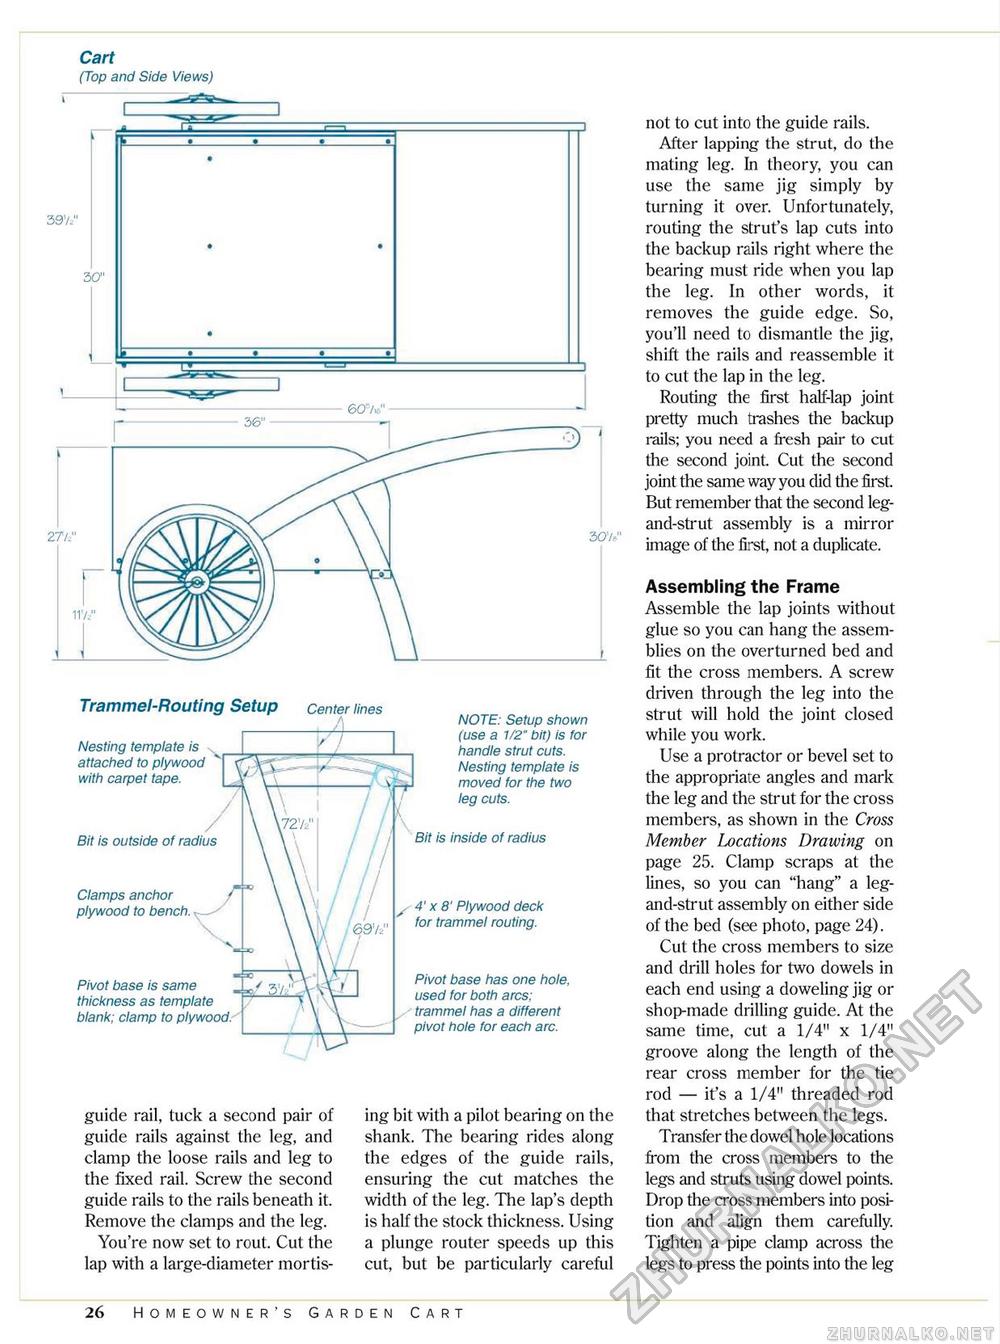
Cart (Top and Side Views) guide rail, tuck a second pair of guide rails against the leg, and clamp the loose rails and leg to the fixed rail. Screw the second guide rails to the rails beneath it. Remove the clamps and the leg. You're now set to rout. Cut the lap with a large-diameter mortis ing bit with a pilot bearing on the shank. The bearing rides along the edges of the guide rails, ensuring the cut matches the width of the leg. The lap's depth is half the stock thickness. Using a plunge router speeds up this cut, but be particularly careful not to cut into the guide rails. After lapping the strut, do the mating leg. In theory, you can use the same jig simply by turning it over. Unfortunately, routing the strut's lap cuts into the backup rails right where the bearing must ride when you lap the leg. In other words, it removes the guide edge. So, you'll need to dismantle the jig, shift the rails and reassemble it to cut the lap in the leg. Routing the first half-lap joint pretty much trashes the backup rails; you need a fresh pair to cut the second joint Cut the second joint the same way you did the first But remember that the second leg-and-strut assembly is a mirror image of the first, not a duplicate. Assembling the Frame Assemble the lap joints without glue so you can hang the assemblies on the overturned bed and fit the cross members. A screw driven through the leg into the strut will hold the joint closed while you work. Use a protractor or bevel set to the appropriate angles and mark the leg and the strut for the cross members, as shown in the Cross Member Locations Drawing on page 25. Clamp scraps at the lines, so you can "hang" a leg-and-strut assembly on either side of the bed (see photo, page 24). Cut the cross members to size and drill holes for two dowels in each end using a doweling jig or shop-made drilling guide. At the same time, cut a 1/4" x 1/4" groove along the length of the rear cross member for the tie rod — it's a 1/4" threaded rod that stretches between the legs. Transfer the dowel hole locations from the cross members to the legs and struts using dowel points. Drop the cross members into position and align them carefully. Tighten a pipe clamp across the legs to press the points into the leg Pivot base is same thickness as template blank; clamp to plywood. Pivot base has one hole, used for both arcs; trammel has a different pivot hole for each arc. NOTE: Setup shown (use a 1/2" bit) is for handle strut cuts. Nesting template is moved for the two leg cuts. inside of radius Clamps anchor plywood to bench. 4' x 8' Plywood deck for trammel routing. Trammel-Routing Setup Nesting template is attached to plywood with carpet tape. Bit is outside of radius 26 Homeowner's Garden Cart |


