Woodworker's Journal Summer-2008, страница 58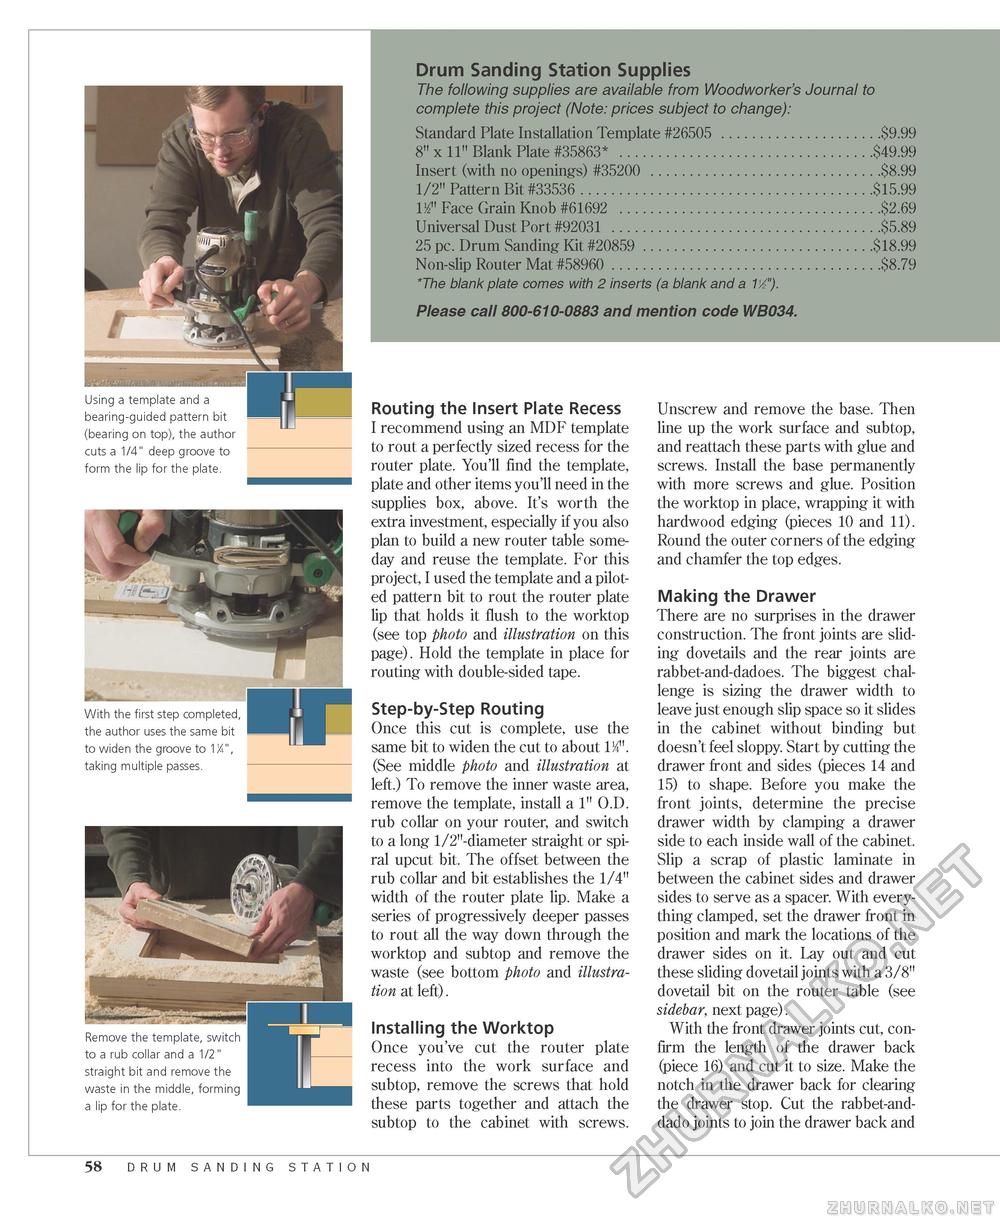
Using a template and a bearing-guided pattern bit (bearing on top), the author cuts a 1/4" deep groove to form the lip for the plate. With the first step completed, the author uses the same bit to widen the groove to W, taking multiple passes. Remove the template, switch to a rub collar and a 1/2" straight bit and remove the waste in the middle, forming a lip for the plate. Drum Sanding Station Supplies The following supplies are available from Woodworker's Journal to complete this project (Note: prices subject to change): Standard Plate Installation Template #26505 .....................$9.99 8" x 11" Blank Plate #35863* .................................$49.99 Insert (with no openings) #35200 ..............................$8.99 1/2" Pattern Bit #33536 ......................................$15.99 112" Face Grain Knob #61692 ..................................$2.69 Universal Dust Port #92031 ...................................$5.89 25 pc. Drum Sanding Kit #20859 ..............................$18.99 Non-slip Router Mat #58960 ...................................$8.79 The blank plate comes with 2 inserts (a blank and a 1'2"). Please call 800-610-0883 and mention code WB034. Routing the Insert Plate Recess I recommend using an MDF template to rout a perfectly sized recess for the router plate. You'll find the template, plate and other items you'll need in the supplies box, above. It's worth the extra investment, especially if you also plan to build a new router table someday and reuse the template. For this project, I used the template and a piloted pattern bit to rout the router plate lip that holds it flush to the worktop (see top photo and illustration on this page). Hold the template in place for routing with double-sided tape. Step-by-Step Routing Once this cut is complete, use the same bit to widen the cut to about 1M". (See middle photo and illustration at left.) To remove the inner waste area, remove the template, install a 1" O.D. rub collar on your router, and switch to a long 1/2"-diameter straight or spiral upcut bit. The offset between the rub collar and bit establishes the 1/4" width of the router plate lip. Make a series of progressively deeper passes to rout all the way down through the worktop and subtop and remove the waste (see bottom photo and illustration at left). Installing the Worktop Once you've cut the router plate recess into the work surface and subtop, remove the screws that hold these parts together and attach the subtop to the cabinet with screws. Unscrew and remove the base. Then line up the work surface and subtop, and reattach these parts with glue and screws. Install the base permanently with more screws and glue. Position the worktop in place, wrapping it with hardwood edging (pieces 10 and 11). Round the outer corners of the edging and chamfer the top edges. Making the Drawer There are no surprises in the drawer construction. The front joints are sliding dovetails and the rear joints are rabbet-and-dadoes. The biggest challenge is sizing the drawer width to leave just enough slip space so it slides in the cabinet without binding but doesn't feel sloppy. Start by cutting the drawer front and sides (pieces 14 and 15) to shape. Before you make the front joints, determine the precise drawer width by clamping a drawer side to each inside wall of the cabinet. Slip a scrap of plastic laminate in between the cabinet sides and drawer sides to serve as a spacer. With everything clamped, set the drawer front in position and mark the locations of the drawer sides on it. Lay out and cut these sliding dovetail joints with a 3/8" dovetail bit on the router table (see sidebar, next page). With the front drawer joints cut, confirm the length of the drawer back (piece 16) and cut it to size. Make the notch in the drawer back for clearing the drawer stop. Cut the rabbet-and-dado joints to join the drawer back and 58 drum sanding station |


