Woodworker's Journal Summer-2008, страница 61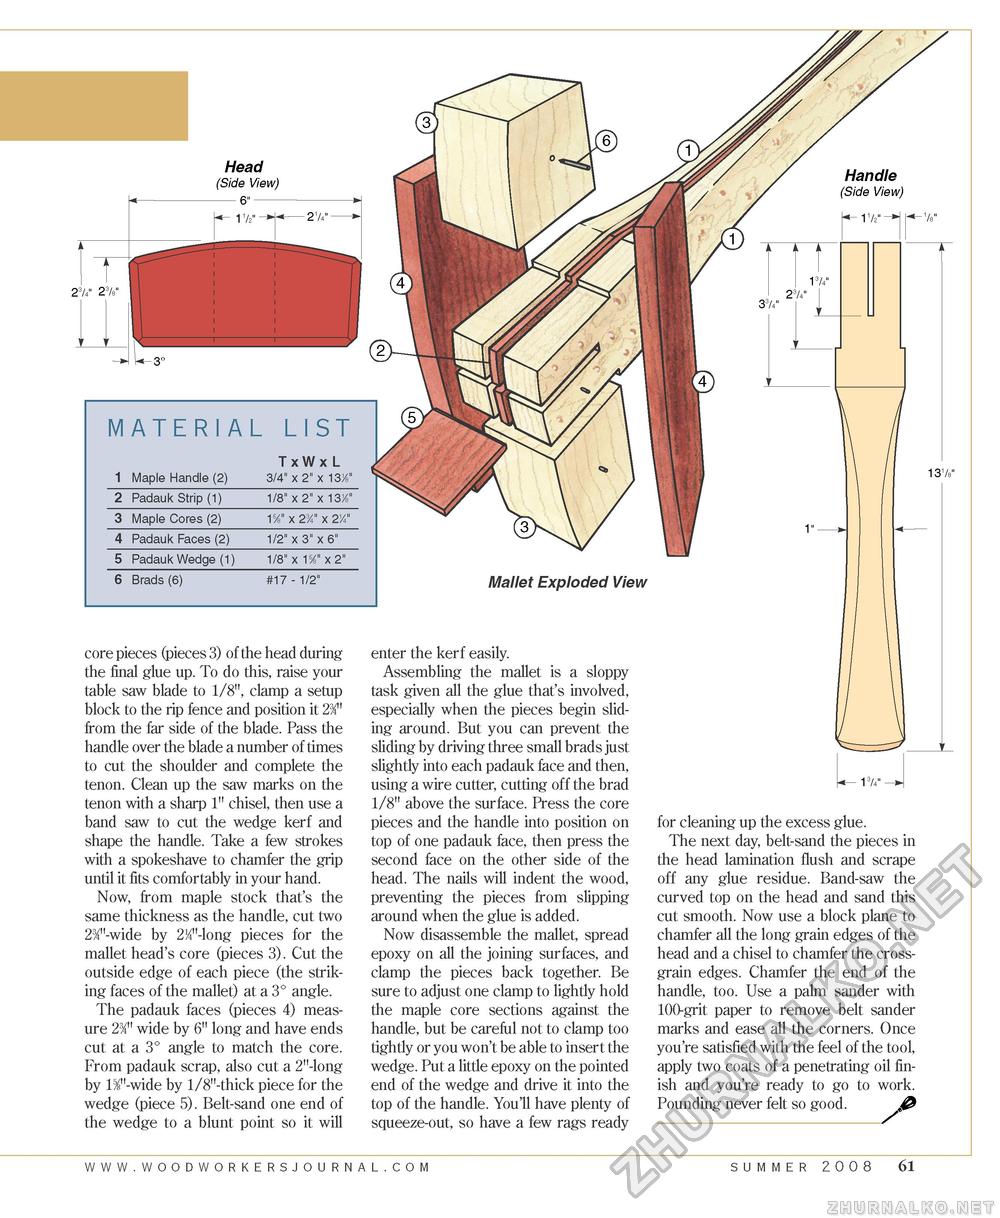
Head (Side View) 6" 23/4" 23/a
core pieces (pieces 3) of the head during the final glue up. To do this, raise your table saw blade to 1/8", clamp a setup block to the rip fence and position it 234" from the far side of the blade. Pass the handle over the blade a number of times to cut the shoulder and complete the tenon. Clean up the saw marks on the tenon with a sharp 1" chisel, then use a band saw to cut the wedge kerf and shape the handle. Take a few strokes with a spokeshave to chamfer the grip until it fits comfortably in your hand. Now, from maple stock that's the same thickness as the handle, cut two 23/'-wide by 2J4"-long pieces for the mallet head's core (pieces 3). Cut the outside edge of each piece (the striking faces of the mallet) at a 3° angle. The padauk faces (pieces 4) measure 23/' wide by 6" long and have ends cut at a 3° angle to match the core. From padauk scrap, also cut a 2"-long by 158"-wide by 1/8"-thick piece for the wedge (piece 5). Belt-sand one end of the wedge to a blunt point so it will enter the kerf easily. Assembling the mallet is a sloppy task given all the glue that's involved, especially when the pieces begin sliding around. But you can prevent the sliding by driving three small brads just slightly into each padauk face and then, using a wire cutter, cutting off the brad 1/8" above the surface. Press the core pieces and the handle into position on top of one padauk face, then press the second face on the other side of the head. The nails will indent the wood, preventing the pieces from slipping around when the glue is added. Now disassemble the mallet, spread epoxy on all the joining surfaces, and clamp the pieces back together. Be sure to adjust one clamp to lightly hold the maple core sections against the handle, but be careful not to clamp too tightly or you won't be able to insert the wedge. Put a little epoxy on the pointed end of the wedge and drive it into the top of the handle. You'll have plenty of squeeze-out, so have a few rags ready for cleaning up the excess glue. The next day, belt-sand the pieces in the head lamination flush and scrape off any glue residue. Band-saw the curved top on the head and sand this cut smooth. Now use a block plane to chamfer all the long grain edges of the head and a chisel to chamfer the cross-grain edges. Chamfer the end of the handle, too. Use a palm sander with 100-grit paper to remove belt sander marks and ease all the corners. Once you're satisfied with the feel of the tool, apply two coats of a penetrating oil finish and you're ready to go to work. Pounding never felt so good. & www.woodworkersjourna l . c o m summer 2008 61 |
||||||||||||||||


