Creative Woodworks & crafts 2001-03, страница 39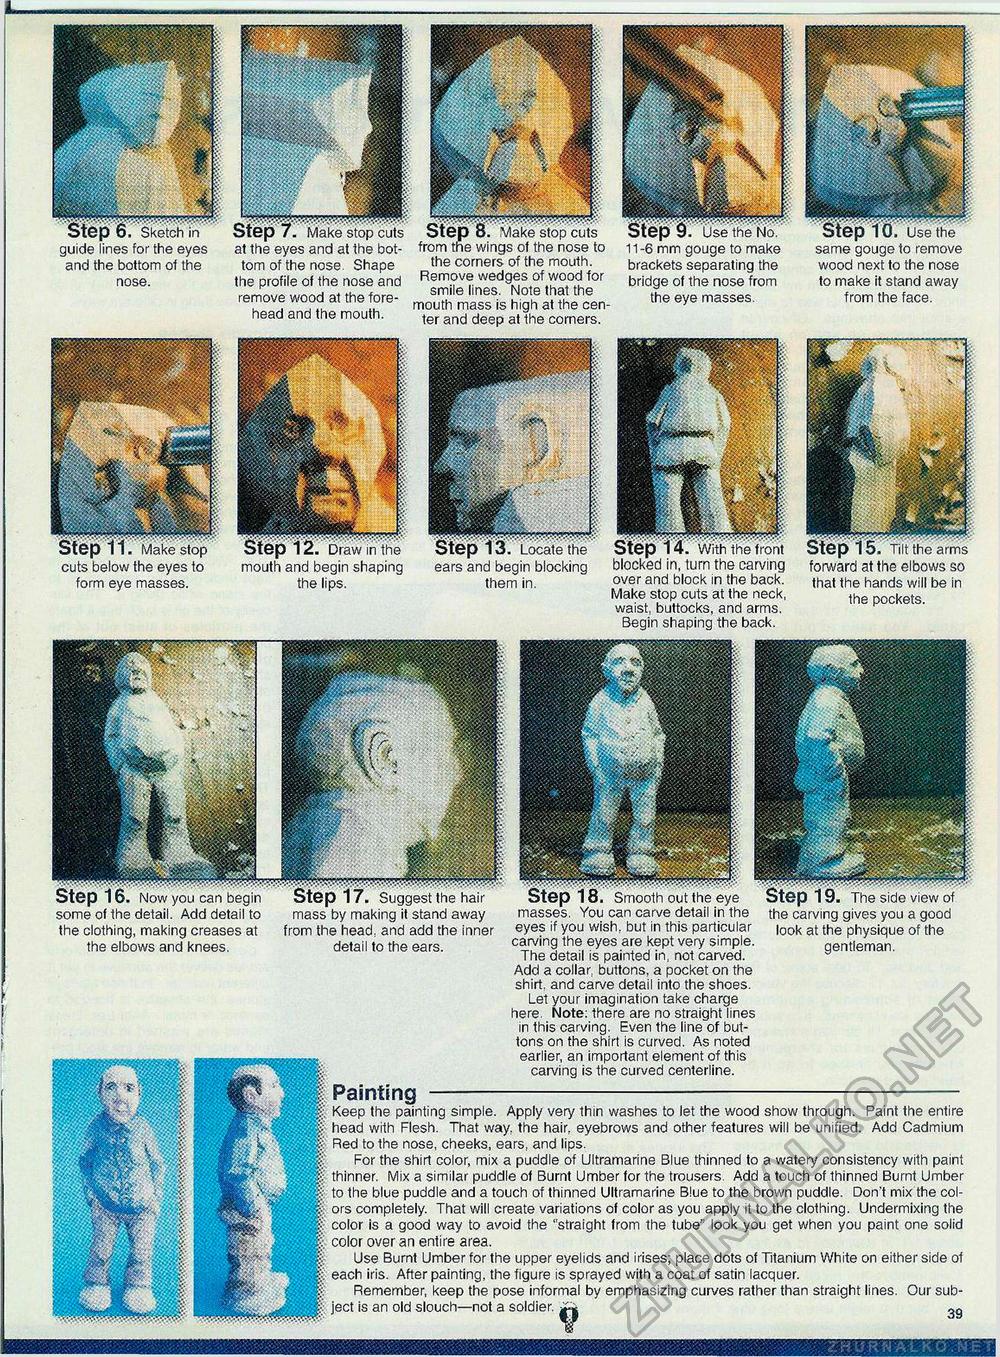
forward at the elbows so that the hands will be in the pockets. and begin shaping the lips. ears and begin blocking them in. blocked in, turn the carving over and block in the back. Make stop cuts at the neck, waist, buttocks, and arms. Begin shaping the back. guide lines for the eyes and the bottom of the nose. 11 -6 mm gouge to make brackets separating the bridge of the nose from the eye masses. same gouge to remove wood next to the nose to make it stand away from the face. the clothing, making creases at the elbows and knees. from the head, and add the inner detail to the ears. Painting masses. You can carve detail in the eyes if you wish, but in this particular carving the eyes are kept very simple. The detail is painted in, not carved. Add a collar, buttons, a pocket on the shirt, and carve detail into the shoes. Let your imagination take charge here. Note: there are no straight lines in this carving. Even the line of buttons on the shirt is curved. As noted earlier, an important element of this carving is the curved centerline. the carving gives you a good look at the physique of the gentleman. Keep the painting simple. Apply very thin washes to let the wood show through. Paint the entire head with Flesh. That way, the hair, eyebrows and other features will be unified. Add Cadmium Red to the nose, cheeks, ears, and lips. For the shirt color, mix a puddle of Ultramarine Blue thinned to a watery consistency with paint thinner. Mix a similar puddle of Burnt Umber for the trousers. Add a touch of thinned Burnt Umber to the blue puddle and a touch of thinned Ultramarine Blue to the brown puddle. Don't mix the colors completely. That will create variations of color as you apply it to the clothing. Undermixing the color is a good way to avoid the "straight from the tube" look you get when you paint one solid color over an entire area. Use Burnt Umber for the upper eyelids and irises; place dots of Titanium White on either side of each iris. After painting, the figure is sprayed with a coat of satin lacquer. Remember, keep the pose informal by emphasizing curves rather than straight lines. Our subject is an old slouch—not a soldier. ^ gg at the eyes and at the bottom of the nose. Shape the profile of the nose and remove wood at the forehead and the mouth. Step 8. Vlake stop cuts from the wings of the nose to the corners of the mouth. Remove wedges of wood for smile lines. Note that the mouth mass is high at the center and deep at the corners. |


