Creative Woodworks & crafts 2001-06, страница 34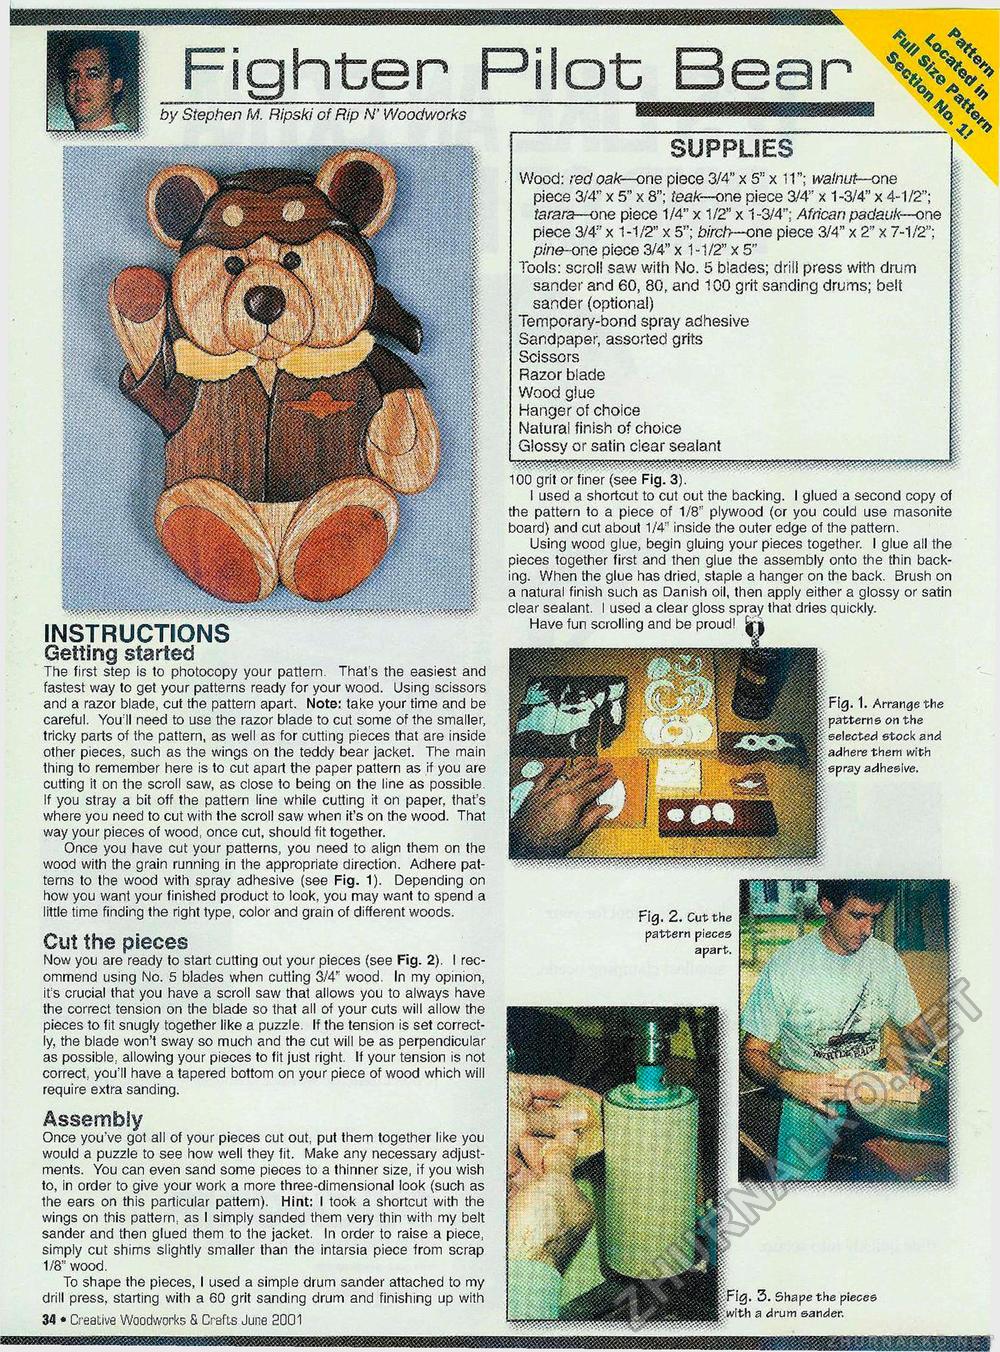
by Stephen M. Ripski of Rip N' Woodworks SUPPLIES Wood: red oak—one piece 3/4" x 5" x 11"; walnut—one piece 3/4" x 5" x 8"; teak—one piece 3/4" x 1-3/4" x 4-1/2"; tarara—one piece 1/4" x 1/2" x 1-3/4"; African padauk—one \ piece 3/4" x 1-1/2" x 5"; birch—one piece 3/4" x 2" x 7-1/2"; pine-one piece 3/4" x 1 -1/2" x 5" Tools: scroll saw with No. 5 blades; driil press with drum sander and 60, 80, and 100 grit sanding drums; belt sander (optional) Temporary-bond spray adhesive Sandpaper, assorted grits Scissors Razor blade Wood glue Hanger of choice Natural finish of choice Glossy or satin clear sealant INSTRUCTIONS Getting started The first step is to photocopy your pattern. That's the easiest and fastest way to get your patterns ready for your wood. Using scissors and a razor blade, cut the pattern apart. Note: take your time and be careful. You'll need to use the razor blade to cut some of the smaller, tricky parts of the pattern, as well as for cutting pieces that are inside other pieces, such as the wings on the teddy bear jacket. The main thing to remember here is to cut apart the paper pattern as if you are cutting it on the scroll saw, as close to being on the line as possible. If you stray a bit off the pattern line while cutting it on paper, that's where you need to cut with the scroll saw when it's on the wood. That way your pieces of wood, once cut, should fit together. Once you have cut your patterns, you need to align them on the wood with the grain running in the appropriate direction. Adhere patterns to the wood with spray adhesive (see Fig. 1). Depending on how you want your finished product to look, you may want to spend a little time finding the right type, color and grain of different woods. Cut the pieces Now you are ready to start cutting out your pieces (see Fig. 2). I recommend using No. 5 blades when cutting 3/4" wood. In my opinion, it's crucial that you have a scroll saw that allows you to always have the correct tension on the blade so that all of your cuts will allow the pieces to fit snugly together like a puzzle. If the tension is set correctly, the blade won't sway so much and the cut will be as perpendicular as possible, allowing your pieces to fit just right. If your tension is not correct, you'll have a tapered bottom on your piece of wood which will require extra sanding. Assembly Once you've got all of your pieces cut out, put them together like you would a puzzle to see how well they fit. Make any necessary adjustments. You can even sand some pieces to a thinner size, if you wish to, in order to give your work a more three-dimensional look (such as the ears on this particular pattern). Hint: I took a shortcut with the wings on this pattern, as I simply sanded them very thin with my belt sander and then glued them to the jacket. In order to raise a piece, simply cut shims slightly smaller than the intarsia piece from scrap 1/8" wood. To shape the pieces, I used a simple drum sander attached to my drill press, starting with a 60 grit sanding drum and finishing up with 34 • Creative Woodworks & Crafts June 2001 Fig. 2. Cut the pattern pieces apart. 3. Shape the pieces a drum sander. 100 grit or finer (see Fig. 3). I used a shortcut to cut out the backing. I glued a second copy of the pattern to a piece of 1/8" plywood (or you could use masonite board) and cut about 1/4" inside the outer edge of the pattern. Using wood glue, begin gluing your pieces together. I glue all the pieces together first and then glue the assembly onto the thin backing. When the glue has dried, staple a hanger on the back. Brush on a natural finish such as Danish oil, then apply either a glossy or satin clear sealant. I used a clear gloss spray that dries quickly. Have fun scrolling and be proud! Sir| 1. Arrange the on the stock and them with adhesive. |


