Creative Woodworks & crafts 2001-10, страница 44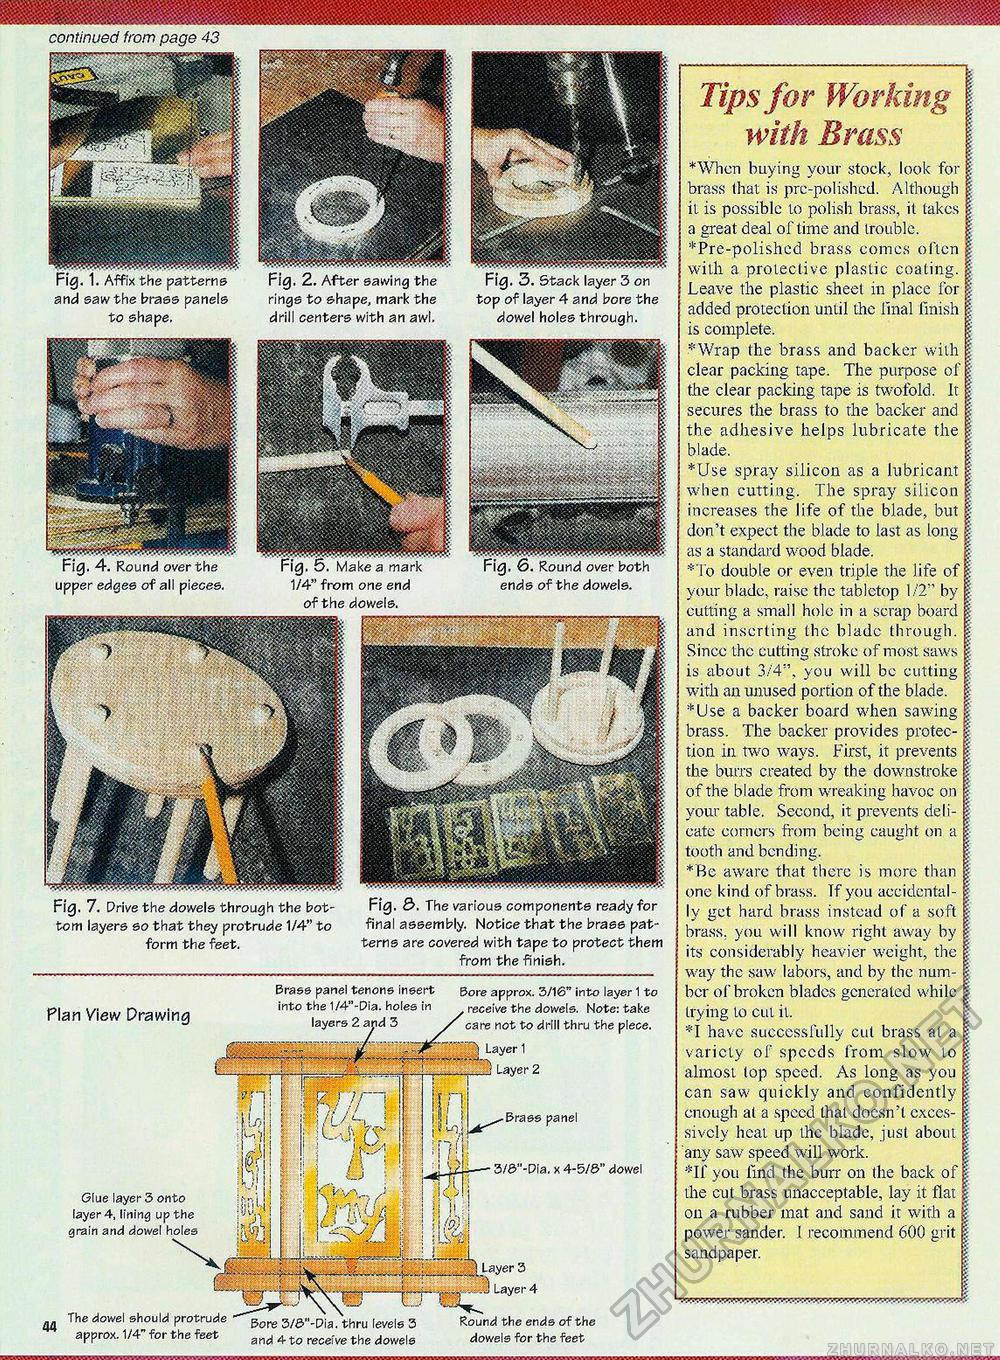
continued from page 43 Fig. 1. Affix the patterns and saw the brass panels to shape. Fig. 2. After sawing the rings to shape, mark the drill centers with an awl. Fig. 3. Stack layer 3 on top of layer 4 and bore the dowel holes through. asi&mm^mm Fig. 4-. Round over the upper edges of all pieces. Fig. 5. Make a mark 1/4" from one end of the dowels. Fig. 6. Round over both ends of the dowels. Fig. 3. The various components ready for final assembly. Notice that the brass patterns are covered with tape to protect them from the finish. Fig. 7. Prive the dowels through the bottom layers so that they protrude 1/4" to form the feet. Brass panel tenons insert into the 1/4"-Dia. holes in layers 2 and 3 Sore approx. 3/16" into layer 1 to , receive the dowels. Note: take care not to drill thru the piece. Layer 1 . ; Layer 2 Plan View Drawing 3/0"-Pia. x 4-5/0" dowel Glue layer 5 onto layer 4, lining up the grain and dowel holes Layer 3 % .A Layer 4 The dowel should protrude approx. 1/4" for the feet Round the ends of the dowels for the feet Bore 3/S"-Pia. thru levels 3 and 4 to receive the dowels Tips for Working j with Brass *Whcn buying your stock, look for | brass (hat is pre-polished. Although | it is possible to polish brass, it takes | a great deal of time and trouble. *Pre-polished brass comes often § with a protective plastic coating. f Leave the plastic sheet in place for § added protection until the final finish | is complete. § * Wrap the brass and backer with I clear packing tape. The purpose of | the clear packing tape is twofold. It § secures the brass to the backer and I the adhesive helps lubricate the | blade. | *Use spray silicon as a lubricant s when cutting. The spray silicon £ increases the life of the blade, but | don't expect the blade to last as long | as a standard wood blade. *To double or even triple the life of % your blade, raise the tablctop 1/2" by | cutting a small hole in a scrap board I and inserting the blade through. | Since the cutting stroke of most saws | is about 3/4", you will be cutting | with an unused portion of the blade. | *Use a backer board when sawing | brass. The backer provides protec-1 tion in two ways. First, it prevents I the burrs created by the downstroke I of the blade from wreaking havoc on i your table. Second, it prevents deli- i cate corners from being caught on a : tooth and bending. *Be aware that there is more than ? one kind of brass. If you accidental- I ly get hard brass instead of a soft > brass, you will know right away by its considerably heavier weight, the £ way the saw labors, and by the num- E ber of broken blades generated while | trying to cut it. *I have successfully cut brass at a \ variety of speeds from slow to almost lop speed. As long as you | can saw quickly and confidently |. enough at a speed that doesn't exces- \ sivcly heal up ihc blade, just abotii | any saw speed will work. *If you find the burr on the back of the cut brass unacceptable, lay it flat on a rubber mat and sand it with a | power sander. I recommend 600 grit \ sandpaper. i |


