Creative Woodworks & crafts 2001-10, страница 51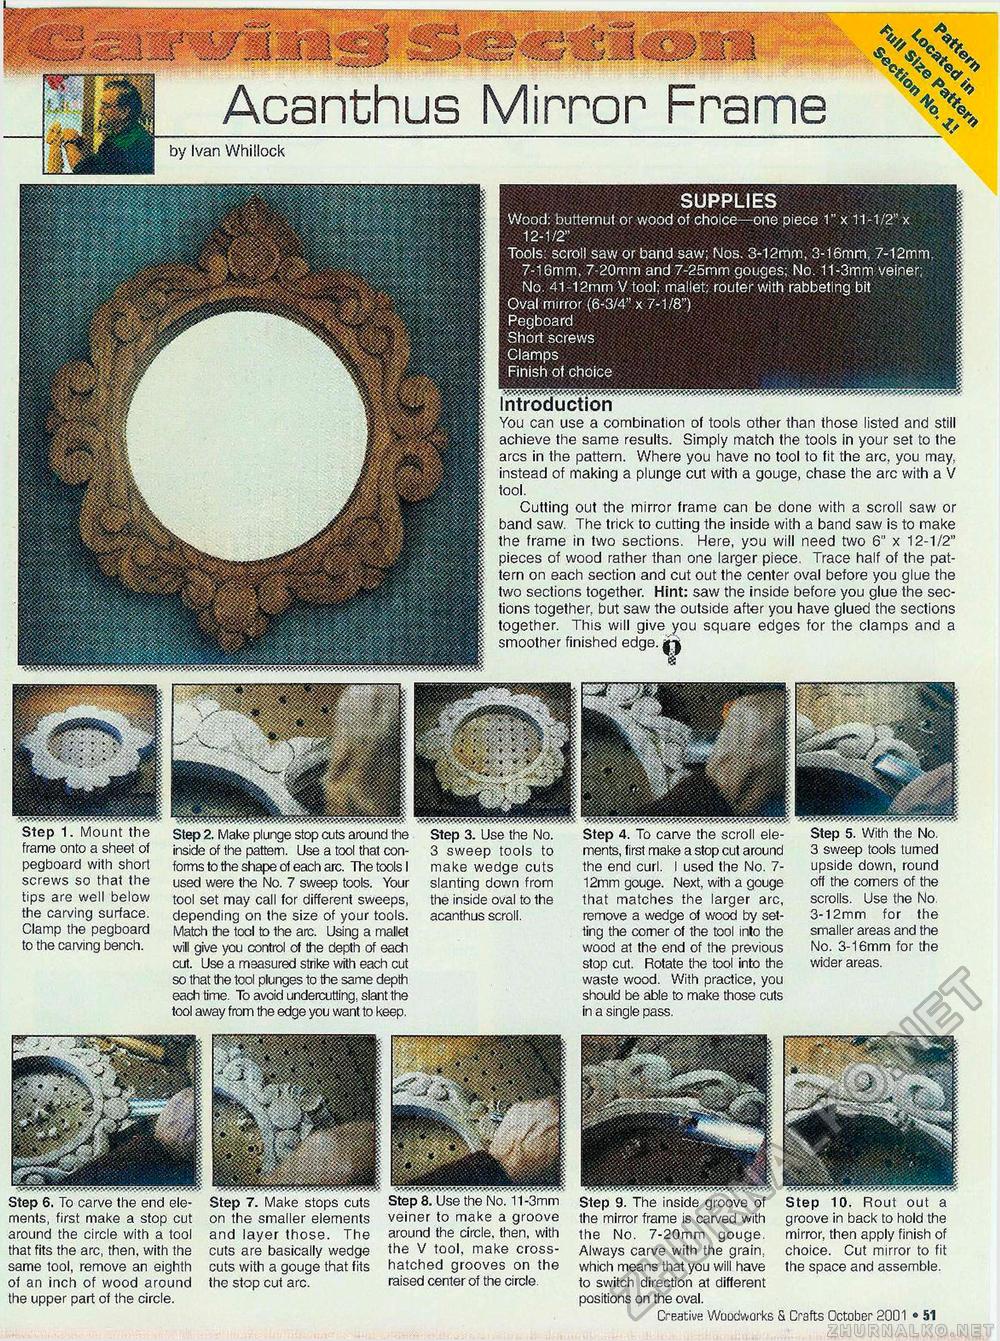
SUPPLIES Wood: butternut or wood of choice—one piece 1" x 11-1/2" x 12-1/2" Tools: scroll saw or band saw; Nos. 3-12mm, 3-16mm, 7-12mm 7-16mm, 7-20mm and 7-25mm gouges; No. 11-3mm veiner; No. 41-12mm V tool; mallet; router with rabbeting bit Oval mirror (6-3/4" x 7-1/8") Pegboard Short screws Clamps Finish of choice Introduction Acanthus Mirror Frame by Ivan Whillock You can use a combination of tools other than those listed and still achieve the same results. Simply match the tools in your set to the arcs in the pattern. Where you have no tool to fit the arc, you may, instead of making a plunge cut with a gouge, chase the arc with a V tool. Cutting out the mirror frame can be done with a scroll saw or band saw. The trick to cutting the inside with a band saw is to make the frame in two sections. Here, you will need two 6" x 12-1/2" pieces of wood rather than one larger piece. Trace half of the pattern on each section and cut out the center oval before you glue the two sections together. Hint: saw the inside before you glue the sections together, but saw the outside after you have glued the sections together. This will give you square edges for the clamps and a smoother finished edge, Step 5. With the No. 3 sweep tools turned upside down, round off the comers of the scrolls. Use the No. 3-12mm for the smaller areas and the No. 3-16mm for the wider areas. — r 1. Mount the frame onto a sheet of pegboard with short screws so that the tips are well below the carving surface. Clamp the pegboard to the carving bench. Step 2. Make plunge stop cuts around the inside of the pattern. Use a tool that conforms to the shape of each arc. The tools I used were the No. 7 sweep tools. Your tool set may call for different sweeps, depending on the size of your tools. Match the tool to the arc. Using a mallet will give you control of the depth of each cut. Use a measured strike with each cut so that the tool plunges to the same depth each time. To avoid undercutting, slant the tool away from the edge you want to keep. Step 3. Use the No. 3 sweep tools to make wedge cuts slanting down from the inside oval to the acanthus scroll. Step 4. To carve the scroll elements, first make a stop cut around the end curl. I used the No. 7-12mm gouge. Next, with a gouge that matches the larger arc, remove a wedge of wood by setting the comer of the tool into the wood at the end of the previous stop cut. Rotate the tool into the waste wood. With practice, you should be able to make those cuts in a single pass. Step 6. To carve the end elements, first make a stop cut around the circle with a tool that fits the arc, then, with the same tool, remove an eighth of an inch of wood around the upper part of the circle. Step 7. Make stops cuts on the smaller elements and layer those. The cuts are basically wedge cuts with a gouge that fits the stop cut arc. veiner to make a groove around the circle, then, with the V tool, make cross-hatched grooves on the raised center of the circle. Step 9. The inside groove of the mirror frame is carved with the No. 7-20mm gouge. Always carve with the grain, which means that you will have to switch direction at different positions on the oval. Step 10. Rout out a groove in back to hold the mirror, then apply finish of choice. Cut mirror to fit the space and assemble. Creative Woodworks & Crafts October 2001 • 51 |


