Creative Woodworks & crafts 2001-10, страница 50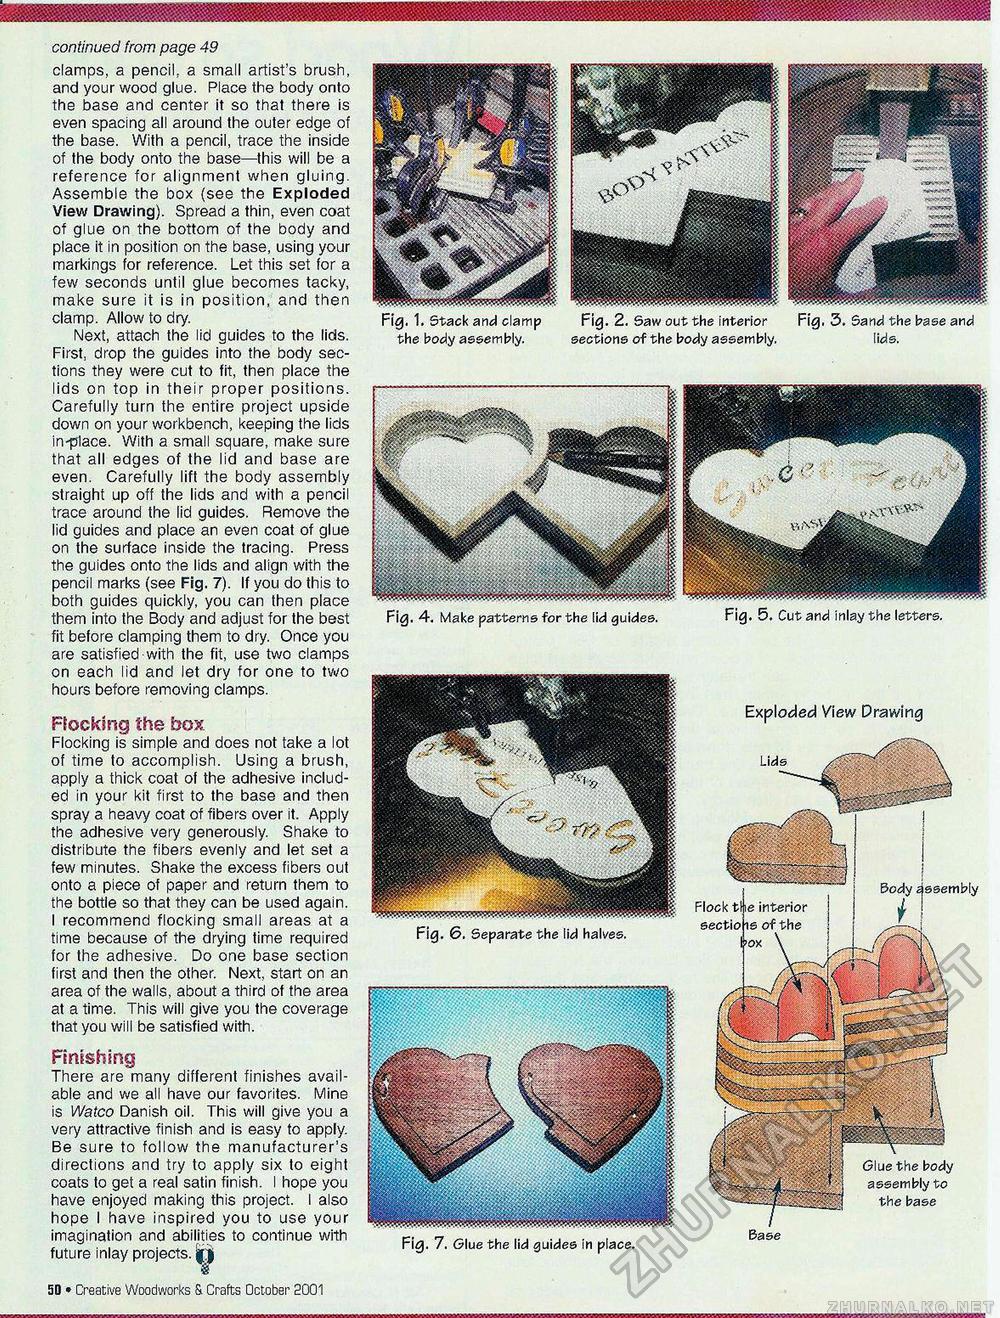
continued from page 49 clamps, a pencil, a small artist's brush, and your wood glue. Place the body onto the base and center it so that there is even spacing all around the outer edge of the base. With a pencil, trace the inside of the body onto the base—this will be a reference for alignment when gluing. Assemble the box (see the Exploded View Drawing). Spread a thin, even coat of glue on the bottom of the body and place it in position on the base, using your markings for reference. Let this set for a few seconds until glue becomes tacky, make sure it is in position, and then clamp. Allow to dry. Next, attach the lid guides to the lids. First, drop the guides into the body sections they were cut to fit, then place the lids on top in their proper positions. Carefully turn the entire project upside down on your workbench, keeping the lids in-place. With a small square, make sure that all edges of the lid and base are even. Carefully lift the body assembly straight up off the lids and with a pencil trace around the lid guides. Remove the lid guides and place an even coat of glue on the surface inside the tracing. Press the guides onto the lids and align with the pencil marks (see Fig. 7). If you do this to both guides quickly, you can then place them into the Body and adjust for the best fit before clamping them to dry. Once you are satisfied with the fit, use two clamps on each lid and let dry for one to two hours before removing clamps. Flocking the box Flocking is simple and does not take a lot of time to accomplish. Using a brush, apply a thick coat of the adhesive included in your kit first to the base and then spray a heavy coat of fibers over it. Apply the adhesive very generously. Shake to distribute the fibers evenly and let set a few minutes. Shake the excess fibers out onto a piece of paper and return them to the bottle so that they can be used again. I recommend flocking small areas at a time because of the drying time required for the adhesive. Do one base section first and then the other. Next, start on an area of the walls, about a third of the area at a time. This will give you the coverage that you will be satisfied with. Finishing There are many different finishes available and we all have our favorites. Mine is Watco Danish oil. This will give you a very attractive finish and is easy to apply. Be sure to follow the manufacturer's directions and try to apply six to eight coats to get a real satin finish. I hope you have enjoyed making this project. I also hope I have inspired you to use your imagination and abilities to continue with future inlay projects. (1 i 12 • Creative Woodworks & Crafts October- 2001 Fig. 1. Stack and clamp Fig. 2. Saw out the interior Fig, 3. Sand the base and the body assembly. sections of the body assembly. lids. Fig. 7. Glue the lid guides in place. Fig. 4. Make patterns for the lid guides. Fig. 5. Cut and inlay the letters. Fig. 6. Separate the lid halves. Exploded View Drawing Glue the body assembly to the base Base Flock tli section e interior s of the |ox i ssembly ■■■■■■■nnsaBBBnaHMBMM |


