Creative Woodworks & crafts 2002-08, страница 52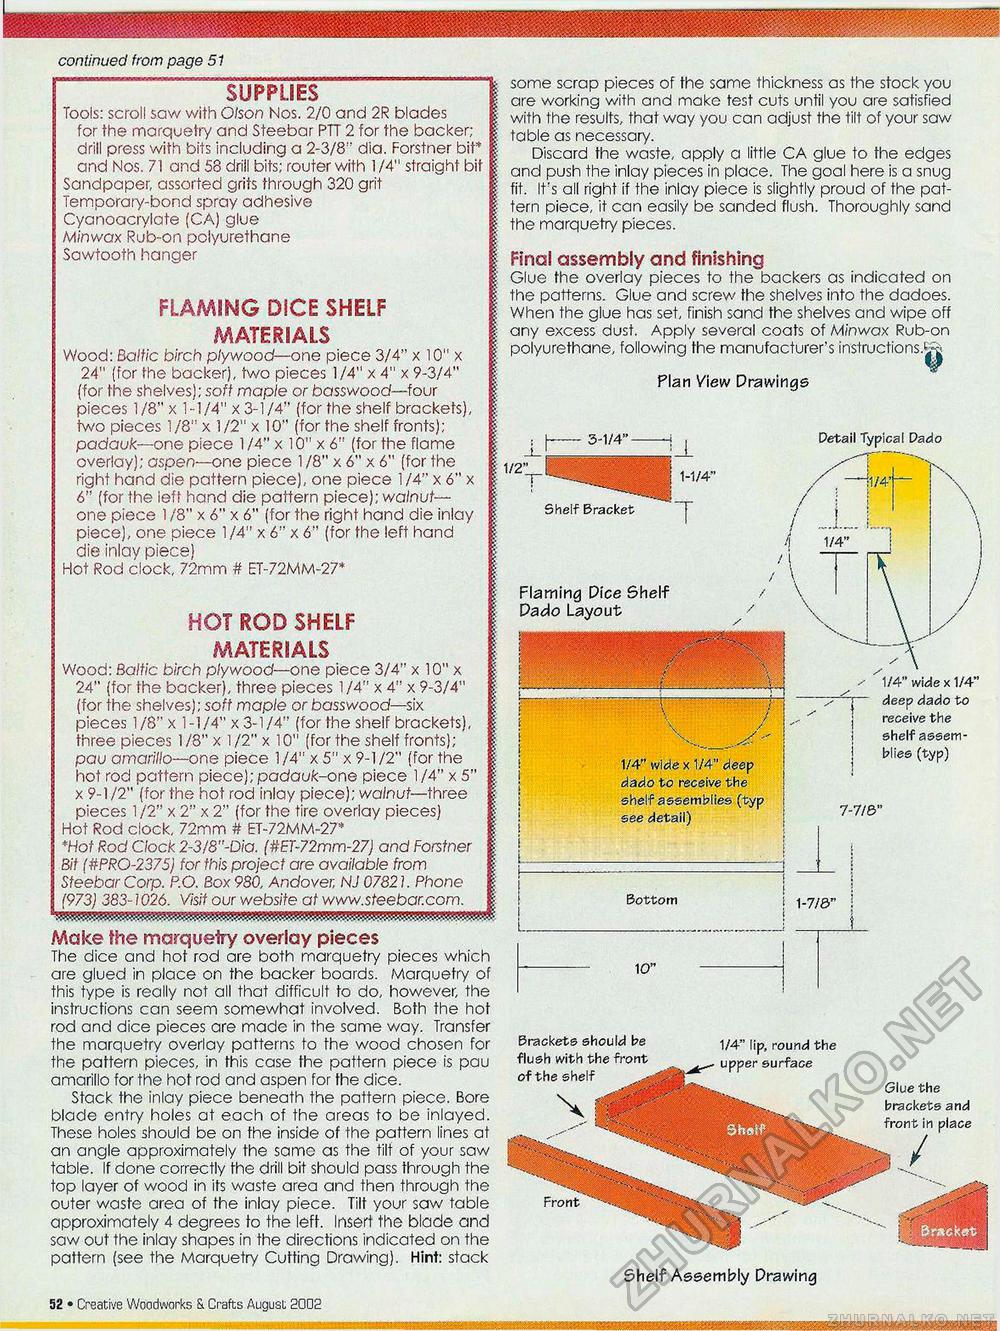
continued from page 51 SUPPLIES Tools: scroll saw with Olson Nos. 2/0 and 2R blades for the marquetry and Steebar PTT 2 for the backer; drill press with bits including a 2-3/8" dia. Forstner bit* and Nos. 71 and 58 drill bits; router with 1/4" straight bit Sandpaper, assorted grits through 320 grit Temporary-bond spray adhesive Cyanoacrylate (CA) glue Minwax Rub-on polyurethane Sawtooth hanger FLAMING DICE SHELF MATERIALS Wood: Baltic birch plywood—one piece 3/4" x 10" x 24" (for the backer), two pieces 1/4" x 4" x 9-3/4" (for the shelves); soft maple or basswood—four pieces 1/8" x 1-1/4" x 3-1/4" (for the shelf brackets), two pieces 1/8" x 1/2" x 10" (for the shelf fronts); padauk—one piece 1/4" x 10" x 6" (for the flame overlay); aspen—one piece 1 /8" x 6" x 6" (for the right hand die pattern piece), one piece 1 /4" x 6" x 6" (for the leff hand die pattern piece); walnut— one piece 1 /8" x 6" x 6" (for the right hand die inlay piece), one piece 1 /4" x 6" x 6" (for the left hand die inlay piece) Hot Rod clock, 72mm # ET-72MM-27* HOT ROD SHELF MATERIALS Wood: Baltic birch plywood—one piece 3/4" x 10" x 24" (for the backer), three pieces 1/4" x 4" x 9-3/4" (for the shelves); soft maple or basswood—six pieces 1 /8" x 1 -1 /4" x 3-1 /4" (for the shelf brackets), three pieces 1 /8" x 1 /2" x 10" (for the shelf fronts); pau amarillo—one piece 1/4" x 5" x 9-1/2" (for the hot rod pattern piece); padauk-one piece 1/4" x 5' x 9-1/2" (for the hot rod inlay piece); walnut—three pieces 1 /2" x 2" x 2" (for the tire overlay pieces) Hot Rod clock, 72mm # ET-72MM-27* *Hot Rod Clock 2-3!8"-Dia. (#ET-72mm-27j and Forstner Bit (#PRO-2375) for this project are available from Steebar Corp. P.O. Box 980, Andover, NJ 07821. Phone (973) 383-1026. Visit our website at www.steebar.com. i Make the marquetry overlay pieces The dice and hot rod are both marquetry pieces which are glued in place on the backer boards. Marquetry of this type is really not all that difficult to do, however, the instructions can seem somewhat involved. Both the hot rod and dice pieces are made in the same way. Transfer the marquetry overlay patterns to the wood chosen for the pattern pieces, in this case the pattern piece is pau amarillo for the hot rod and aspen for the dice. Stack the inlay piece beneath the pattern piece. Bore blade entry holes at each of the areas to be inlayed. These holes should be on the inside of the pattern lines at an angle approximately the same as the tilt of your saw table. If done correctly the drill bit should pass through the top layer of wood in its waste area and then through the outer waste area of the inlay piece. Tilt your saw table approximately 4 degrees to the left. Insert the blade and saw out the inlay shapes in the directions indicated on the pattern (see the Marquetry Cutting Drawing). Hint: stack some scrap pieces of the same thickness as the stock you are working with and make test cuts until you are satisfied with the results, that way you can adjust the tilt of your saw table as necessary. Discard the waste, apply a little CA glue to the edges and push the inlay pieces in place. The goal here is a snug fit. It's all right if the inlay piece is slightly proud of the pattern piece, it can easily be sanded flush. Thoroughly sand the marquetry pieces. Final assembly and finishing Glue the overlay pieces to the backers as indicated on the patterns. Glue and screw the shelves into the dadoes. When the glue has set, finish sand the shelves and wipe off any excess dust. Apply several coats of Minwax Rub-on polyurethane, following the manufacturer's instructions.^ ¥ Plan View Drawings 3-1/4" Detail Typical Da do 1/2" 1/4" wide x 1/4" deep dado to receive the shelf assemblies (typ see detail) 1/4" wide x 1/4" deep dado to receive the shelf assemblies (typ) 7-7/6" Bottom ! 1-7/3" : 10" Shelf Assembly Drawing Brackets should be flush with the front of the shelf 1/4" lip, round the upper surface Front Glue the brackets and front in place 18 • Creative Woodworks S. Crafts August 2002 |


