Popular Woodworking 2002-04 № 127, страница 35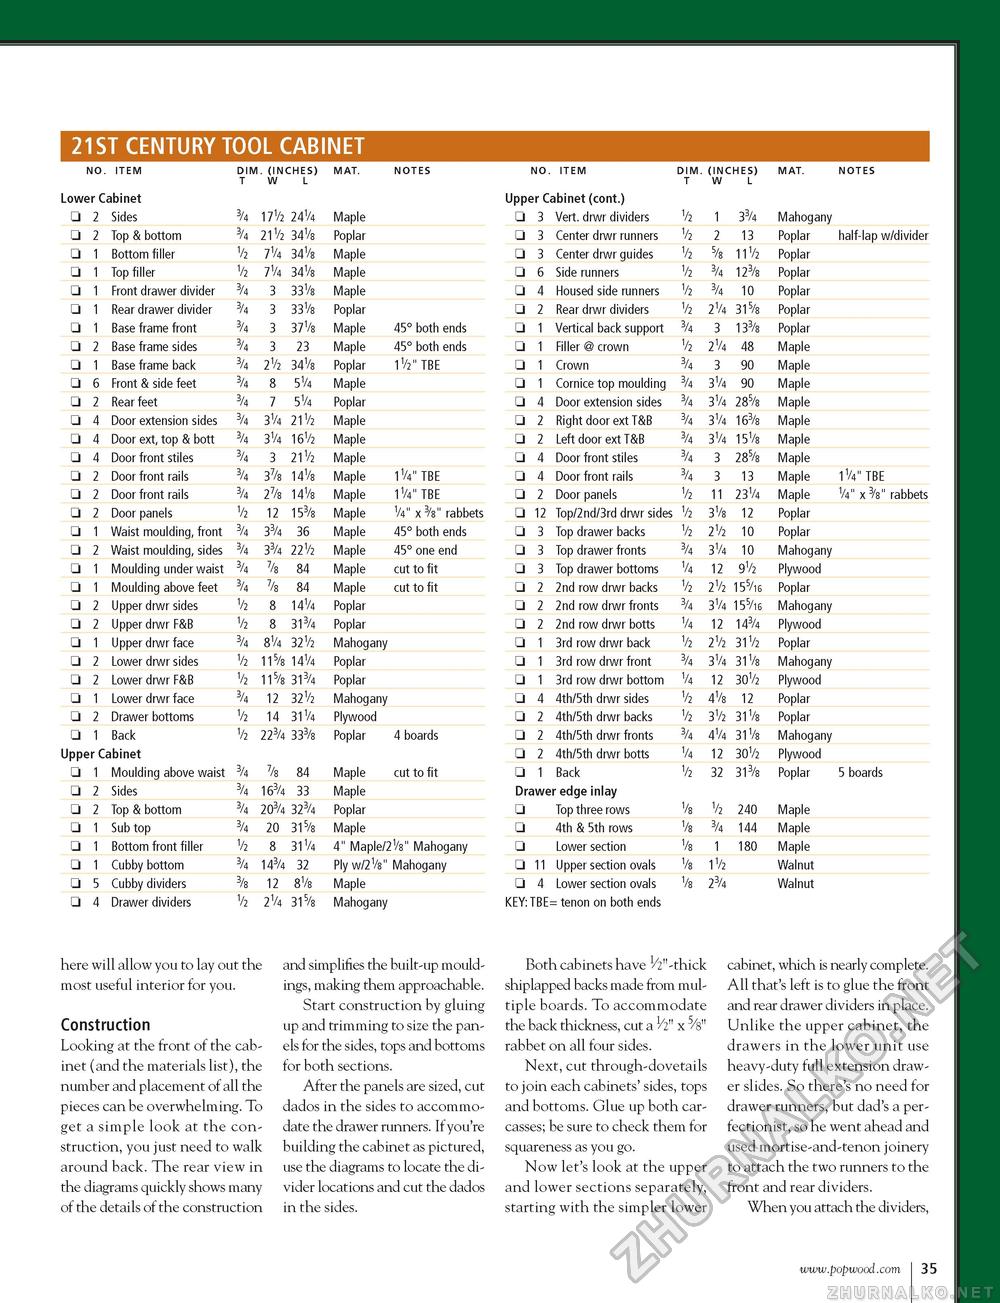
21ST CENTURY TOOL CABINET NO. ITEM Lower Cabinet □ 2 Sides □ 2 Top & bottom □ 1 Bottom filler □ 1 Top filler □ 1 Front drawer divider □ 1 Rear drawer divider □ 1 Base frame front □ 2 Base frame sides □ 1 Base frame back □ 6 Front & side feet □ 2 Rear feet □ 4 Door extension sides □ 4 Door ext, top & bott □ 4 Door front stiles □ 2 Door front rails □ 2 Door front rails □ 2 Door panels □ 1 Waist moulding, front □ 2 Waist moulding, sides □ 1 Moulding under waist □ 1 Moulding above feet □ 2 Upper drwr sides □ 2 Upper drwr F&B □ 1 Upper drwr face □ 2 Lower drwr sides □ 2 Lower drwr F&B □ 1 Lower drwr face □ 2 Drawer bottoms □ 1 Back Upper Cabinet □ 1 Moulding above waist □ 2 Sides □ 2 Top & bottom □ 1 Sub top □ 1 Bottom front filler □ 1 Cubby bottom □ 5 Cubby dividers □ 4 Drawer dividers DIM. (INCHES) T W L 3/4 17V2 24V4 3/4 21V2 34V8 V2 714 3418 V2 7V4 34V8 3/4 3 33 V8 3/4 3 33 V8 3/4 3 37 V8 3/4 3 23 3/4 2V2 34V8 3/4 8 5V4 3/4 7 5V4 3/4 3V4 21V2 3/4 3V4 16^/2 3/4 3 21V2 3/4 37/8 14V8 3/4 27/8 14V8 V2 12 153/8 3/4 33/4 36 3/4 33/4 22V2 3/4 7/8 84 3/4 7/8 84 V2 8 14V4 V2 8 313/4 3/4 8V4 32V2 V2 11S/8 14V4 V2 11S/8 313/4 3/4 12 32V2 V2 14 31V4 V2 223/4 333/8 3/4 7/8 84 3/4 163/4 33 3/4 203/4 323/4 3/4 20 315/8 V2 8 31 V4 3/4 143/4 32 3/8 12 8V/8 V2 2^/4 315/8 DIM. T (INCHES) WL Upper Cabinet (cont.) Maple Poplar Maple Maple Maple Poplar Maple 45° both ends Maple 45° both ends Poplar 1V2" TBE Maple Poplar Maple Maple Maple Maple 1V4" TBE Maple 1V4" TBE Maple V4" x 3/8" rabbets Maple 45° both ends Maple 45° one end Maple cut to fit Maple cut to fit Poplar Poplar Mahogany Poplar Poplar Mahogany Plywood Poplar 4 boards Maple cut to fit Maple Poplar Maple 4" Maple/2V/8" Mahogany Ply w/2V8" Mahogany Maple Mahogany DIM. T (INCHES) WL Upper Cabinet (cont.) NO. ITEM NOTES
NOTES NO. ITEM NOTES here will allow you to lay out the most useful interior for you. Construction Looking at the front of the cabinet (and the materials list), the number and placement of all the pieces can be overwhelming. To get a simple look at the construction, you just need to walk around back. The rear view in the diagrams quickly shows many of the details of the construction and simplifies the built-up mouldings, making them approachable. Start construction by gluing up and trimming to size the panels for the sides, tops and bottoms for both sections. After the panels are sized, cut dados in the sides to accommodate the drawer runners. If you're building the cabinet as pictured, use the diagrams to locate the divider locations and cut the dados in the sides. Both cabinets have 1/2"-thick shiplapped backs made from multiple boards. To accommodate the back thickness, cut a 1/2" x 5/s" rabbet on all four sides. Next, cut through-dovetails to join each cabinets' sides, tops and bottoms. Glue up both carcasses; be sure to check them for squareness as you go. Now let's look at the upper and lower sections separately, starting with the simpler lower cabinet, which is nearly complete. All that's left is to glue the front and rear drawer dividers in place. Unlike the upper cabinet, the drawers in the lower unit use heavy-duty full extension drawer slides. So there's no need for drawer runners, but dad's a perfectionist, so he went ahead and used mortise-and-tenon joinery to attach the two runners to the front and rear dividers. When you attach the dividers, |
||||||||||||||||||||||||||||||||||||||||||||||||||||||||||||||||||||||||||||||||||||||||||||||||||||||||||||||||||||||||||||||||||||||||||||||||||||||||||||||||||||||||||||||||||||||||||||||||||||||||||||||||||||||||||||||||||||||||||||||||||||||||||||||||||||||||||||||||||||||||||||||||||||||||||||||||


