Popular Woodworking 2003-04 № 133, страница 65
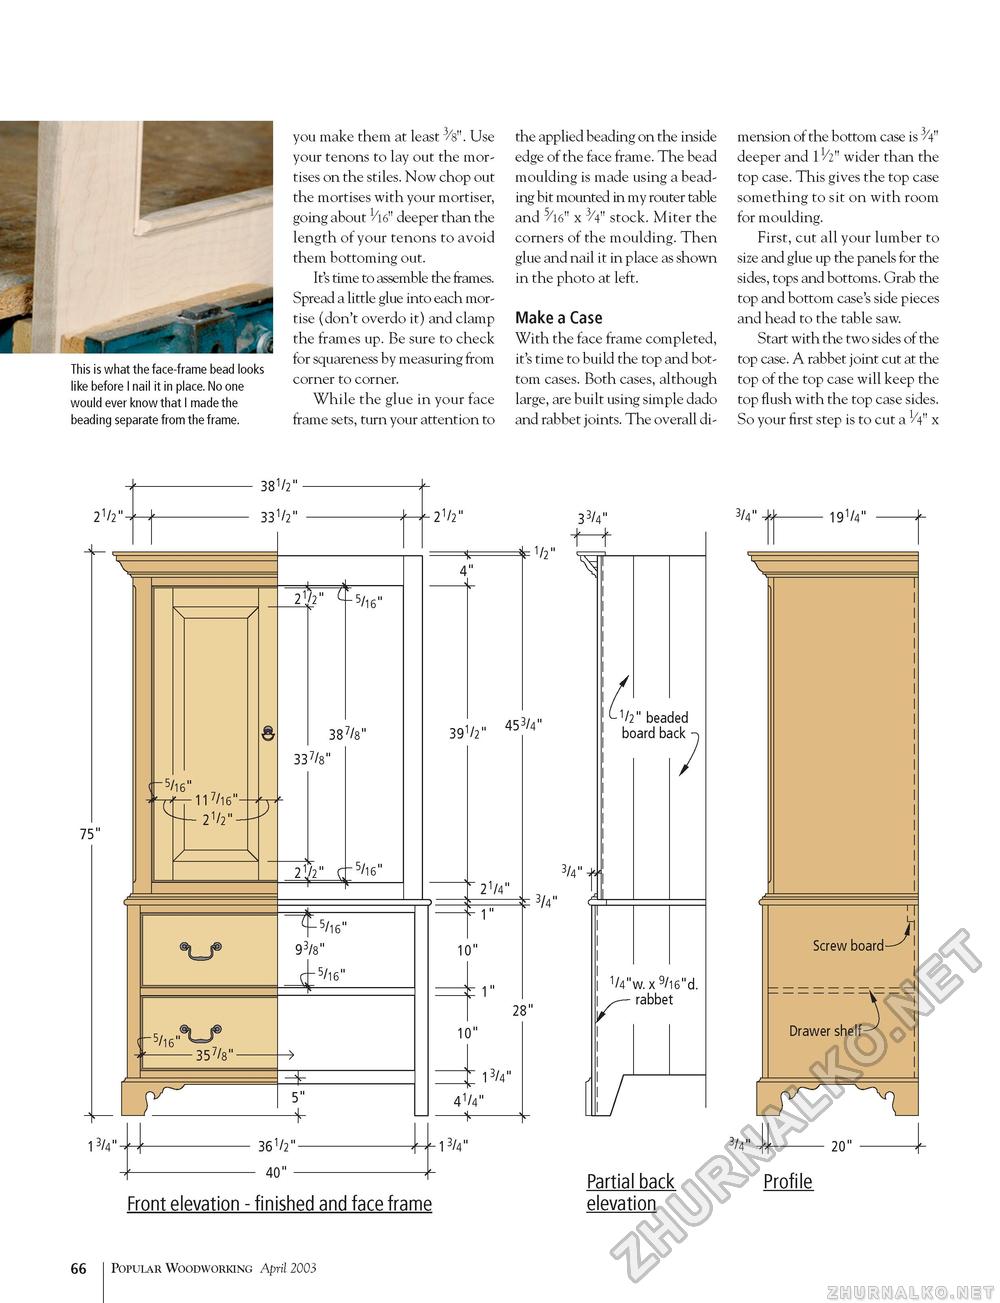
This is what the face-frame bead looks like before I nail it in place. No one would ever know that I made the beading separate from the frame. you make them at least 3/s". Use your tenons to lay out the mortises on the stiles. Now chop out the mortises with your mortiser, going about 1/l6" deeper than the length of your tenons to avoid them bottoming out. It's time to assemble the frames. Spread a little glue into each mortise (don't overdo it) and clamp the frames up. Be sure to check for squareness by measuring from corner to corner. While the glue in your face frame sets, turn your attention to the applied beading on the inside edge of the face frame. The bead moulding is made using a beading bit mounted in my router table and 5/l6" x 3/4" stock. Miter the corners of the moulding. Then glue and nail it in place as shown in the photo at left. Make a Case With the face frame completed, it's time to build the top and bottom cases. Both cases, although large, are built using simple dado and rabbet joints. The overall di mension of the bottom case is deeper and 11/2" wider than the top case. This gives the top case something to sit on with room for moulding. First, cut all your lumber to size and glue up the panels for the sides, tops and bottoms. Grab the top and bottom case's side pieces and head to the table saw. Start with the two sides of the top case. A rabbet joint cut at the top of the top case will keep the top flush with the top case sides. So your first step is to cut a V4" x 2V2"- 381/2" 33V2" V 75" 5/16" f-pf—117/16"- 2V2"- <-5/16" - 357/S"- 21/2" 5/16" 387/S" 337/S" 21/2" y ''f 5/16" 5/16" 93/s" 4 CT5/16" ^F- 13/4"- 5" -+ 21/2" 4" —4- 391/2 b1/2" 33/4" ,, 453/4" " 21/4" 1" 10" 1" 3/4" 3/4" r 28" 10" 13/4" 41/4" 1/2" beaded board back 1/4"w. X 9/16"d. rabbet 361/2"- 40" - ■13/4" Front elevation - finished and face frame Partial back elevation 3/4" 191/4" V 3/4" , 20" Profile 66 Popular Woodworking April 2003 |


