Popular Woodworking 2003-10 № 136, страница 52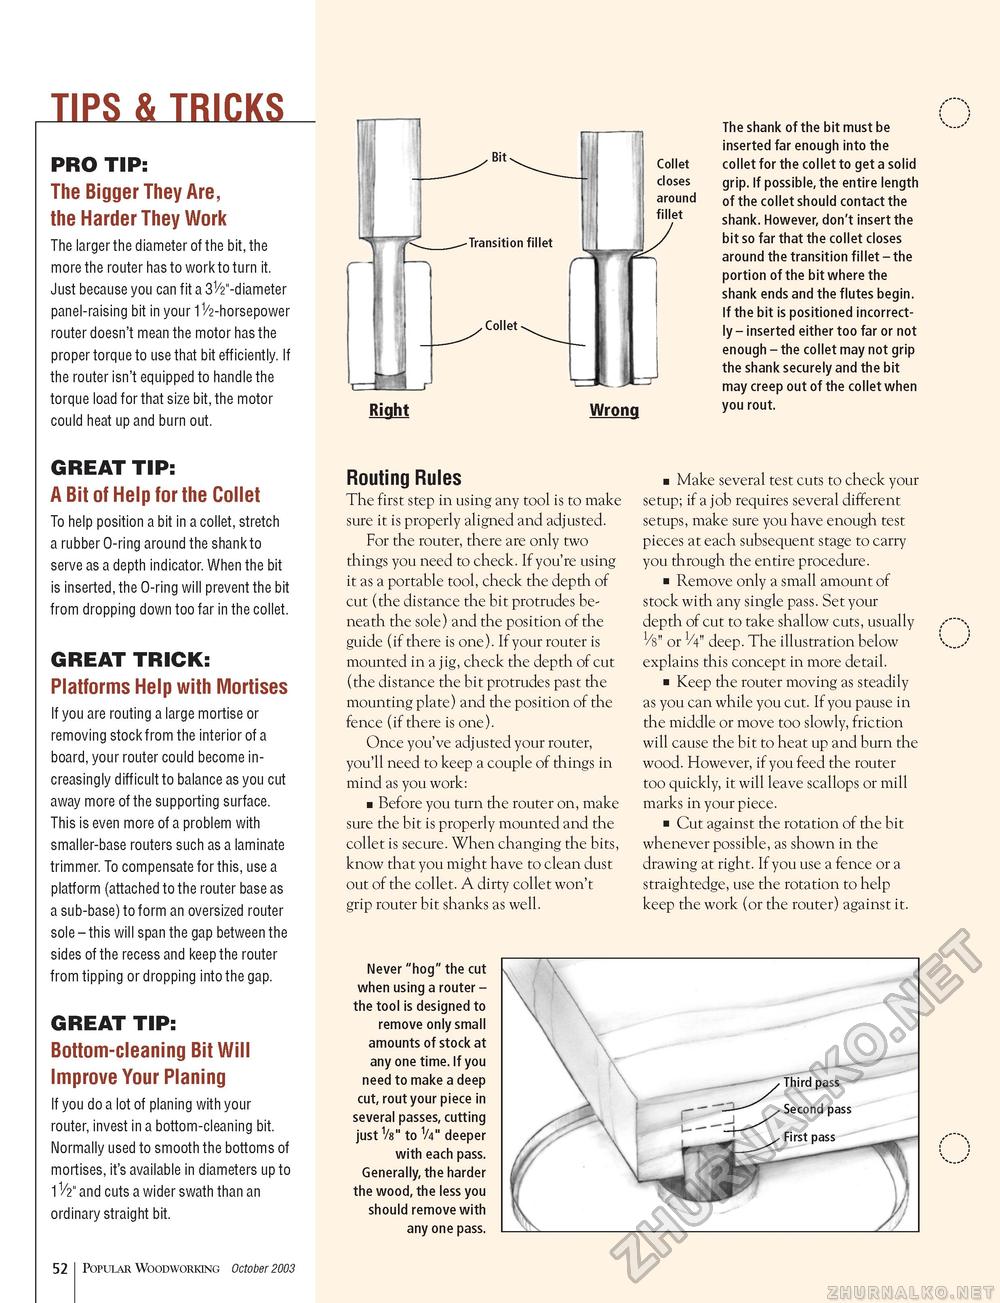
TIPS & TRICKS PRO TIP: The Bigger They Are, the Harder They Work The larger the diameter of the bit, the more the router has to work to turn it. Just because you can fit a 31/2"-diameter panel-raising bit in your 1 V2-horsepower router doesn't mean the motor has the proper torque to use that bit efficiently. If the router isn't equipped to handle the torque load for that size bit, the motor could heat up and burn out. GREAT TIP: A Bit of Help for the Collet To help position a bit in a collet, stretch a rubber O-ring around the shank to serve as a depth indicator. When the bit is inserted, the O-ring will prevent the bit from dropping down too far in the collet. GREAT TRICK: Platforms Help with Mortises If you are routing a large mortise or removing stock from the interior of a board, your router could become increasingly difficult to balance as you cut away more of the supporting surface. This is even more of a problem with smaller-base routers such as a laminate trimmer. To compensate for this, use a platform (attached to the router base as a sub-base) to form an oversized router sole - this will span the gap between the sides of the recess and keep the router from tipping or dropping into the gap. GREAT TIP: Bottom-cleaning Bit Will Improve Your Planing If you do a lot of planing with your router, invest in a bottom-cleaning bit. Normally used to smooth the bottoms of mortises, it's available in diameters up to 1V2" and cuts a wider swath than an ordinary straight bit. Collet closes around fillet Right Wrong The shank of the bit must be inserted far enough into the collet for the collet to get a solid grip. If possible, the entire length of the collet should contact the shank. However, don't insert the bit so far that the collet closes around the transition fillet - the portion of the bit where the shank ends and the flutes begin. If the bit is positioned incorrectly - inserted either too far or not enough - the collet may not grip the shank securely and the bit may creep out of the collet when you rout. Routing Rules The first step in using any tool is to make sure it is properly aligned and adjusted. For the router, there are only two things you need to check. If you're using it as a portable tool, check the depth of cut (the distance the bit protrudes beneath the sole) and the position of the guide (if there is one). If your router is mounted in a jig, check the depth of cut (the distance the bit protrudes past the mounting plate) and the position of the fence (if there is one). Once you've adjusted your router, you'll need to keep a couple of things in mind as you work: ■ Before you turn the router on, make sure the bit is properly mounted and the collet is secure. When changing the bits, know that you might have to clean dust out of the collet. A dirty collet won't grip router bit shanks as well. ■ Make several test cuts to check your setup; if a job requires several different setups, make sure you have enough test pieces at each subsequent stage to carry you through the entire procedure. ■ Remove only a small amount of stock with any single pass. Set your depth of cut to take shallow cuts, usually 1/8" or 1/4" deep. The illustration below explains this concept in more detail. ■ Keep the router moving as steadily as you can while you cut. If you pause in the middle or move too slowly, friction will cause the bit to heat up and burn the wood. However, if you feed the router too quickly, it will leave scallops or mill marks in your piece. ■ Cut against the rotation of the bit whenever possible, as shown in the drawing at right. If you use a fence or a straightedge, use the rotation to help keep the work (or the router) against it. Never "hog" the cut when using a router -the tool is designed to remove only small amounts of stock at any one time. If you need to make a deep cut, rout your piece in several passes, cutting just 1/8" to V4" deeper with each pass. Generally, the harder the wood, the less you should remove with any one pass. 52 Popular Woodworking October 2003 |


