Popular Woodworking 2004-10 № 143, страница 94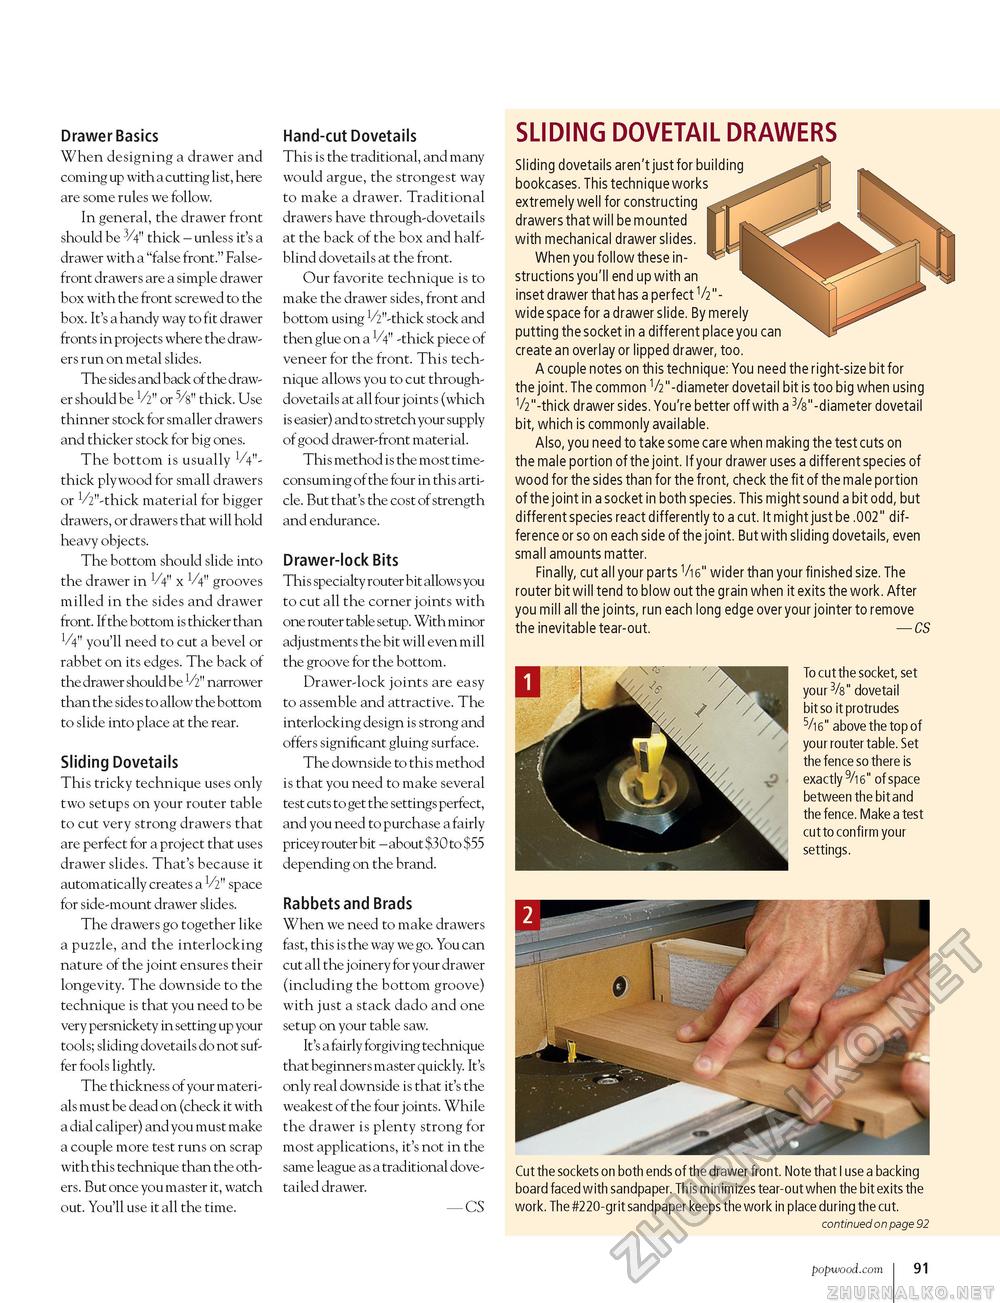
Drawer Basics When designing a drawer and coming up with a cutting list, here are some rules we follow. In general, the drawer front should be 3/4" thick - unless it's a drawer with a "false front." False-front drawers are a simple drawer box with the front screwed to the box. It's a handy way to fit drawer fronts in projects where the drawers run on metal slides. The sides and back of the drawer should be V2" or thick. Use thinner stock for smaller drawers and thicker stock for big ones. The bottom is usually V4"-thick plywood for small drawers or V2"-thick material for bigger drawers, or drawers that will hold heavy objects. The bottom should slide into the drawer in 1/4" x V4" grooves milled in the sides and drawer front. If the bottom is thicker than W' you'll need to cut a bevel or rabbet on its edges. The back of the drawer should be V2" narrower than the sides to allow the bottom to slide into place at the rear. Sliding Dovetails This tricky technique uses only two setups on your router table to cut very strong drawers that are perfect for a project that uses drawer slides. That's because it automatically creates a space for side-mount drawer slides. The drawers go together like a puzzle, and the interlocking nature of the joint ensures their longevity. The downside to the technique is that you need to be very persnickety in setting up your tools; sliding dovetails do not suffer fools lightly. The thickness of your materials must be dead on (check it with a dial caliper) and you must make a couple more test runs on scrap with this technique than the others. But once you master it, watch out. You'll use it all the time. Hand-cut Dovetails This is the traditional, and many would argue, the strongest way to make a drawer. Traditional drawers have through-dovetails at the back of the box and half-blind dovetails at the front. Our favorite technique is to make the drawer sides, front and bottom using V2"-thick stock and then glue on a V4" -thick piece of veneer for the front. This technique allows you to cut through-dovetails at all four joints (which is easier) and to stretch your supply of good drawer-front material. This method is the most time-consuming of the four in this article. But that's the cost of strength and endurance. Drawer-lock Bits This specialty router bit allows you to cut all the corner joints with one router table setup. With minor adjustments the bit will even mill the groove for the bottom. Drawer-lock joints are easy to assemble and attractive. The interlocking design is strong and offers significant gluing surface. The downside to this method is that you need to make several test cuts to get the settings perfect, and you need to purchase a fairly pricey router bit - about $30 to $55 depending on the brand. Rabbets and Brads When we need to make drawers fast, this is the way we go. You can cut all the j oinery for your drawer (including the bottom groove) with just a stack dado and one setup on your table saw. It's a fairly forgiving technique that beginners master quickly. It's only real downside is that it's the weakest of the four joints. While the drawer is plenty strong for most applications, it's not in the same league as a traditional dovetailed drawer. — CS SLIDING DOVETAIL DRAWERS Sliding dovetails aren't just for building bookcases. This technique works extremely well for constructing drawers thatwill bemounted with mechanical drawer slides. When you follow these instructions you'll end up with an inset drawer that has a perfect V2"-wide space for a drawer slide. By merely putting the socket in a different place you can create an overlay or lipped drawer, too. A couple notes on this technique: You need the right-size bit for the joint. The common V2"-diameter dovetail bit is too big when using 1/2"-thick drawer sides. You're better off with a 3/8"-diameter dovetail bit, which is commonly available. Also, you need to take some care when making the test cuts on the male portion of the joint. If your drawer uses a different species of wood for the sides than for the front, check the fit of the male portion of the joint in a socket in both species. This might sound a bit odd, but different species react differently to a cut. It might just be .002" difference or so on each side of the joint. But with sliding dovetails, even small amounts matter. Finally, cut all your parts V16" wider than your finished size. The router bit will tend to blow out the grain when it exits the work. After you mill all the joints, run each long edge over your jointer to remove the inevitable tear-out. — CS To cut the socket, set your 3/8" dovetail bit so it protrudes 5/i6" above the top of your router table. Set the fence so there is exactly 9/i6" of space between the bit and the fence. Make a test cut to confirm your settings. Cut the sockets on both ends of the drawer front. Note that I use a backing board faced with sandpaper. This minimizes tear-out when the bit exits the work. The #220-grit sandpaper keeps the work in place during the cut. continued on page 92 popwood.com 91 |


