Popular Woodworking 2005-04 № 147, страница 50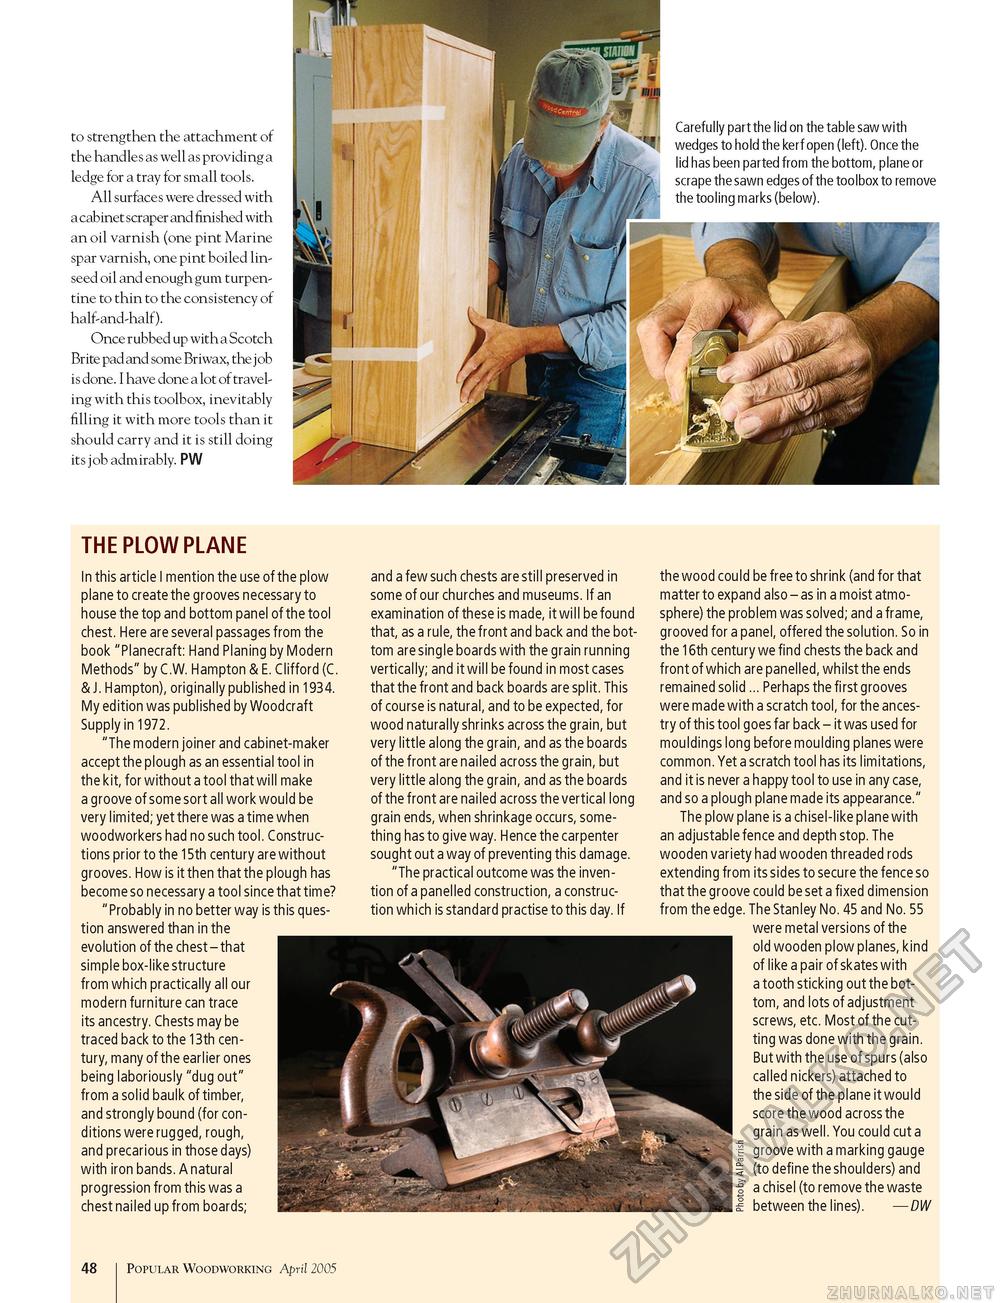
to strengthen the attachment of the handles as well as providing a ledge for a tray for small tools. All surfaces were dressed with a cabinet scraper and finished with an oil varnish (one pint Marine spar varnish, one pint boiled linseed oil and enough gum turpentine to thin to the consistency of half-and-half). Once rubbed up with a Scotch Brite pad and some Briwax, the j ob is done. I have done a lot of traveling with this toolbox, inevitably filling it with more tools than it should carry and it is still doing its job admirably. PW Carefully part the lid on the table saw with wedges to hold the kerf open (left). Once the lid has been parted from the bottom, plane or scrape the sawn edges of the toolbox to remove the tooling marks (below). THE PLOW PLANE In this article I mention the use of the plow plane to create the grooves necessary to house the top and bottom panel of the tool chest. Here are several passages from the book "Planecraft: Hand Planing by Modern Methods" by C.W. Hampton & E. Clifford (C. & J. Hampton), originally published in 1934. My edition was published by Woodcraft Supply in 1972. "The modern joiner and cabinet-maker accept the plough as an essential tool in the kit, for without a tool that will make a groove of some sort all work would be very limited; yet there was a time when woodworkers had no such tool. Constructions prior to the 15th century are without grooves. How is it then that the plough has become so necessary a tool since that time? "Probably in no better way is this question answered than in the evolution of the chest - that simple box-like structure from which practically all our modern furniture can trace its ancestry. Chests may be traced back to the 13th century, many of the earlier ones being laboriously "dug out" from a solid baulk of timber, and strongly bound (for conditions were rugged, rough, and precarious in those days) with iron bands. A natural progression from this was a chest nailed up from boards; and a few such chests are still preserved in some of our churches and museums. If an examination of these is made, it will be found that, as a rule, the front and back and the bottom are single boards with the grain running vertically; and it will be found in most cases that the front and back boards are split. This of course is natural, and to be expected, for wood naturally shrinks across the grain, but very little along the grain, and as the boards of the front are nailed across the grain, but very little along the grain, and as the boards of the front are nailed across the vertical long grain ends, when shrinkage occurs, something has to give way. Hence the carpenter sought out a way of preventing this damage. "The practical outcome was the invention of a panelled construction, a construction which is standard practise to this day. If the wood could be free to shrink (and for that matter to expand also - as in a moist atmosphere) the problem was solved; and a frame, grooved for a panel, offered the solution. So in the 16th century we find chests the back and front of which are panelled, whilst the ends remained solid ... Perhaps the first grooves were made with a scratch tool, for the ancestry of this tool goes far back - it was used for mouldings long before moulding planes were common. Yet a scratch tool has its limitations, and it is never a happy tool to use in any case, and so a plough plane made its appearance." The plow plane is a chisel-like plane with an adjustable fence and depth stop. The wooden variety had wooden threaded rods extending from its sides to secure the fence so that the groove could be set a fixed dimension from the edge. The Stanley No. 45 and No. 55 were metal versions of the old wooden plow planes, kind of like a pair of skates with a tooth sticking out the bottom, and lots of adjustment screws, etc. Most of the cutting was done with the grain. But with the use of spurs (also called nickers) attached to the side of the plane it would score the wood across the grain as well. You could cut a groove with a marking gauge (to define the shoulders) and a chisel (to remove the waste between the lines). — DW 48 1 Popular Woodworking April 2005 |


