Popular Woodworking 2005-04 № 147, страница 55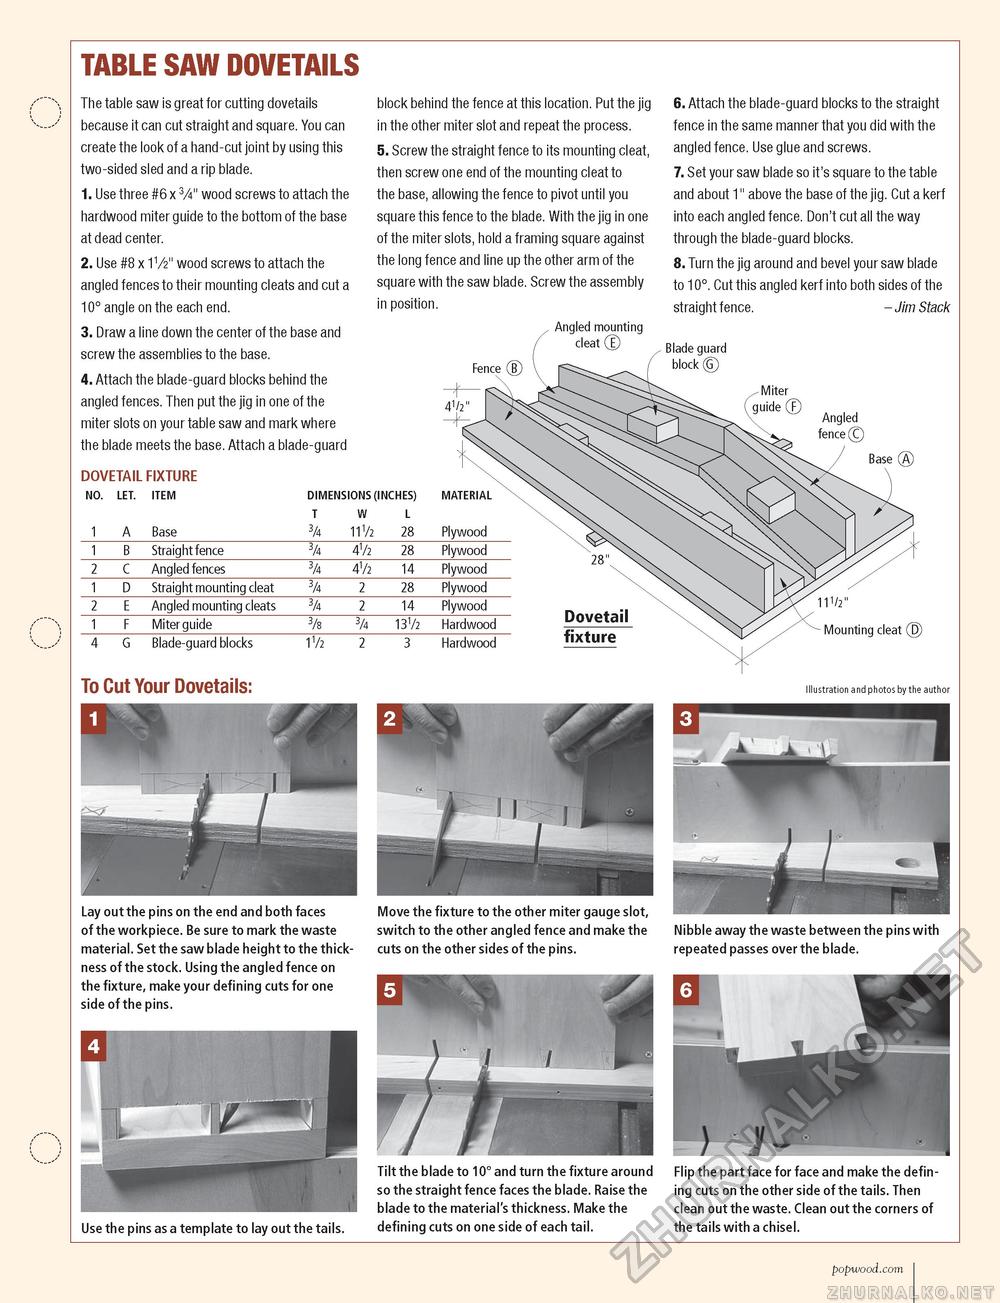
TABLE SAW DOVETAILS The table saw is great for cutting dovetails because it can cut straight and square. You can create the look of a hand-cut joint by using this two-sided sled and a rip blade. 1. Use three #6 x W wood screws to attach the hardwood miter guide to the bottom of the base at dead center. 2. Use #8 x 1V2" wood screws to attach the angled fences to their mounting cleats and cut a 10° angle on the each end. 3. Draw a line down the center of the base and screw the assemblies to the base. 4. Attach the blade-guard blocks behind the angled fences. Then put the jig in one of the miter slots on your table saw and mark where the blade meets the base. Attach a blade-guard DOVETAIL FIXTURE block behind the fence at this location. Put the jig in the other miter slot and repeat the process. 5. Screw the straight fence to its mounting cleat, then screw one end of the mounting cleat to the base, allowing the fence to pivot until you square this fence to the blade. With the jig in one of the miter slots, hold a framing square against the long fence and line up the other arm of the square with the saw blade. Screw the assembly in position. Angled mounting cleat (E 6. Attach the blade-guard blocks to the straight fence in the same manner that you did with the angled fence. Use glue and screws. 7. Set your saw blade so it's square to the table and about 1" above the base of the jig. Cut a kerf into each angled fence. Don't cut all the way through the blade-guard blocks. 8. Turn the jig around and bevel your saw blade to 10°. Cut this angled kerf into both sides of the straight fence. - Jim Stack Blade guard block ©
Dovetail fixture To Cut Your Dovetails: 1V2" Mounting cleat (D) Illustration and photos by the author Lay out the pins on the end and both faces of the workpiece. Be sure to mark the waste material. Set the saw blade height to the thickness of the stock. Using the angled fence on the fixture, make your defining cuts for one side of the pins. Move the fixture to the other miter gauge slot, switch to the other angled fence and make the cuts on the other sides of the pins. Nibble away the waste between the pins with repeated passes over the blade. Use the pins as a template to lay out the tails. Tilt the blade to 10° and turn the fixture around so the straight fence faces the blade. Raise the blade to the material's thickness. Make the defining cuts on one side of each tail. Flip the part face for face and make the defin-ng cuts on the other side of the tails. Then clean out the waste. Clean out the corners of the tails with a chisel. popwood.com 55 |
||||||||||||||||||||||||||||||||||||||||||||||||||||||||


