Popular Woodworking 2006-10 № 157, страница 58
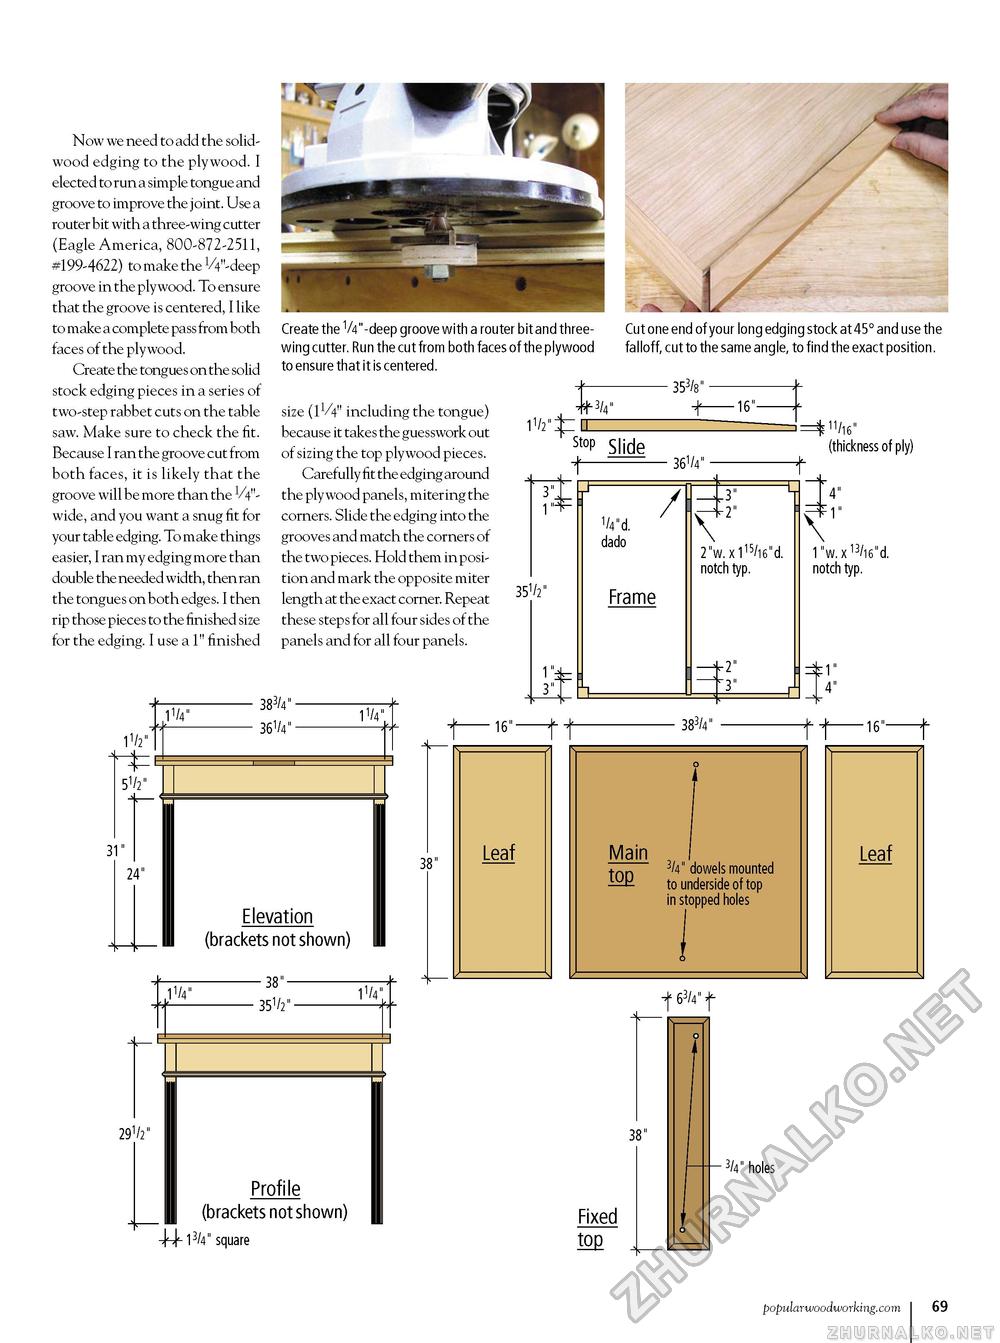
Now we need to add the solid-wood edging to the plywood. I elected to run a simple tongue and groove to improve the joint. Use a router bit with a three-wing cutter (Eagle America, 800-872-2511, #199-4622) to make the V4"-deep groove in the plywood. To ensure that the groove is centered, I like to make a complete pass from both faces of the plywood. Create the tongues on the solid stock edging pieces in a series of two-step rabbet cuts on the table saw. Make sure to check the fit. Because I ran the groove cut from both faces, it is likely that the groove will be more than the 1/4"-wide, and you want a snug fit for your table edging. To make things easier, I ran my edging more than double the needed width, then ran the tongues on both edges. I then rip those pieces to the finished size for the edging. I use a 1" finished Create the V4"-deep groove with a router bit and three-wing cutter. Run the cut from both faces of the plywood to ensure that it is centered. Cut one end of your long edging stock at 45° and use the falloff, cut to the same angle, to find the exact position. size (1V4" including the tongue) because it takes the guesswork out of sizing the top plywood pieces. Carefully fit the edging around the plywood panels, mitering the corners. Slide the edging into the grooves and match the corners of the two pieces. Hold them in position and mark the opposite miter length at the exact corner. Repeat these steps for all four sides of the panels and for all four panels. ■ 353/8" -16" st°P Slide 35V 11/2" 11/4" 51/2" 31" 24" 383/4"-361/4" - 11/4" Elevation (brackets not shown) 361/4" ■ (thickness °f ply) 2"w.x1l5/16"d. n°tch typ. X 4" 1" 1"w. x 13/16"d. n°tch typ. 1" 4" 38" 291/2" 11/4" -38"-35V- 11/4 Profile (brackets not shown) 13/4" square 16" 383/4" Main M3/4" d°wels m°unted t° underside °f t°p in st°pped h°les -16"- 63/4" f 38" Fixed top ■ 3/4" h°les popularwoodworking.com i 69 |


