Popular Woodworking 2006-10 № 157, страница 61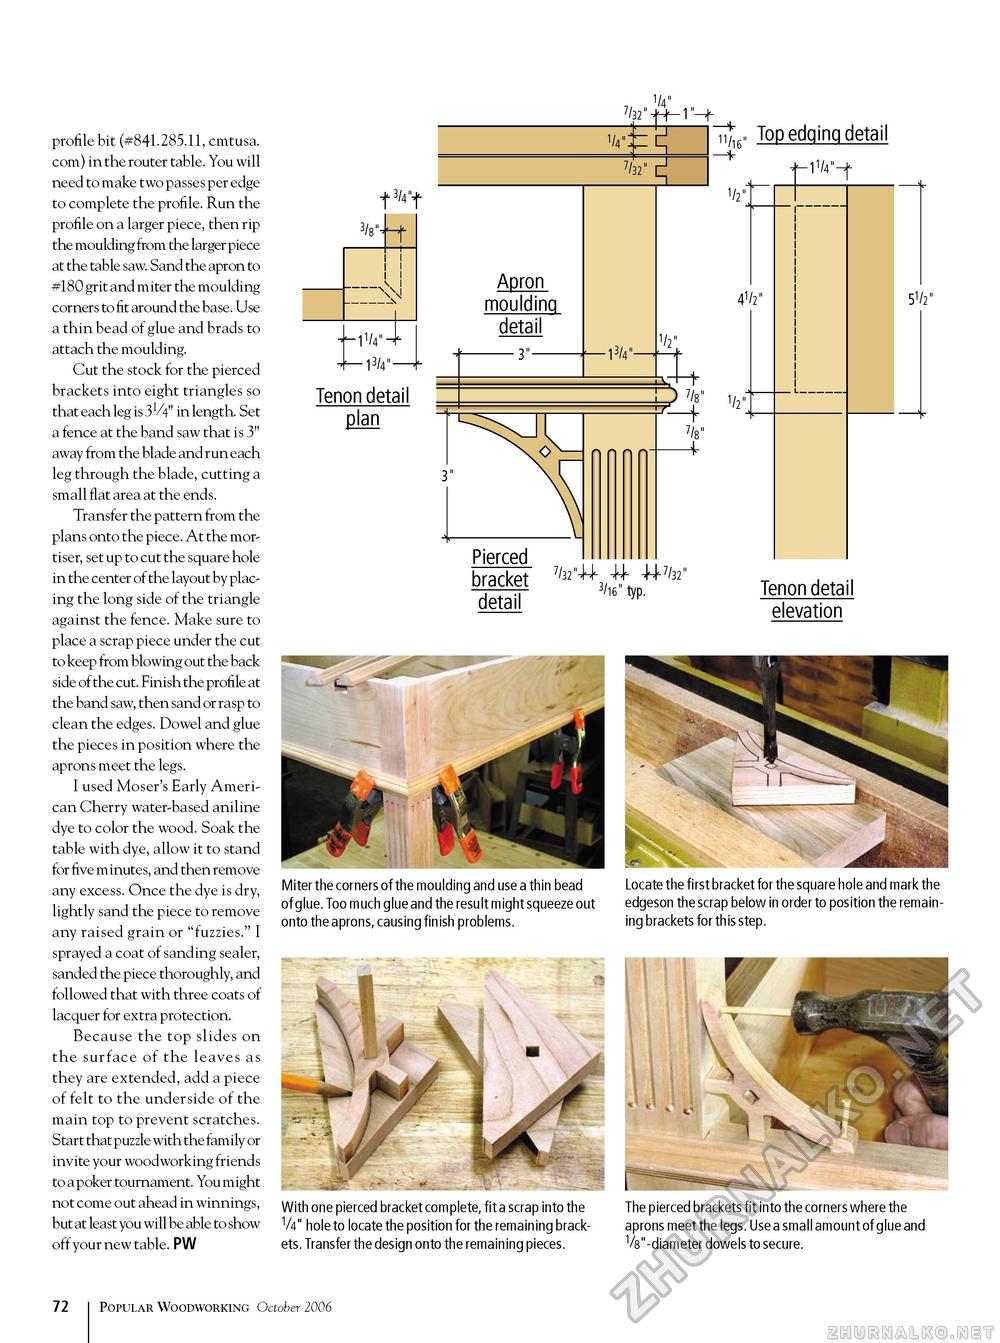
profile bit (#841.285.11, cmtusa. com) in the router table. You will need to make two passes per edge to complete the profile. Run the profile on a larger piece, then rip the moulding from the larger piece at the table saw. Sand the apron to #180 grit and miter the moulding corners to fit around the base. Use a thin bead of glue and brads to attach the moulding. Cut the stock for the pierced brackets into eight triangles so that each leg is 3V4" in length. Set a fence at the band saw that is 3" away from the blade and run each leg through the blade, cutting a small flat area at the ends. Transfer the pattern from the plans onto the piece. At the mor-tiser, set up to cut the square hole in the center of the layout by placing the long side of the triangle against the fence. Make sure to place a scrap piece under the cut to keep from blowing out the back side of the cut. Finish the profile at the band saw, then sand or rasp to clean the edges. Dowel and glue the pieces in position where the aprons meet the legs. I used Moser's Early American Cherry water-based aniline dye to color the wood. Soak the table with dye, allow it to stand for five minutes, and then remove any excess. Once the dye is dry, lightly sand the piece to remove any raised grain or "fuzzies." I sprayed a coat of sanding sealer, sanded the piece thoroughly, and followed that with three coats of lacquer for extra protection. Because the top slides on the surface of the leaves as they are extended, add a piece of felt to the underside of the main top to prevent scratches. Start that puzzle with the family or invite your woodworking friends to a poker tournament. You might not come out ahead in winnings, but at least you will be able to show off your new table. PW Top edging detail iv4"- 3/4" "iV —13/4"-■ Tenon detail plan Pierced bracket 7/32" detail %" typ. Tenon detail elevation Miter the corners of the moulding and use a thin bead of glue. Too much glue and the result might squeeze out onto the aprons, causing finish problems. Locate the first bracket for the square hole and mark the edgeson the scrap below in order to position the remaining brackets for this step. With one pierced bracket complete, fit a scrap into the V4" hole to locate the position for the remaining brackets. Transfer the design onto the remaining pieces. The pierced brackets fit into the corners where the aprons meet the legs. Use a small amount of glue and V8"-diameter dowels to secure. 72 Popular Woodworking October 2006 |


