Popular Woodworking 2006-10 № 157, страница 60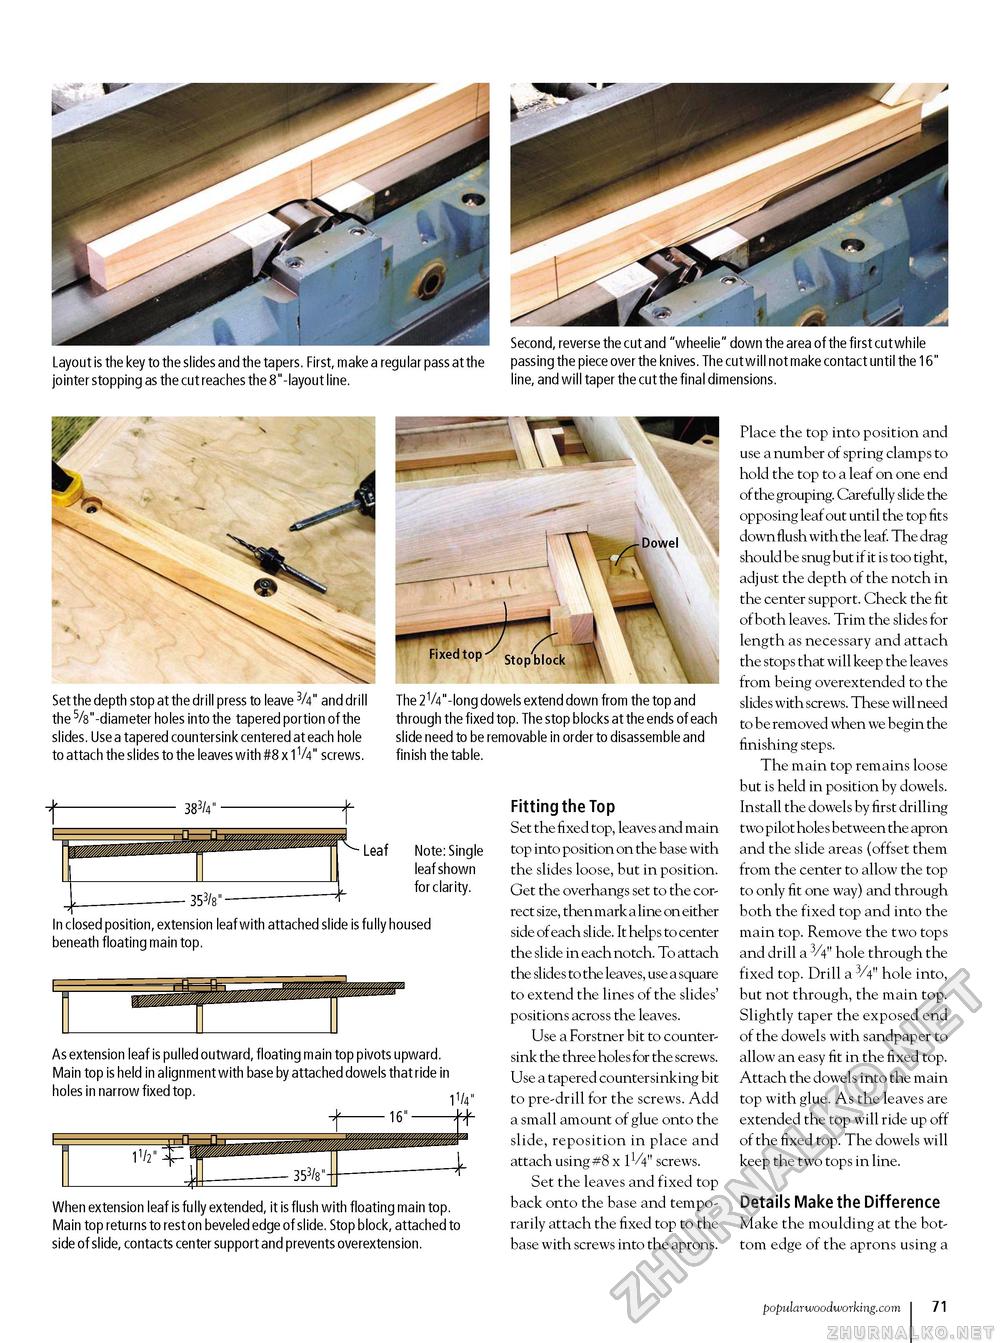
Layout is the key to the slides and the tapers. First, make a regular pass at the passing the piece over the knives. The cut will not make contact until the 16" jointer stopping as the cut reaches the 8"-layout line. line, and will taper the cut the final dimensions. Set the depth stop at the drill press to leave 3/4" and drill the 5/8"-diameter holes into the tapered portion of the slides. Use a tapered countersink centered at each hole to attach the slides to the leaves with #8 x 1V4" screws. The 2V4"-long dowels extend down from the top and through the fixed top. The stop blocks at the ends of each slide need to be removable in order to disassemble and finish the table. 383/4" ■ 383/4" ■
■ 353/8"- ■Leaf ■ 353/8"- Note: Single leaf shown for clarity. In closed position, extension leaf with attached slide is fully housed beneath floating main top. As extension leaf is pulled outward, floating main top pivots upward. Main top is held in alignment with base by attached dowels that ride in holes in narrow fixed top. ,, _^-16" M" When extension leaf is fully extended, it is flush with floating main top. Main top returns to rest on beveled edge of slide. Stop block, attached to side of slide, contacts center support and prevents overextension. Fitting the Top Set the fixed top, leaves and main top into position on the base with the slides loose, but in position. Get the overhangs set to the correct size, then mark a line on either side of each slide. It helps to center the slide in each notch. To attach the slides to the leaves, use a square to extend the lines of the slides' positions across the leaves. Use a Forstner bit to countersink the three holes for the screws. Use a tapered countersinking bit to pre-drill for the screws. Add a small amount of glue onto the slide, reposition in place and attach using #8 x 11/4" screws. Set the leaves and fixed top back onto the base and temporarily attach the fixed top to the base with screws into the aprons. Place the top into position and use a number of spring clamps to hold the top to a leaf on one end of the grouping. Carefully slide the opposing leaf out until the top fits down flush with the leaf. The drag should be snug but if it is too tight, adjust the depth of the notch in the center support. Check the fit of both leaves. Trim the slides for length as necessary and attach the stops that will keep the leaves from being overextended to the slides with screws. These will need to be removed when we begin the finishing steps. The main top remains loose but is held in position by dowels. Install the dowels by first drilling two pilot holes between the apron and the slide areas (offset them from the center to allow the top to only fit one way) and through both the fixed top and into the main top. Remove the two tops and drill a 3/4" hole through the fixed top. Drill a 3/4" hole into, but not through, the main top. Slightly taper the exposed end of the dowels with sandpaper to allow an easy fit in the fixed top. Attach the dowels into the main top with glue. As the leaves are extended the top will ride up off of the fixed top. The dowels will keep the two tops in line. Details Make the Difference Make the moulding at the bottom edge of the aprons using a popularwoodworking.com i 71 |
||||


