Popular Woodworking 2007-08 № 163, страница 28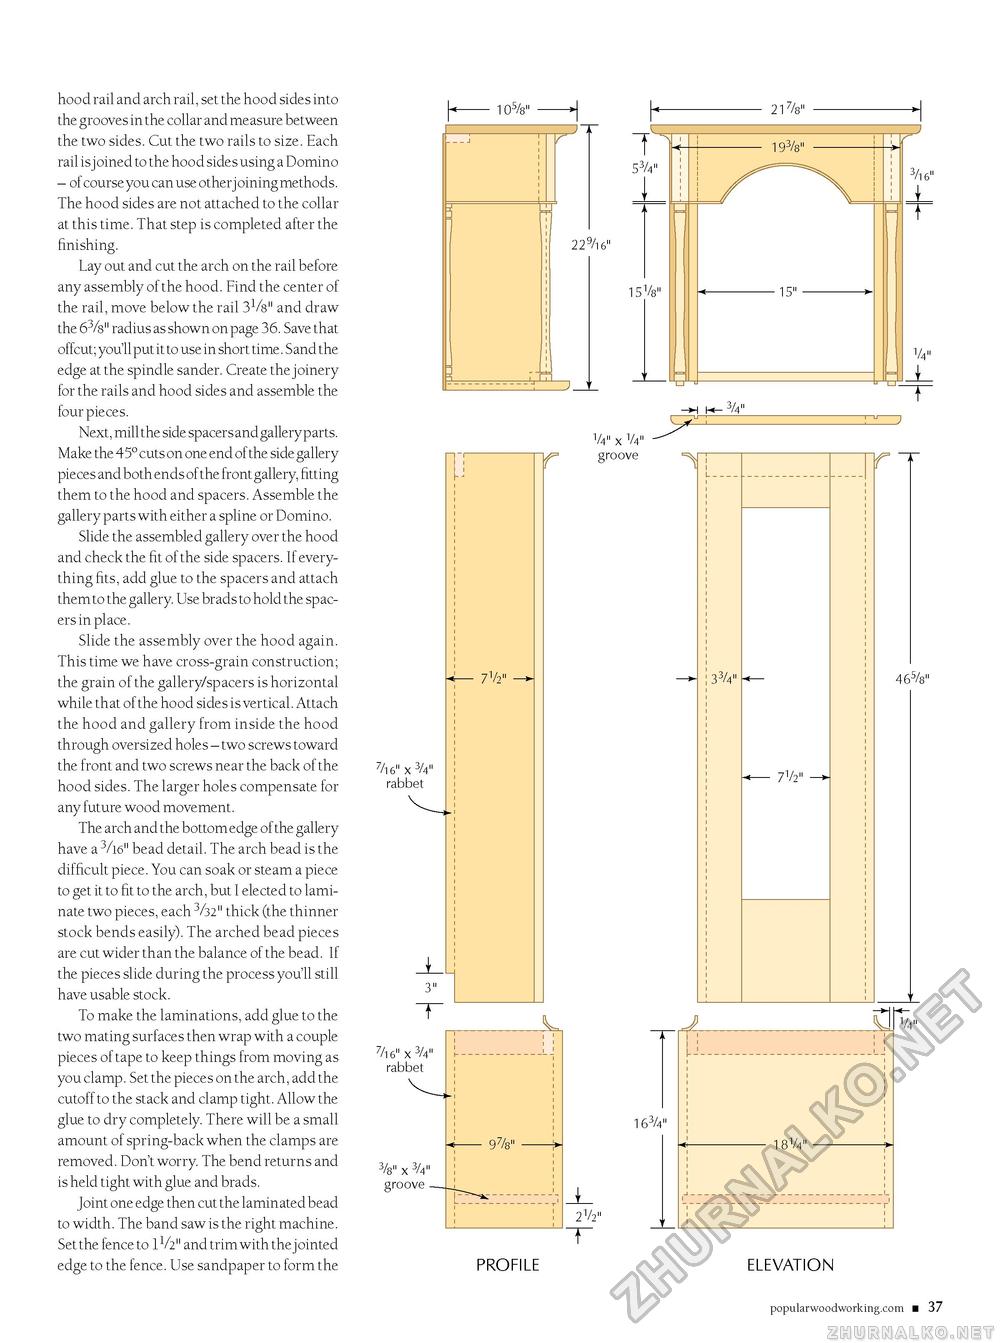
hood rail and arch rail, set the hood sides into the grooves in the collar and measure between the two sides. Cut the two rails to size. Each rail isjoined to the hood sides using a Domino - of course you can use other j oining methods. The hood sides are not attached to the collar at this time. That step is completed after the finishing. Lay out and cut the arch on the rail before any assembly of the hood. Find the center of the rail, move below the rail 31/8" and draw the 63/8" radius as shown on page 36. Save that offcut; you'll put it to use in short time. Sand the edge at the spindle sander. Create the joinery for the rails and hood sides and assemble the four pieces. Next, mill the side spacers and gallery parts. Make the 45° cuts on one end of the side gallery pieces and both ends of the front gallery, fitting them to the hood and spacers. Assemble the gallery parts with either a spline or Domino. Slide the assembled gallery over the hood and check the fit of the side spacers. If everything fits, add glue to the spacers and attach them to the gallery. Use brads to hold the spacers in place. Slide the assembly over the hood again. This time we have cross-grain construction; the grain of the gallery/spacers is horizontal while that of the hood sides is vertical. Attach the hood and gallery from inside the hood through oversized holes - two screws toward the front and two screws near the back of the hood sides. The larger holes compensate for any future wood movement. The arch and the bottom edge of the gallery have a 3/16" bead detail. The arch bead is the difficult piece. You can soak or steam a piece to get it to fit to the arch, but I elected to laminate two pieces, each 3/32" thick (the thinner stock bends easily). The arched bead pieces are cut wider than the balance of the bead. If the pieces slide during the process you'll still have usable stock. To make the laminations, add glue to the two mating surfaces then wrap with a couple pieces of tape to keep things from moving as you clamp. Set the pieces on the arch, add the cutoff to the stack and clamp tight. Allow the glue to dry completely. There will be a small amount of spring-back when the clamps are removed. Don't worry. The bend returns and is held tight with glue and brads. Joint one edge then cut the laminated bead to width. The band saw is the right machine. Set the fence to 1V211 and trim with thejointed edge to the fence. Use sandpaper to form the 217s" 7 53/4" 15Va" 193/s" ■ 15" ■ - 3/4" 7|6" X 3A" rabbet 3" 7|6" X 3/4" rabbet 3/s" X 3/4" groove _ 71/2" 1/4" X 1/4" groove 1 33/4" 7V2" 978" 163/4" 2 72" J 181/4" 316" T 1 4" 1 T 467s" 1 4" PROFILE ELEVATiON popularwoodworking.com ■ 37 |


