Popular Woodworking 2007-08 № 163, страница 29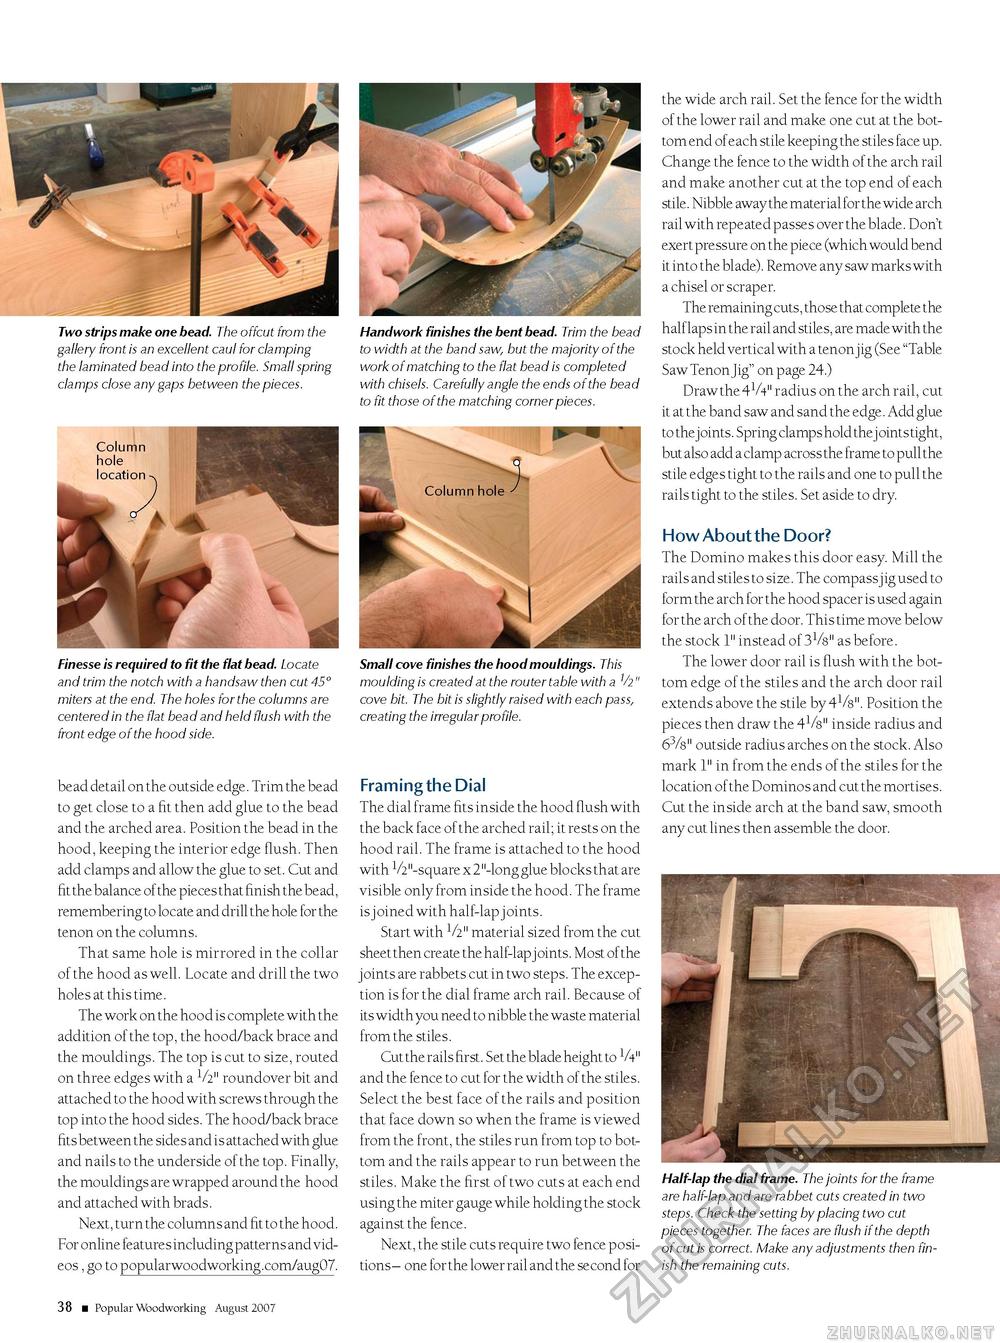
Two strips make one bead. The offcut from the gallery front is an excellent caul for clamping the laminated bead into the profile. Small spring clamps close any gaps between the pieces. Handwork finishes the bent bead. Trim the bead to width at the band saw, but the majority of the work of matching to the flat bead is completed with chisels. Carefully angle the ends of the bead to fit those of the matching corner pieces. Column hole location Finesse is required to fit the flat bead. Locate and trim the notch with a handsaw then cut 45° miters at the end. The holes for the columns are centered in the flat bead and held flush with the front edge of the hood side. Small cove finishes the hood mouldings. This moulding is created at the router table with a " cove bit. The bit is slightly raised with each pass, creating the irregular profile. bead detail on the outside edge. Trim the bead to get close to a fit then add glue to the bead and the arched area. Position the bead in the hood, keeping the interior edge flush. Then add clamps and allow the glue to set. Cut and fit the balance of the pieces that finish the bead, remembering to locate and drill the hole for the tenon on the columns. That same hole is mirrored in the collar of the hood as well. Locate and drill the two holes at this time. The work on the hood is complete with the addition of the top, the hood/back brace and the mouldings. The top is cut to size, routed on three edges with a 1/2" roundover bit and attached to the hood with screws through the top into the hood sides. The hood/back brace fits between the sides and is attached with glue and nails to the underside of the top. Finally, the mouldings are wrapped around the hood and attached with brads. Next, turn the columns and fit to the hood. For online features including patterns and videos , go to popularwoodworking.com/aug07. Framing the Dial The dial frame fits inside the hood flush with the back face of the arched rail; it rests on the hood rail. The frame is attached to the hood with 1/2"-square x 2"-long glue blocks that are visible only from inside the hood. The frame is joined with half-lap joints. Start with 1/2" material sized from the cut sheet then create the half-lap joints. Most of the joints are rabbets cut in two steps. The exception is for the dial frame arch rail. Because of its width you need to nibble the waste material from the stiles. Cut the rails first. Set the blade height to V4" and the fence to cut for the width of the stiles. Select the best face of the rails and position that face down so when the frame is viewed from the front, the stiles run from top to bottom and the rails appear to run between the stiles. Make the first of two cuts at each end using the miter gauge while holding the stock against the fence. Next, the stile cuts require two fence positions - one for the lower rail and the second for the wide arch rail. Set the fence for the width of the lower rail and make one cut at the bottom end of each stile keeping the stiles face up. Change the fence to the width of the arch rail and make another cut at the top end of each stile. Nibble away the material for the wide arch rail with repeated passes over the blade. Don't exert pressure on the piece (which would bend it into the bl ade). Remove any saw marks with a chisel or scraper. The remaining cuts, those that complete the half laps in the rail and stiles, are made with the stock held vertical with a tenon jig (See "Table Saw Tenon Jig" on page 24.) Draw the 4V4" radius on the arch rail, cut it at the band saw and sand the edge. Add glue to the j oints. Spring clamps hold the j oints tight, but also add a clamp across the frame to pull the stile edges tight to the rails and one to pull the rails tight to the stiles. Set aside to dry. How About the Door? The Domino makes this door easy. Mill the rails and stiles to size. The compass j ig used to form the arch for the hood spacer is used again for the arch of the door. This time move below the stock 1" instead of 3V8" as before. The lower door rail is flush with the bottom edge of the stiles and the arch door rail extends above the stile by 41/8". Position the pieces then draw the 41/8" inside radius and 63/8" outside radius arches on the stock. Also mark 1" in from the ends of the stiles for the location of the Dominos and cut the mortises. Cut the inside arch at the band saw, smooth any cut lines then assemble the door. Half-lap the dial frame. The joints for the frame are half-lap and are rabbet cuts created in two steps. Check the setting by placing two cut pieces together. The faces are flush if the depth of cut is correct. Make any adjustments then finish the remaining cuts. 38 ■ Popular Woodworking August 2007 |


