Popular Woodworking 2008-12 № 173, страница 13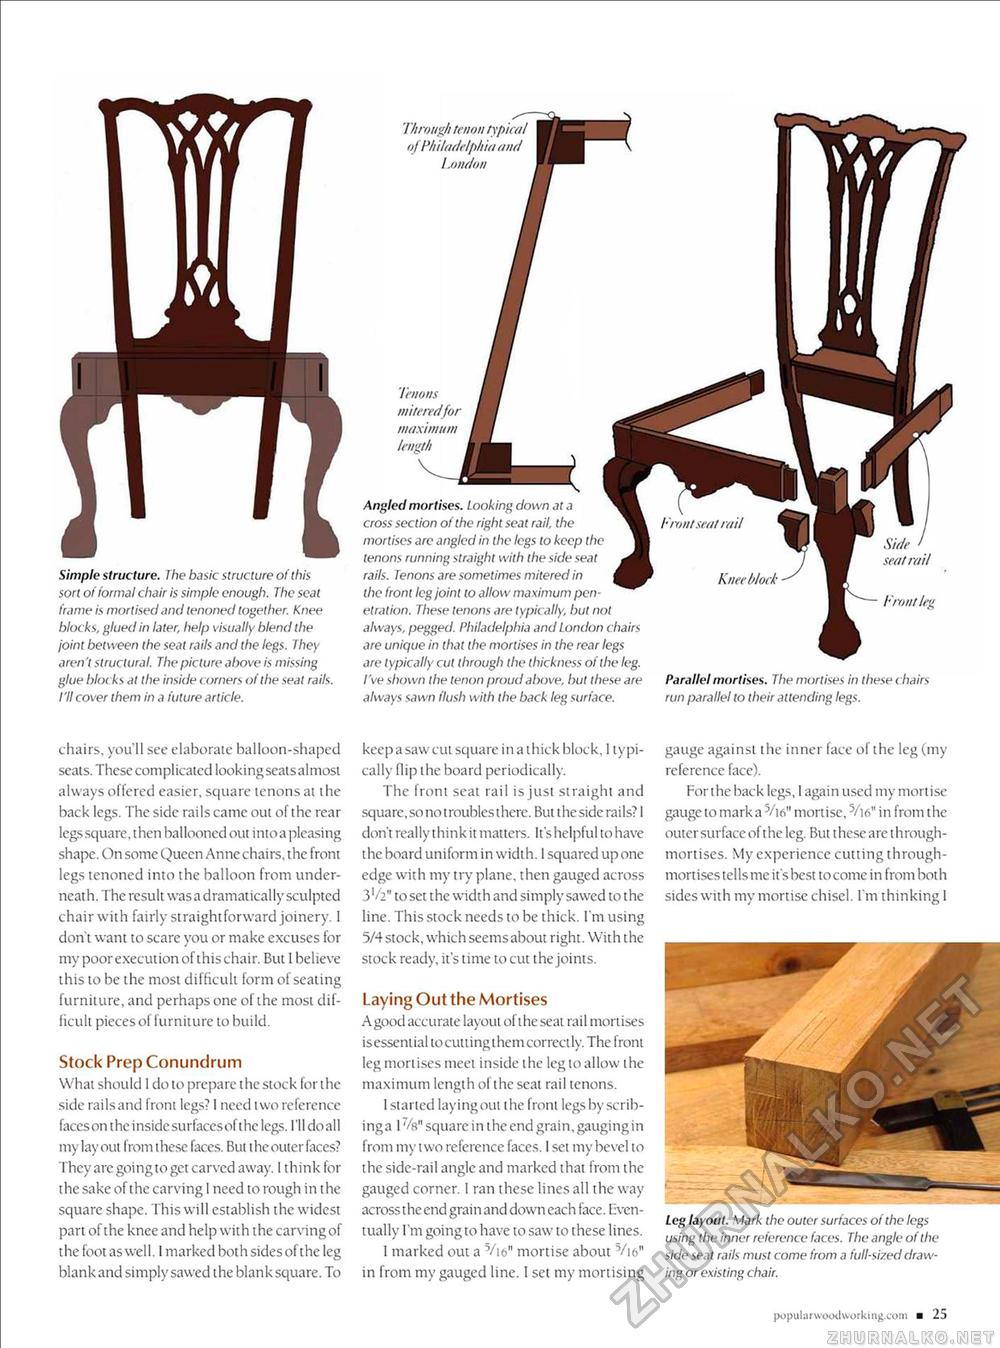
Through tenon typical of Philadelphia and London Simple structure. The basic structure of this sort of formal chair is simple enough. The seal frame is mortised and tenoned together. Knee blocks, glued in later, help visually blend the joint between the seat rails and the legs. They aren't structural. The picture above is missing glue bloc ks at the inside c orners of the seat rails. I'll cover them in a future article. Tenons m itered for maximum length Angled mortises. Looking down at a cross section of the right seat rail, the mortises are angled in the legs to keep the tenons running straight with the side seat rails. Tenons are sometimes mitered in the front leg joint to allow maximum penetration. These tenons are typically, but not always, pegged. Philadelphia and London chairs are unique in that the mortises in the rear legs are typically cut through the thickness of the leg. I've shown the tenon proud above, but these are always sawn flush with the back leg surface. Front kg Parallel mortises. The mortises in these chairs run parallel to their attending legs. chairs, you'll see elaborate balloon-shaped seats. These complicated lookingseatsalmost always offered easier, square tenons at the back legs. The side rails came out of the rear legs square, then ballooned out intoa pleasing shape. On some Queen Anne chairs, the front legs tenoned into the balloon from underneath. The result was a dramatically sculpted chair with fairly straightforward joinery. I don't want to scare you or make excuses for my poor execution of this chair. But 1 believe this to be the most difficult form of seating furniture, and perhaps one of the most difficult pieces of furniture to build. Stock Prep Conundrum What should 1 do to prepare the stock for the side railsand front legs? I need two reference faces on theinsidesurfacesofthe legs. I'll doall my lay out from t hese faces. But t he outer l aces? They arc going to get carved away. 1 think for the sake of the carving 1 need to rough in the square shape. This will establish the widest part of the knee and help with the carvingof the foot as well. I marked both sides ol the leg blank and simply sawed the blank square. To keep a saw cut square in a thick block, 1 typically flip the board periodically. The front seat rail is just straight and square, so no troubles there. But the side rails? I don't really think it matters. It's helpful to have the board uniform in width. I squared up one edge with my try plane, then gauged across 3'/?" to set the width and simply sawed to the line. This stock needs to be thick. I'm using 5/4 stock, which seems about right. With the stock ready, it's time to cut the joints. Laying Out the Mortises A good accurate layout of the seat rail mortises is essential tocuuingthem correctly. The front leg mortises meet inside the leg to allow the maximum length of the seat rail tenons. 1 started laying out the front legs by scribing a I square in the end grain, gauging in from my two reference faces. I set my bevel to the side-rail angle and marked that from the gauged corner. 1 ran these lines all the way across t he end grain and down each face, liven-tually I'm going to have to saw to these lines. I marked out a V|&" mortise about 5/i6" in from my gauged line. 1 set my mortising gauge against the inner face of the leg (my reference face). For the back legs, I again used my mortise gauge to marka5/i6M mortise, 5/i6" in from the outer surface of the leg. But these are through-mortises. My experience cutting through-mortises tells me it's best to come in from hot h sides with my mortise chisel. I'm thinking 1 Leg layout. Mark the outer surfaces of the legs using the inner reference faces. The angle of the side seat rails must come from a full-sired drawing or existing chair. populdrwoodworking.com ■ 25 |


