Popular Woodworking 2008-12 № 173, страница 15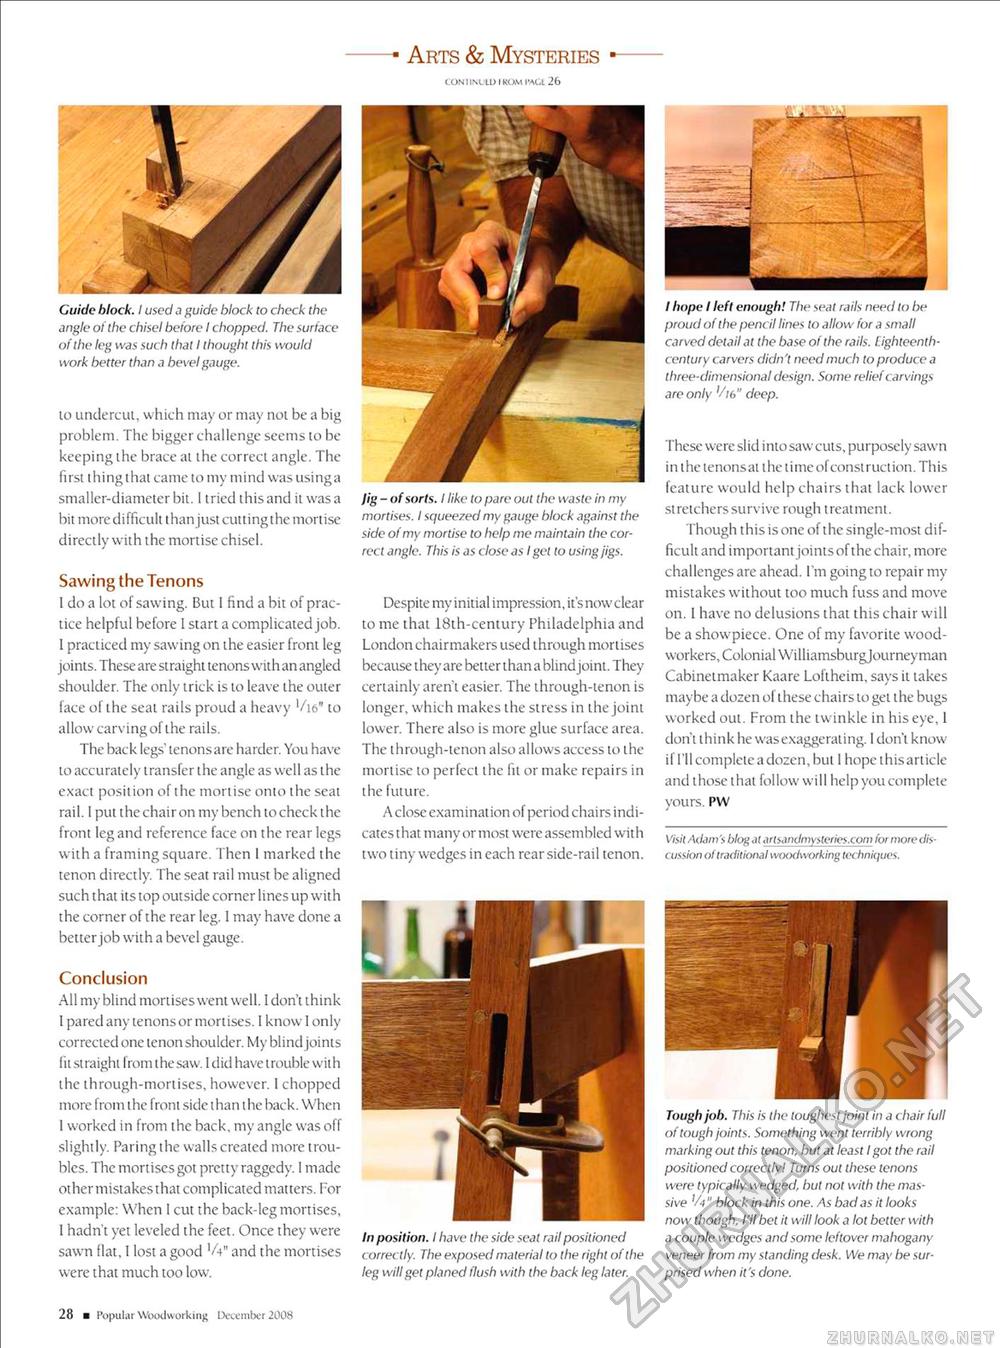
Guide block. I used a guide block to check the angle of the chisel before I chopped. The surface of the leg was such that I thought this would work better than a bevel gauge. to undercut, which may or may not be a big problem. The bigger challenge seems to be keeping the brace at the correct angle. The first thing that came to my mind was using a smaller-diameter bit. I tried this and it was a bit more difficult than just cuttingthc mortise directly with the mortise chisel. Sawing the Tenons I do a lot of sawing. But 1 find a bit of practice helpful before 1 start a complicated job. 1 practiced my sawing on the easier front leg joints. These are straight tenons with an angled shoulder. The only trick is to leave the outer face of the seal rails proud a heavy Vie" to allow carving of the rails. The back legs' tenons are harder. You have to accurately transfer the angle as well as the exact position of the mortise onto the seat rail. I put the chair on my bench tocheck the front leg and reference face on the rear legs with a framing square. Then I marked the tenon directly. The seat rail must be aligned such t hat its top outside corner lines up with the corner of the rear leg. I may have done a better job with a bevel gauge. Conclusion All my blind mortises went well. I don't think 1 pared any tenons or mortises. I know I only corrected one tenon shoulder. My blind joints lit st raight from i he saw. I d id have t rouble w it h the through-mortises, however. I chopped more from the front side than the back. When 1 worked in from the back, my angle was off slightly. Paring the walls created more troubles. The mortises got pretty raggedy. I made other mistakes that complicated matters. For example: When I cut the back-leg mortises, I hadn't yet leveled the feet. Once they were sawn Mat, 1 lost a good 'A" and the mortises were that much too low. I hope I left enough! The seat rails need to be proud of the pencil lines to allow for a small carved detail at the base of the rails, l ighteenth-century carvers didn't need much to produce a three-dimensional design. Some relief carvings are only '/it," deep. These were slid into saw cuts, purposely sawn i n i he tenons at i he t i me of const ruct ion. This feature would help chairs that lack lower stretchers survive rough treatment. Though t his is one of ihe single-most difficult and important joints of the chair, more challenges are ahead. I'm going to repair my mistakes without too much fuss and move on. I have no delusions that this chair will be a showpiece. One of my favorite woodworkers, Colonial Williamsburgjourney man Cabinetmaker Kaare Loftheim, says it takes maybe a dozen of these chairs to get the bugs worked out. From the twinkle in his eye, I don't think he was exaggerating. I don't know il I'll complete a dozen, but I hopethisarticle and those that follow will help you complete yours. PW Visit Adam'$ blog at arhandmYSleries.com for more discussion of traditional woodworking techniques. — Arts & Mysteries CONIINL IL) IKOM t'AGl 26 Jig - of sorts. I like to pare out the waste in my mortises. I squeezed my gauge block against the side of my mortise to help me maintain the correct angle. This is as close as I gel to using jigs. Despite my initial impression, it's now clear to me that 18th-century Philadelphia and London chairmakers used through mortises because they are better than a blind joint. They certainly aren't easier. The through-tenon is longer, which makes the stress in the joint lower. There also is more glue surface area. The through-tenon also allows access to the mortise to perfect the fit or make repairs in the future. A close examination of period chairs indicates that many or most were assembled with two tiny wedges in each rear side-rail tenon. Tough job. This is llie lougliesl joint in a chair full of tough joints. Something went terribly wrong marking out this tenon, but at least I got the rail positioned correctly! Turns oul these tenons were typically wedged, but not with the massive block in this one. As bad as it looks now though, I'll bet it will look a lot better with a couple wedges and some leftover mahogany veneer from my standing desk. We may be surprised when it's done. In position. I have the side seat rail positioned correctly. The exposed material to ihe right of the leg will gel planed flush with ihe back leg later. 28 ■ Popul ar Woodworking December 2008 |


