Popular Woodworking 2008-12 № 173, страница 17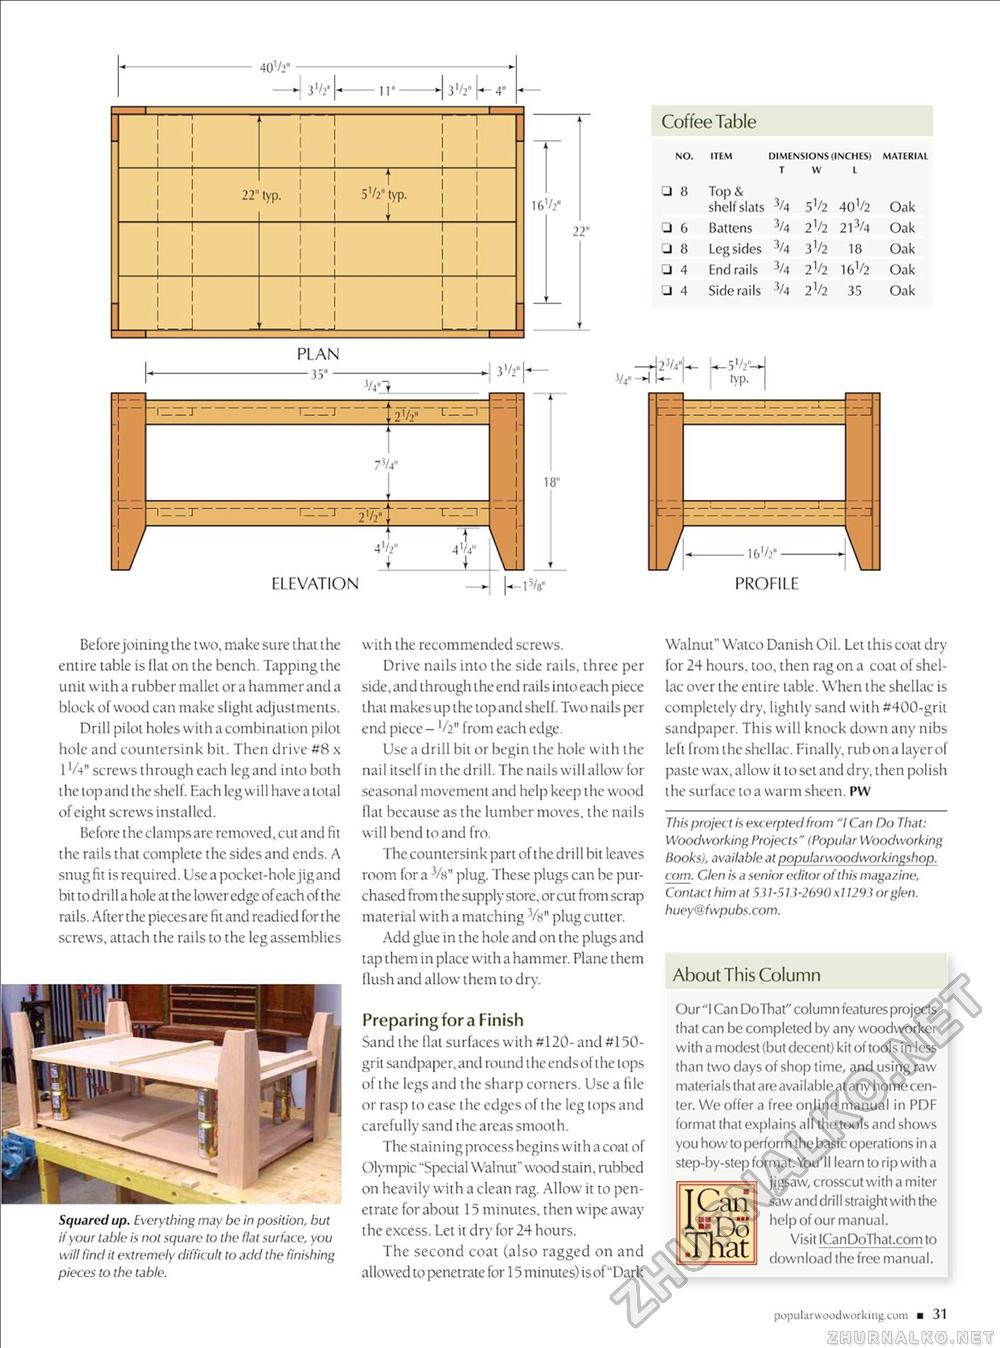
r ,i__ V — T" 40'/V Vh' 11" 3'/2» . 40'/V 11" 3'/2» .
16'/2" 3'/2- 16'/2" 22" PLAN — 35" - 3'/2- " nrzji" I 2]h" "T-T-TT 75/4" rzrz-T- 2i/2. "r^-jrr "I I I I --J-I --I 4'/," 4V4" ELEVATION 18" I—15/8" Coffee Table NO. ITEM DIMENSIONS (INCHES) MATERIAL T VV I □ 8 Top & shelf slats 3/4 5V2 40'/2 Oak □ 6 Battens 3/4 2^2 213/4 Oak □ 8 Leg sides 3/4 3V2 18 Oak □ 4 End rails 3/4 2V2 W'2 Oak J 4 Side rails 3/4 2V2 35 Oak V4"- 2j/4"! typ. 1/ ■16'/>' 1 PROFILE Before joining the two, make sure that the entire table is llat on the bench. Tapping the unit with a rubber mallet or a hammer and a block of wood can make slight adjustments. Drill pilot holes with a combination pilot hole and countersink bit. Then drive #8 x 1V4" screws through each leg and into both the top and the shell. Each leg will have a total of eight screws installed. Before the clamps are removed, cut and fit the rails that complete the sides and ends. A snug fit is required. Use a pocket-hole jig and bit to drill a hole at the lower edge of each of the rails. After the pieces are fit and readied for the screws, attach the rails to the leg assemblies Squared up. Everything may be in position, but if your table is not square to the flat surface, you will find it extremely difficult to add the finishing pieces to the table. with the recommended screws. Drive nails into the side rails, three per side, and through the end rails into each piece that makes up the top and shelf. Two nails per end piece - l/2M from each edge. Use a drill bit or begin the hole with the nail itself in the drill. The nails will allow for seasonal movement and help keep the wood flat because as the lumber moves, the nails will bend to and fro. The countersink part of the drill bit leaves room for a Vs" plug. These plugs can be purchased from the supply store, or cut from scrap material with a matching Vs" plug cutter. Add glue in the hole and on the plugs and tap them in place with a hammer. Plane them Hush and allow them to dry. Preparing for a Finish Sand the fiat surfaces with #120- and #150-grit sandpaper, and round the ends of the tops of the legs and the sharp corners. Use a file or rasp to ease t he edges of the leg tops and carefully sand the areas smooth. The stainingprocess begins with a coat of Olympic "Special Walnut" wood stain, rubbed on heavily with a clean rag. Allow it to penetrate for about 15 minutes, then wipe away the excess. Let it dry for 24 hours. The second coat (also ragged on and allowed to penetrate for 15 minutes) is of "Dark Walnut" Watco Danish Oil. Let this coat dry for 24 hours, too, then rag on a coat of shellac over the entire table. When the shellac is completely dry, lightly sand with #400-grit sandpaper. This will knock down any nibs left from the shellac. Finally, rub on a layer of paste wax, allow it toset and dry, then polish the surface to a warm sheen. PW This project is excerpted from "I Can Do That: Woodworking Projects" (Popular Woodworking Booksj, available at popularwoodworkingshop. com. Glen is a senior editor of this magazine. Contact him at 531-513-2690 x 11293 or glen. huey@fwpubs.com. About This Column Our "I Can Do That" column features projects that can be completed by any woodworker with a modest (but decent) kit of tools in less than two days of shop time, and using raw materials that are available at any home center. We offer a free online manual in PDF format that explains all the tools and shows you how to perform the basic operations in a step-by-step format. You'll learn to rip with a jigsaw, crosscut with a miter I Can sawand drill straightwith the J[ ■■ help of our manual. Visit ICanDoTliat.com to download the free manual. popularwoodworking.com ■ 31 |


