Popular Woodworking 2009-08 № 177, страница 32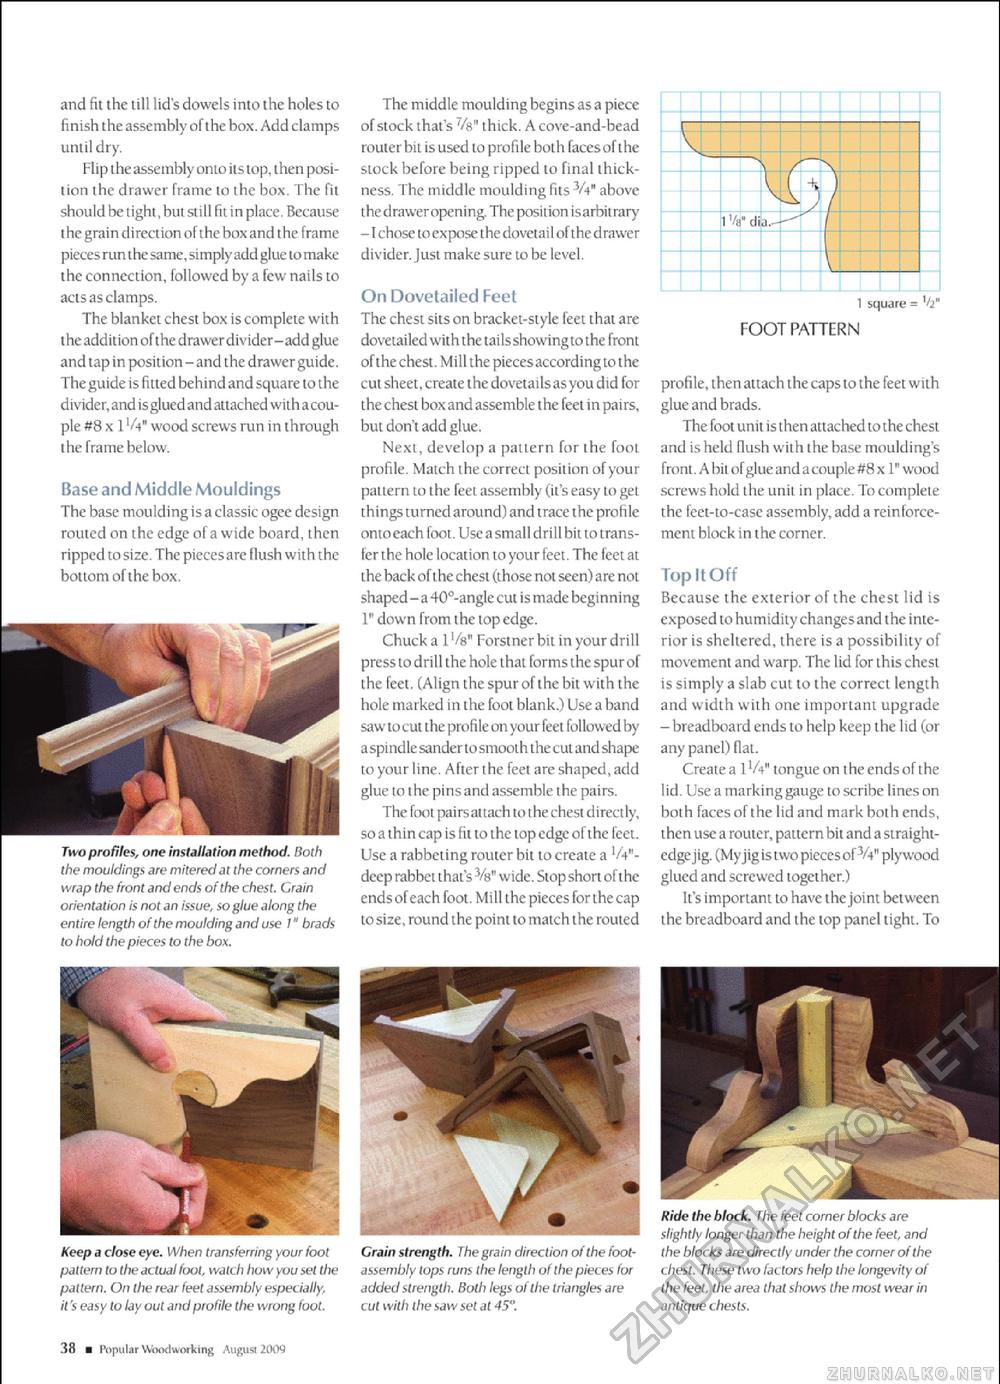
and fit the till lid's dowels into the holes to finish the assembly ofthe box. Add clamps until dry. Hip t he assembly onto its top, t hen position the drawer frame to the box. The fit should be tight, but still fit i n place. Because the graindirectionoftheboxand the frame pieces run the sa me, si mply add glue lo make lhe connection, followed by a Tew nails to acisas clamps. The blanket chest box iscomplete with lhe addition ofthe drawerdivider-add glue and lap in position - and the drawer guide. The guide is fitted behind andsquare lothe d ivider, and is glued and attac hed wi t h a couple #8 x 1 Vi" wood screws run in through I he frame below. Base and Middle Mouldings The base moulding is a classic ogee design routed on the edge of a wide board, then ripped to size. The piecesare Hush with the bottom ofthe box. Two profiles, one installation method. Both the mouldings are mitered at the comers and wrap the front and ends ofthe chest. Grain orientation is not an issue, so glue along the entire length ofthe moulding and use J" brads to hold the pieces to the box. The middle moulding begins as a piece of stock that's Vs" thick. A cove-and-bead router bit is used to profile both faces ofthe stock before being ripped to final thickness The middle moulding fits Vt" above thedrawer opening. The position is arbitrary -1 chose to expose the dovetai I of the drawer divider. Just make sure to be level. On Dovetailed Feet The chest sits on bracket-style feet that are dovetailed with the tai Isshowingto the front of the chest. Mill the pieces according to the cut sheet, create the dovetailsasyou did for the chest boxand assemble lhe feet in pairs, but don't add glue. Next, develop a pattern for the foot profile. Match the correct position of your pattern to the feet assembly (it's easy to get things turnedaround) and trace the profile ontoeach foot. Usea small drill bit to trans-ferthe hole location to your feet. The feet at the back ofthe chest (those not seen) are not shape d- a 40s-angle cut is made beginning 1" down from the top edge. Chuck a l'/s" Forstner bit in your drill press to drill the hole that forms the spur of the feet. (Align the spur of the bit with the hole marked in the fool blank.) Use a band saw to cut the profile on your feel followed by a spindle sander lo smooLh the cut and shape to your line. After the feet are shaped, add glue to the pinsand assemble the pairs. The foot pairs attach to thechesldireclly, soa thincap is fii to the topedge ofthe feet. Use a rabbeting router bil to create a VV-deep rabbet that's vb" wide. Slop short of lhe ends of each foot. Mill the pieces for the cap tosize, round the point lo match the routed 1 square - FOOT PATTERN profile, then attach the caps tothe feet with glue and brads. The foot unit is then att ac hed to the chest and is held flush with the base moulding's front. A bit ofglueandacouple#8 x 1" wood screws hold the unit in place. To complete the feet-to-case assembly, add a reinforcement block in the corner. Top It Off Because the exterior of the chest lid is exposed to humidity changesand the interior is sheltered, there is a possibility of movement and warp. The lid for this chest is simply a slab cut to the correct length a nd width with one important upgrade - breadboard ends to help keep the lid (or any panel) flat. Creates lVt" tongue on the endsofthe lid. Use a marking gauge to scribe lines on both faces of lhe lid and mark both ends, then use a rouier, pattern bil and a straight-edgejig. (My jigistwo pieces of JA" plywood glued and screwed together.) It's important to have the joint bclween the breadboard and the lop panel light. To Keep ct dose eye. When transferring your foot pattern to the actual foot, watch how you set the pattern. On the rear feet assembly especially, it's easy to lay out and profile the wrong foot. Grain strength. I he grain direction ofthe foot-assembly tops runs the length of the pieces for added strength. Both legs of the triangle* are cut with the saw set at 45". Ride the block. The feet corner blocks are slightly longer than the height ofthe feet, and the blocks are directly under the corner ofthe chest. These two factors help the longevity of the feet, the area that shows the most wear in antique chests. 38 m Popular Wood working August 2009 |


