Popular Woodworking 2009-12 № 180, страница 50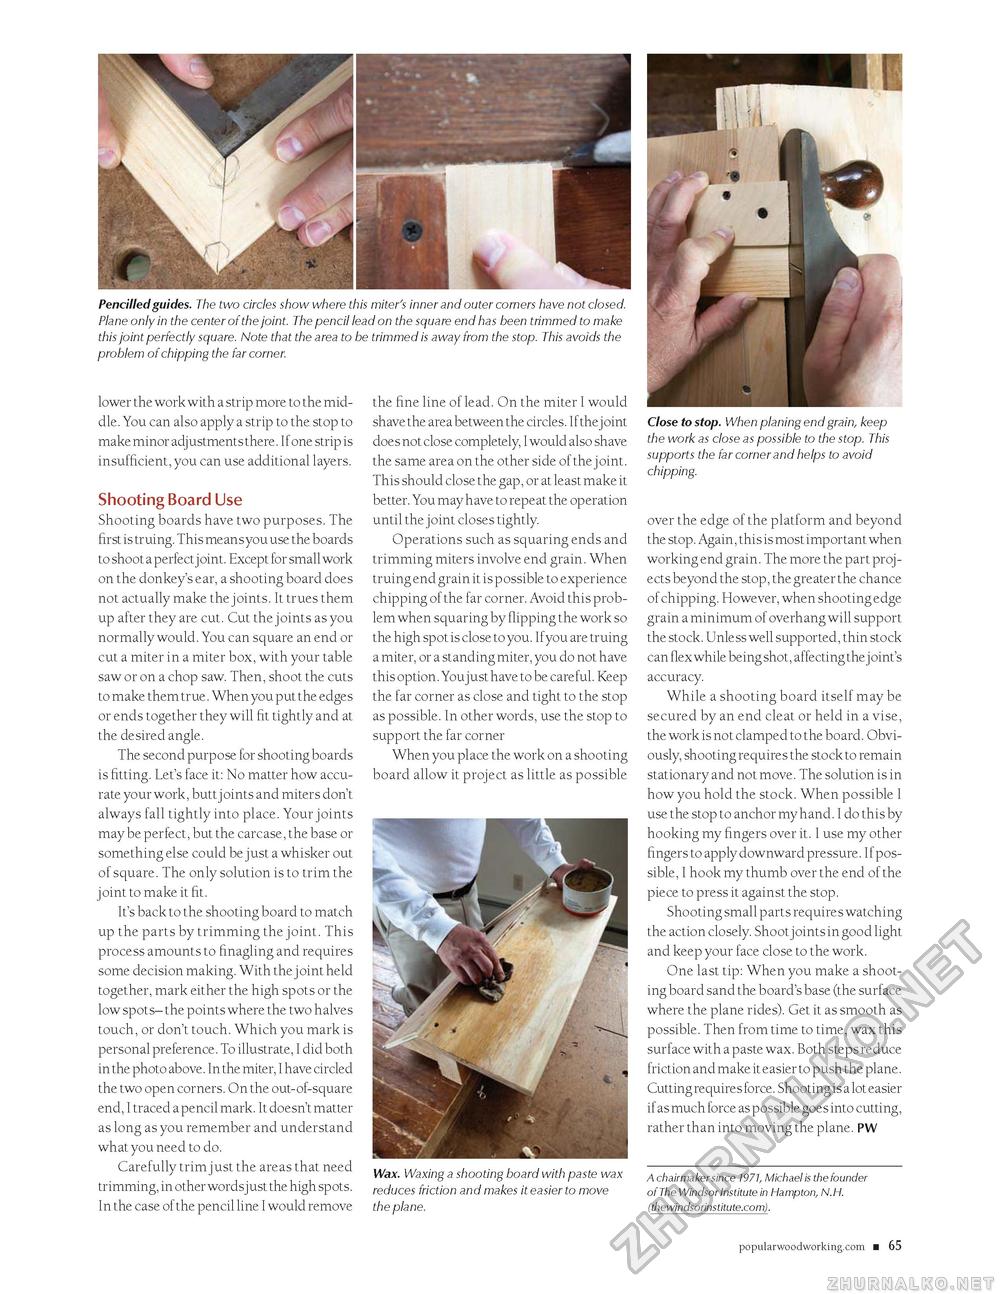
Pencilled guides. The two circles show where this miter's inner and outer corners have not closed. Plane only in the center of the joint. The pencil lead on the square end has been trimmed to make this joint perfectly square. Note that the area to be trimmed is away from the stop. This avoids the problem of chipping the far corner. lower the work with a strip more to the middle. You can also apply a strip to the stop to make minor adjustments there. If one strip is insufficient, you can use additional layers. Shooting Board UseShooting boards have two purposes. The first is truing. This means you use the boards to shoot a perfectj oint. Except for small work on the donkey's ear, a shooting board does not actually make the joints. It trues them up after they are cut. Cut the joints as you normally would. You can square an end or cut a miter in a miter box, with your table saw or on a chop saw. Then, shoot the cuts to make them true. When you put the edges or ends together they will fit tightly and at the desired angle. The second purpose for shooting boards is fitting. Let's face it: No matter how accurate your work, butt joints and miters don't always fall tightly into place. Your joints may be perfect, but the carcase, the base or something else could be just a whisker out of square. The only solution is to trim the joint to make it fit. It's back to the shooting board to match up the parts by trimming the joint. This process amounts to finagling and requires some decision making. With the joint held together, mark either the high spots or the low spots- the points where the two halves touch, or don't touch. Which you mark is personal preference. To illustrate, I did both in the photo above. In the miter, I have circled the two open corners. On the out-of-square end, I traced a pencil mark. It doesn't matter as long as you remember and understand what you need to do. Carefully trim just the areas that need trimming, in other wordsjust the high spots. In the case of the pencil line I would remove the fine line of lead. On the miter I would shave the area between the circles. If thejoint does not close completely, I would also shave the same area on the other side of the joint. This should close the gap, or at least make it better. You may have to repeat the operation until the joint closes tightly. Operations such as squaring ends and trimming miters involve end grain. When truing end grain it is p ossible to experience chipping of the far corner. Avoid this problem when squaring by flipping the work so the high spot is close to you. Ifyou are truing a miter, or a standing miter, you do not have this option. Youjust have to be careful. Keep the far corner as close and tight to the stop as possible. In other words, use the stop to support the far corner When you place the work on a shooting board allow it project as little as possible Wax. Waxing a shooting board with paste wax reduces friction and makes it easier to move the plane. Close to stop. When planing end grain, keep the work as close as possible to the stop. This supports the far corner and helps to avoid chipping. over the edge of the platform and beyond the stop. Again, this is most important when working end grain. The more the part projects beyond the stop, the greater the chance of chipping. However, when shooting edge grain a minimum of overhang will support the stock. Unless well supported, thin stock can flex while being shot, affecting the joint's accuracy. While a shooting board itself may be secured by an end cleat or held in a vise, the work is not clamped to the board. Obviously, shooting requires the stock to remain stationary and not move. The solution is in how you hold the stock. When possible I use the stop to anchor my hand. I do this by hooking my fingers over it. I use my other fingers to apply downward pressure. If possible, I hook my thumb over the end of the piece to press it against the stop. Shooting small parts requires watching the action closely. Shoot joints in good light and keep your face close to the work. One last tip: When you make a shooting board sand the board's base (the surface where the plane rides). Get it as smooth as possible. Then from time to time, wax this surface with a paste wax. Both steps reduce friction and make it easier to push the plane. Cutting requires force. Shooting is a lot easier if as much force as possible goes into cutting. rather than into moving the plane. PW A chairmaker since 1971, Michael is the founder of The Windsor Institute in Hampton, N.H. (thewindsorinstitute.com). popularwoodworking.com ■ 21 |


