10 - Heavy Duty Lathe Stand, страница 11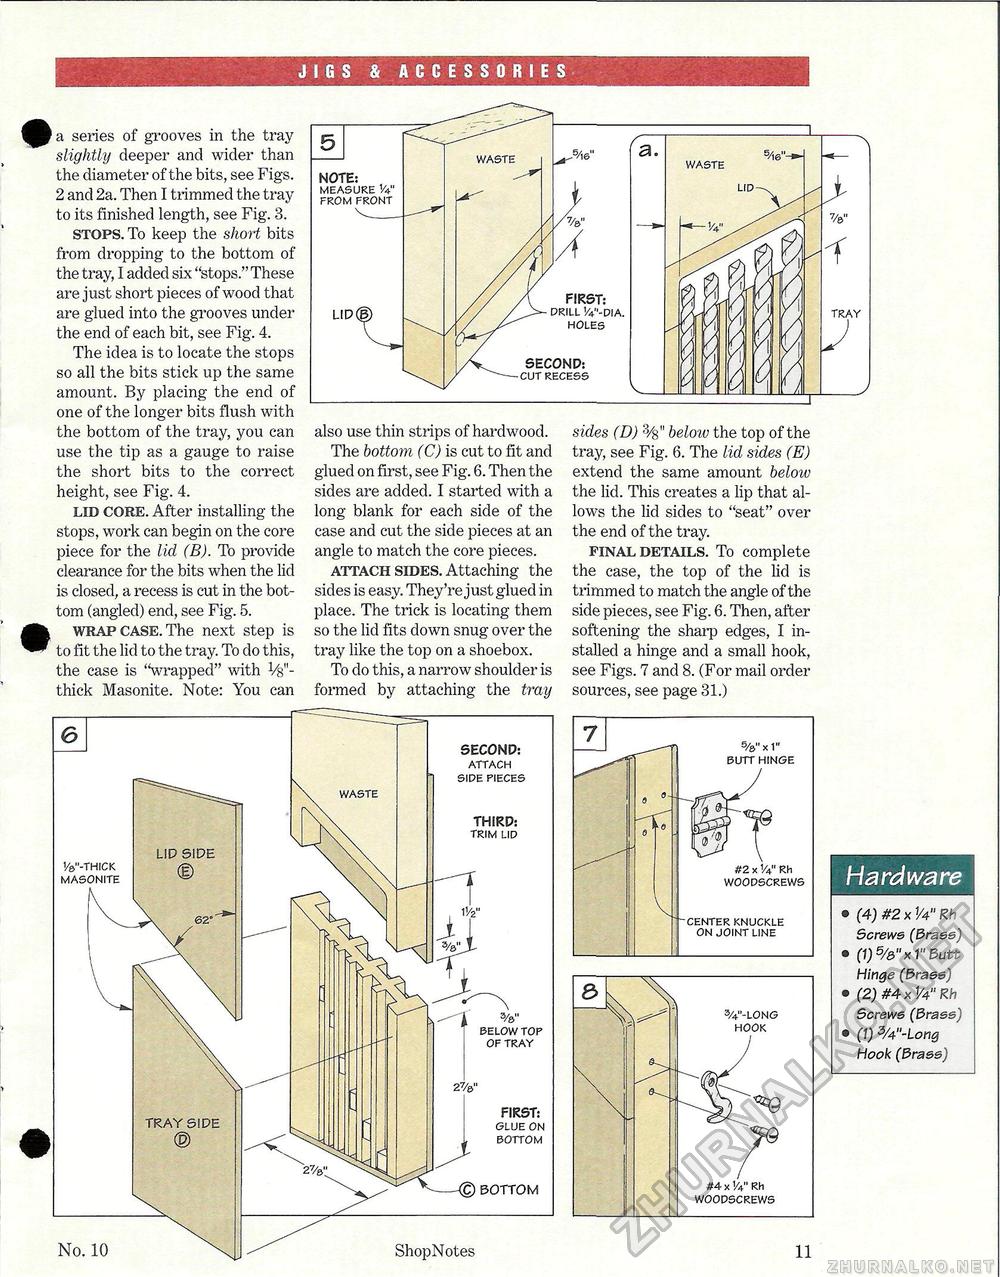
JIGS & ACCESSORIES ^^a series of grooves in the tray slightly deeper and wider than the diamet er of the bits, see Figs. 2 and 2a. Then I trimmed the tray to its finished length, see Fig. 3. stops. To keep the short bits from dropping to the bottom of the tray, I added six "stops." These are just short pieces of wood that are glued into the grooves under the end of each bit, see Fig. 4. The idea is to locate the stops so all the bits stick up the same amount. By placing the end of one of the longer bits flush with the bottom of the tray, you can use the tip as a gauge to raise the short bits to the correct height, see Fig. 4. lid core. After installing the stops, work can begin on the core piece for the lid (B). To provide clearance for the bits when the lid is closed, a recess is cut in the bottom (angled) end, see Fig. 5. • wrap case. The next step is to fit the lid to the tray. To do this, the case is "wrapped" with Vg"-thick Masonite. Note: You can also use thin strips of hardwood. The bottom (C) is cut to fit and glued on first, see Fig. 6. Then the sides are added. I started with a long blank for each side of the case and cut the side pieces at an angle to match the core pieces. attach sides. Attaching the sides is easy. They're just glued in place. The trick is locating them so the lid fits down snug over the tray like the top on a shoebox. To do this, a narrow shoulder is formed by attaching the tray sides (D) 3/g" below the top of the tray, see Fig. 6. The lid sides (E) extend the same amount beloiv the lid. This creates a lip that allows the lid sides to "seat" over the end of the tray. final details. To complete the case, the top of the lid is trimmed to match the angle of the side pieces, see Fig. 6. Then, after softening the sharp edges, I installed a hinge and a small hook, see Figs. 7 and 8. (For mail order sources, see page 31.) Hardware • (4)#2x1/4"Rh Screws (Braes) • (1)5/&"x1" Butt Hinge (Brass) • (2) #4 x V4" Rh Screws (Brass) • (1) W-Long Hook (Brass) 11 WASTE NOTE: MEASURE V4" FROM FRONT LID FIRST: DRILL '/4"-DIA. HOLES SECOND: CUT RECESS TRAY SIDE ® No. 10 ShopNotes LID SIDE V&"-THICK MASONITE SECOND: ATTACH SIDE PIECES THIRD: TRIM LID 3/&" BELOW TOP OF TRAY BOTTOM FIRST: GLUE ON BOTTOM |


