10 - Heavy Duty Lathe Stand, страница 9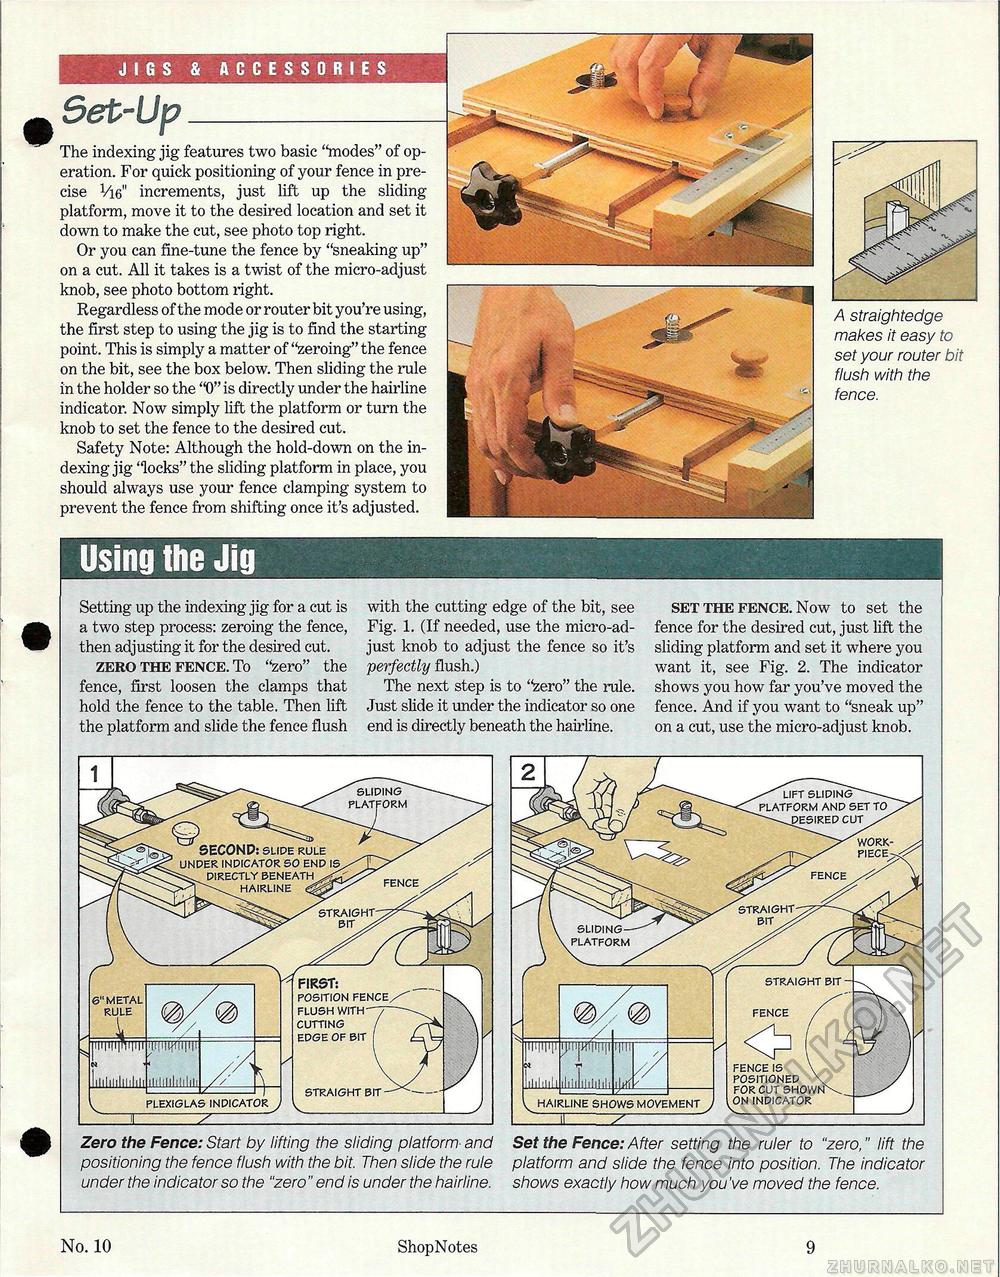
JIGS & ACCESSORIES Set-Up The indexing jig features two basic "modes" of operation. For quick positioning of your fence in precise V16" increments, just lift up the sliding platform, move it to the desired location and set it down to make the cut, see photo top right. Or you can fine-tune the fence by "sneaking up" on a cut. All it takes is a twist of the micro-adjust knob, see photo bottom right. Regardless of the mode or router bit you're using, the first step to using the jig is to find the starting point. This is simply a matter of "zeroing" the fence on the bit, see the box below. Then sliding the rule in the holder so the "0" is directly under the hairline indicator. Now simply lift the platform or turn the knob to set the fence to the desired cut. Safety Note: Although the hold-down on the indexing jig 'locks" the sliding platform in place, you should always use your fence clamping system to prevent the fence from shifting once it's adjusted. A straightedge makes it easy to set your router bit flush with the fence. SLIDING PLATFORM / LIFT SLIDING^— PLATFORM AND SET TO ~~"~~--^DESIRED CUT WORK-PIECE- SECONPs SLIDE RULE UNDER INDICATOR SO END IS DIRECTLY BENEATH^ HAIRLINE STRAIGHT BIT ^ STRAIGHT-BIT ^ SLIDING — PLATFORM STRAIGHT BIT FIRST: POSITION FENCE/"" FLUSH WITH"-"/— CUTTING / EDGE OF BIT i < 6" METAL RULE STRAIGHT BIT PLEXIGLAS INDICATOR Zero the Fence: Start by lifting the sliding platform and positioning the fence flush with the bit. Then slide the rule under the indicator so the "zero" end is under the hairline. Set the Fence: After setting the ruler to "zero," lift the platform and slide the fence into position. The indicator shows exactly how much you've moved the fence. Setting up the indexing jig for a cut is a two step process: zeroing the fence, then adjusting it for the desired cut. zero the fence. To "zero" the fence, first loosen the clamps that hold the fence to the table. Then lift the platform and slide the fence flush with the cutting edge of the bit, see Fig. 1. (If needed, use the micro-ad-just knob to adjust the fence so it's perfectly flush.) The next step is to "zero" the rule. Just slide it under the indicator so one end is directly beneath the hairline. set the fence. Now to Set the fence for the desired cut, just lift the sliding platform and set it where you want it, see Fig. 2. The indicator shows you how far you've moved the fence. And if you want to "sneak up" on a cut, use the micro-adjust knob. No. 10 ShopNotes 9 |


