36 - Miter Trimmer, страница 20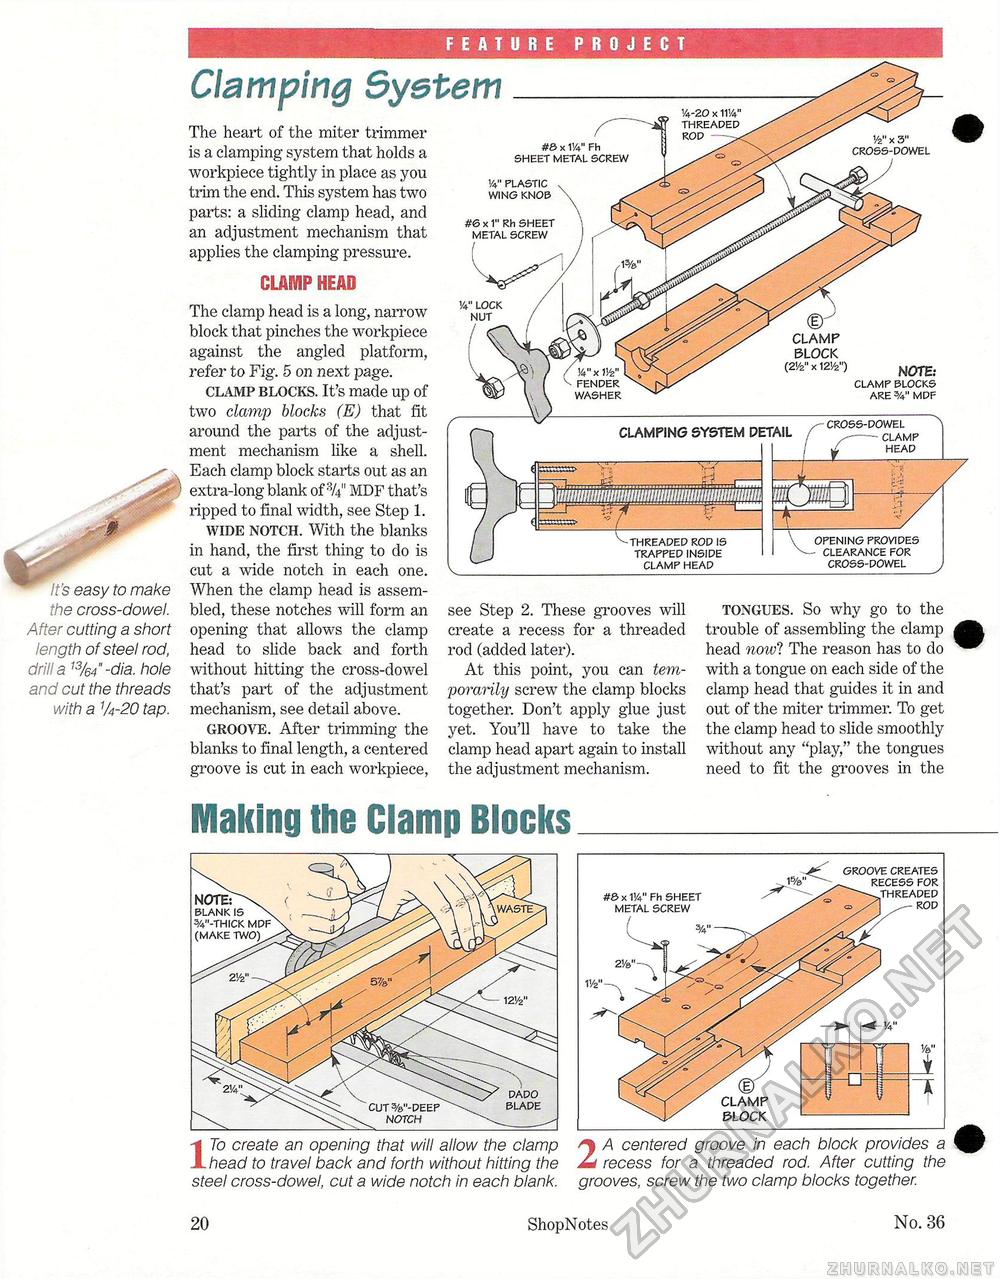
It's easy to make the cross-dowel. After cutting a short length of steel rod, drill a ]3/e4 -dia. hole and cut the threads with a 1/4-20 tap. Making the Clamp BlocksFEATURE PROJECT Vz" x 3" CROSS-DOWEL CLAMP HEAD The clamp head is a long, narrow block that pinches the workpiece against the angled platform, refer to Fig. 5 on next page. clamp blocks. It's made up of two clamp blocks (E) that fit around the parts of the adjustment mechanism like a shell. Each clamp block starts out as an extra-long blank of %" MDF that's ripped to final width, see Step 1. wide notch. With the blanks in hand, the first thing to do is cut a wide notch in each one. When the clamp head is assembled, these notches will form an opening that allows the clamp head to slide back and forth without hitting the cross-dowel that's part of the adjustment mechanism, see detail above. groove. After trimming the blanks to final length, a centered groove is cut in each workpiece, Clamping System NUT CLAMP BLOCK (2'/2" x 121/2") MOTE: CLAMP BLOCKS ARE %" MDF CLAMPING SYSTEM DETAIL THREADED ROD IS TRAPPED INSIDE CLAMP HEAD — CROSS-DOWEL - CLAMP HEAD OPENING PROVIDES - CLEARANCEFOR CROSS-DOWEL see Step 2. These grooves will create a recess for a threaded rod (added later). At this point, you can temporarily screw the clamp blocks together. Don't apply glue just yet. You'll have to take the clamp head apart again to install the adjustment mechanism. tongues. So why go to the trouble of assembling the clamp head nowl The reason has to do with a tongue on each side of the clamp head that guides it in and out of the miter trimmer. To get the clamp head to slide smoothly without any "play," the tongues need to fit the grooves in the The heart of the miter trimmer is a clamping system that holds a workpiece tightly in place as you trim the end. This system has two parts: a sliding clamp head, and an adjustment mechanism that applies the clamping pressure. 1/4" PLASTIC WING KNOB #6 x 1" Rh SHEET METAL SCREW #& x VA" Fh SHEET METAL SCREW 3/4"-THICK MDF (MAKE DADO BLADE 1T0 create an opening that will allow the clamp head to travel back and forth without hitting the steel cross-dowel, cut a wide notch in each blank. 2 A centered groove in each block provides a recess for a threaded rod. After cutting the grooves, screw the two clamp blocks together. #& x VA" Fh SHEET METAL SCREW 2Va"~ CLAMP BLOCK GROOVE CREATES RECESS FOR 20 ShopNotes No. 36 |


