36 - Miter Trimmer, страница 7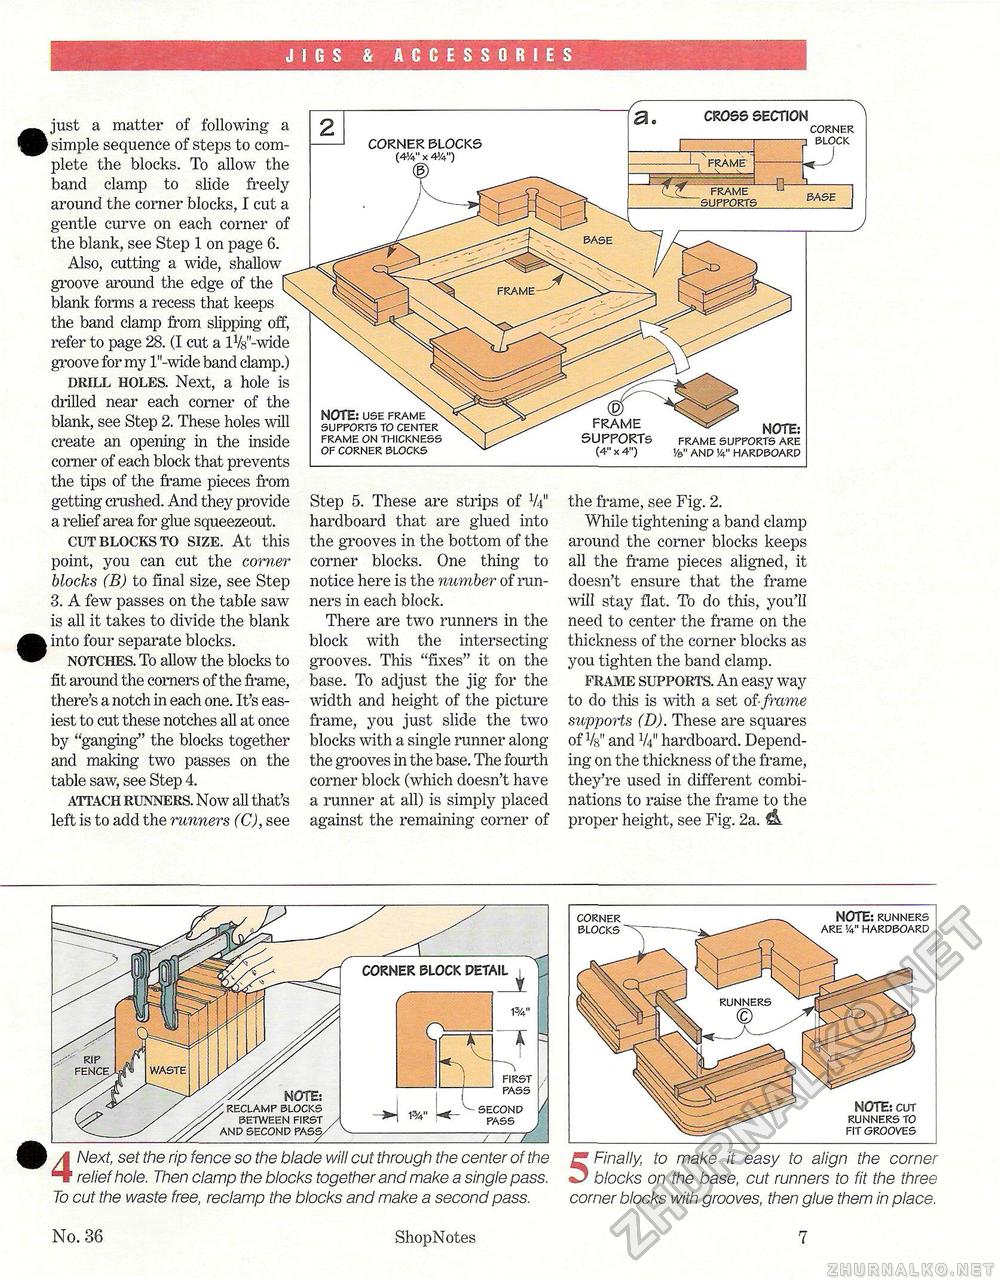
JIGS & ACCESSORIES just a matter of following a f simple sequence of steps to complete the blocks. To allow the band clamp to slide freely around the corner blocks, I cut a gentle curve on each corner of the blank, see Step 1 on page 6. Also, cutting a wide, shallow groove around the edge of the blank forms a recess that keeps the band clamp from slipping off, refer to page 28. (I cut a lV-V'-wide groove for my l"-wide band clamp.) drill holes. Next, a hole is drilled near each comer of the blank, see Step 2. These holes wall create an opening in the inside comer of each block that prevents the tips of the frame pieces from getting crushed. And they provide a relief area for glue squeezeout. cut blocks to size. At this point, you can cut the corner blocks (B) to final size, see Step 3. A few passes on the table saw is all it takes to divide the blank . into four separate blocks. notches. To allow the blocks to fit around the comers of the frame, there's a notch in each one. It's easiest to cut these notches all at once by "ganging" the blocks together and making two passes on the table saw, see Step 4. attach runners. Now all that's left is to add the runners (C), see CROSS SECTION CORNER BLOCKS (414" x 4!4") corner block NOTE: use frame supports to center frame on thickness of corner blocks D) FRAME ^ NOTE: SUPPORTS frame supports are (4" x 4") iand 1/4" hardboard Step 5. These are strips of V4" hardboard that are glued into the grooves in the bottom of the corner blocks. One thing to notice here is the number of runners in each block. There are two runners in the block with the intersecting grooves. This "fixes" it on the base. To adjust the jig for the width and height of the picture frame, you just slide the two blocks with a single runner along the grooves in the base. The fourth corner block (which doesn't have a runner at all) is simply placed against the remaining corner of the frame, see Fig. 2. While tightening a band clamp around the corner blocks keeps all the frame pieces aligned, it doesn't ensure that the frame will stay flat. To do this, you'll need to center the frame on the thickness of the corner blocks as you tighten the band clamp. frame supports. An easy way to do this is with a set of-frame supports (D). These are squares of Va" and V4" hardboard. Depending on the thickness of the frame, they're used in different combinations to raise the frame to the proper height, see Fig. 2a. & 4 Next, set the rip fence so the blade will cut through the center of the relief hole. Then clamp the blocks together and make a single pass. To cut the waste free, reclamp the blocks and make a second pass. 5 Finally, to make it easy to align the corner blocks on the base, cut runners to fit the three corner blocks with grooves, then glue them in place. No. 36 ShopNotes CORNER SLOCK DETAIL first second pass NOTE: cut runners to fit grooves corner blocks NOTE: runners are y4" hardboard |


