43 - Build Your Own Dovetail Jig, страница 18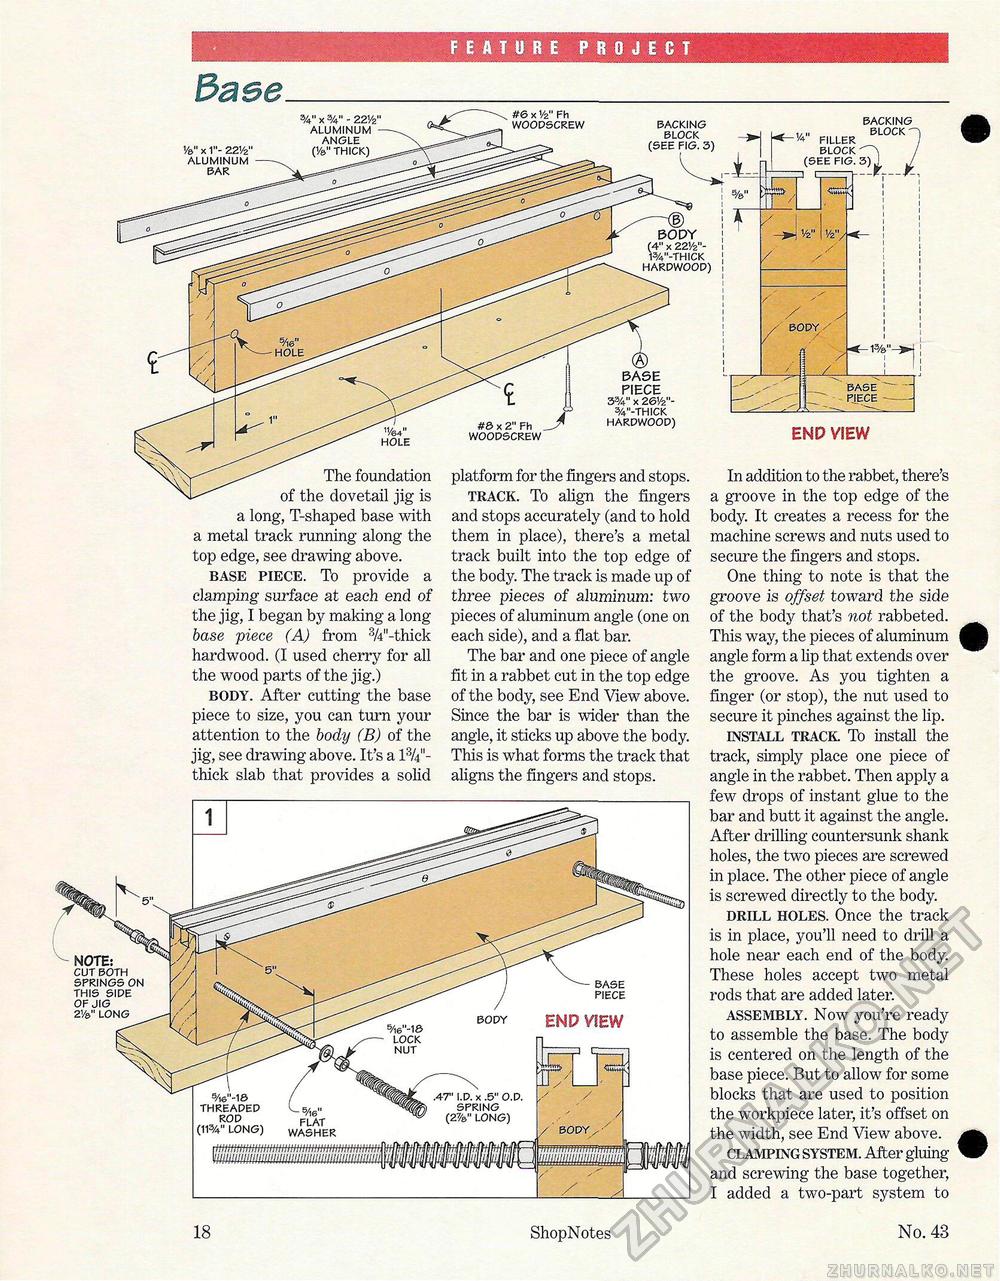
FEATURE PROJECT Base Ve>" x 1"- 221/2" aluminum bar %" x W - 221/21 aluminum angle (1/a" thick) backing block The foundation of the dovetail jig is a long, T-shapecl base with a metal track running along the top edge, see drawing above. base piece. To provide a clamping surface at each end of the jig, I began by making a long base piece (A) from 3/4"-thick hardwood. (I used cherry for all the wood parts of the jig.) body. After cutting the base piece to size, you can turn your attention to the body (B) of the jig, see drawing above. It's a 1%"-thick slab that provides a solid platform for the fingers and stops. track. To align the fingers and stops accurately (and to hold them in place), there's a metal track built into the top edge of the body. The track is made up of three pieces of aluminum: two pieces of aluminum angle (one on each side), and a flat bar. The bar and one piece of angle fit in a rabbet cut in the top edge of the body, see End View above. Since the bar is wider than the angle, it sticks up above the body. This is what forms the track that aligns the fingers and stops. BHD VIEW In addition to the rabbet, there's a groove in the top edge of the body. It creates a recess for the machine screws and nuts used to secure the fingers and stops. One thing to note is that the groove is offset toward the side of the body that's not rabbeted. This way, the pieces of aluminum angle form a lip that extends over the groove. As you tighten a finger (or stop), the nut used to secure it pinches against the lip. install track To install the track, simply place one piece of angle in the rabbet. Then apply a few drops of instant glue to the bar and butt it against the angle. After drilling countersunk shank holes, the two pieces are screwed in place. The other piece of angle is screwed directly to the body. drill holes. Once the track is in place, you'll need to drill a hole near each end of the body. These holes accept two metal rods that are added later. assembly. Now you're ready to assemble the base. The body is centered on the length of the base piece. But to allow for some blocks that are used to position the workpiece later, it's offset on the width, see End View above. clamping system. After gluing and screwing the base together, I added a two-part system to 18 ShopNotes xj No. 43 |


