43 - Build Your Own Dovetail Jig, страница 23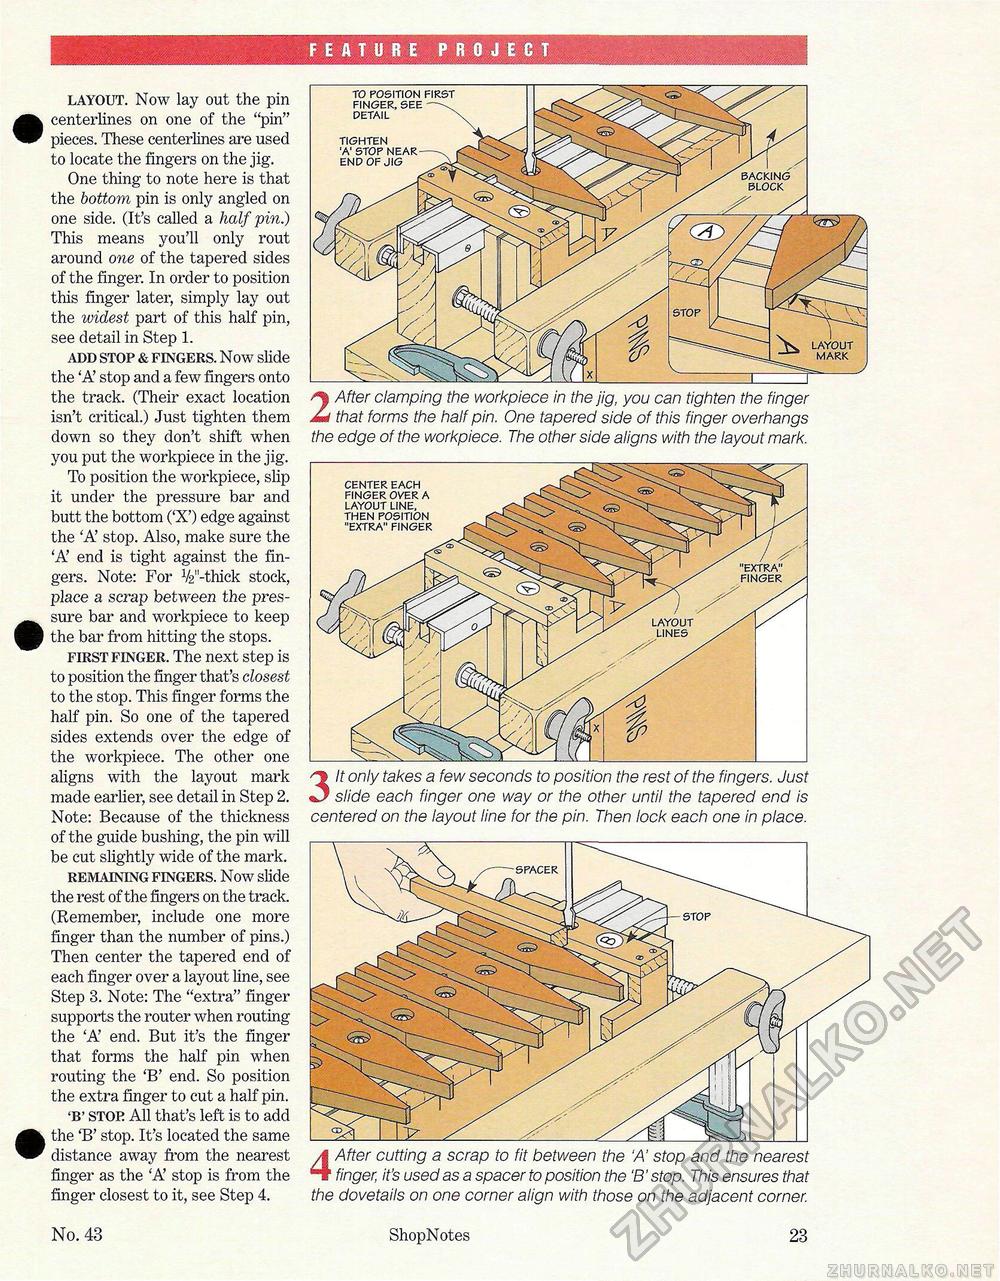
FEATURE PROJECT LAYOUT. Now lay out the pin • centerlines on one of the "pin" pieces. These centerlines are used to locate the fingers on the jig. One thing to note here is that the bottom pin is only angled on one side. (It's called a half pin.) This means you'll only rout around one of the tapered sides of the finger. In order to position this finger later, simply lay out the ividest part of this half pin, see detail in Step 1. add stop & fingers. Now slide the 'A' stop and a few fingers onto the track. (Their exact location isn't critical.) Just tighten them down so they don't shift when you put the workpiece in the jig. To position the workpiece, slip it under the pressure bar and butt the bottom ('X') edge against the 'A' stop. Also, make sure the 'A' end is tight against the fingers. Note: For V2"-thick stock, place a scrap between the pres- • sure bar and workpiece to keep the bar from hitting the stops. first finger. The next step is to position the finger that's closest to the stop. This finger forms the half pin. So one of the tapered sides extends over the edge of the workpiece. The other one aligns with the layout mark made earlier, see detail in Step 2. Note: Because of the thickness of the guide bushing, the pin will be cut slightly wide of the mark. remaining fingers. Now slide the rest of the fingers on the track. (Remember, include one more finger than the number of pins.) Then center the tapered end of each finger over a layout line, see Step 3. Note: The "extra" finger supports the router when routing the 'A' end. But it's the finger that forms the half pin when routing the 'B' end. So position the extra finger to cut a half pin. 'b' stop All that's left is to add ^^ the 'B' stop. It's located the same ^^ distance away from the nearest finger as the 'A' stop is from the finger closest to it, see Step 4. No. 43 2 After clamping the workpiece in the jig, you can tighten the finger that forms the half pin. One tapered side of this finger overhangs the edge of the workpiece. The other side aligns with the layout mark. 3 It only takes a few seconds to position the rest of the fingers. Just slide each finger one way or the other until the tapered end is centered on the layout line for the pin. Then lock each one in place. 4 After cutting a scrap to fit between the A' stop and the nearest finger, it's used as a spacer to position the 'B' stop. This ensures that the dovetails on one corner align with those on the adjacent corner. ShopNotes 23 TO POSITION FIRST FINGER, SEE DETAIL TIGHTEN 'A' STOP NEAR END OF JIG BACKING BLOCK CENTER EACH FINGER OVER A LAYOUT LINE, THEN POSITION "EXTRA" FINGER |


