43 - Build Your Own Dovetail Jig, страница 24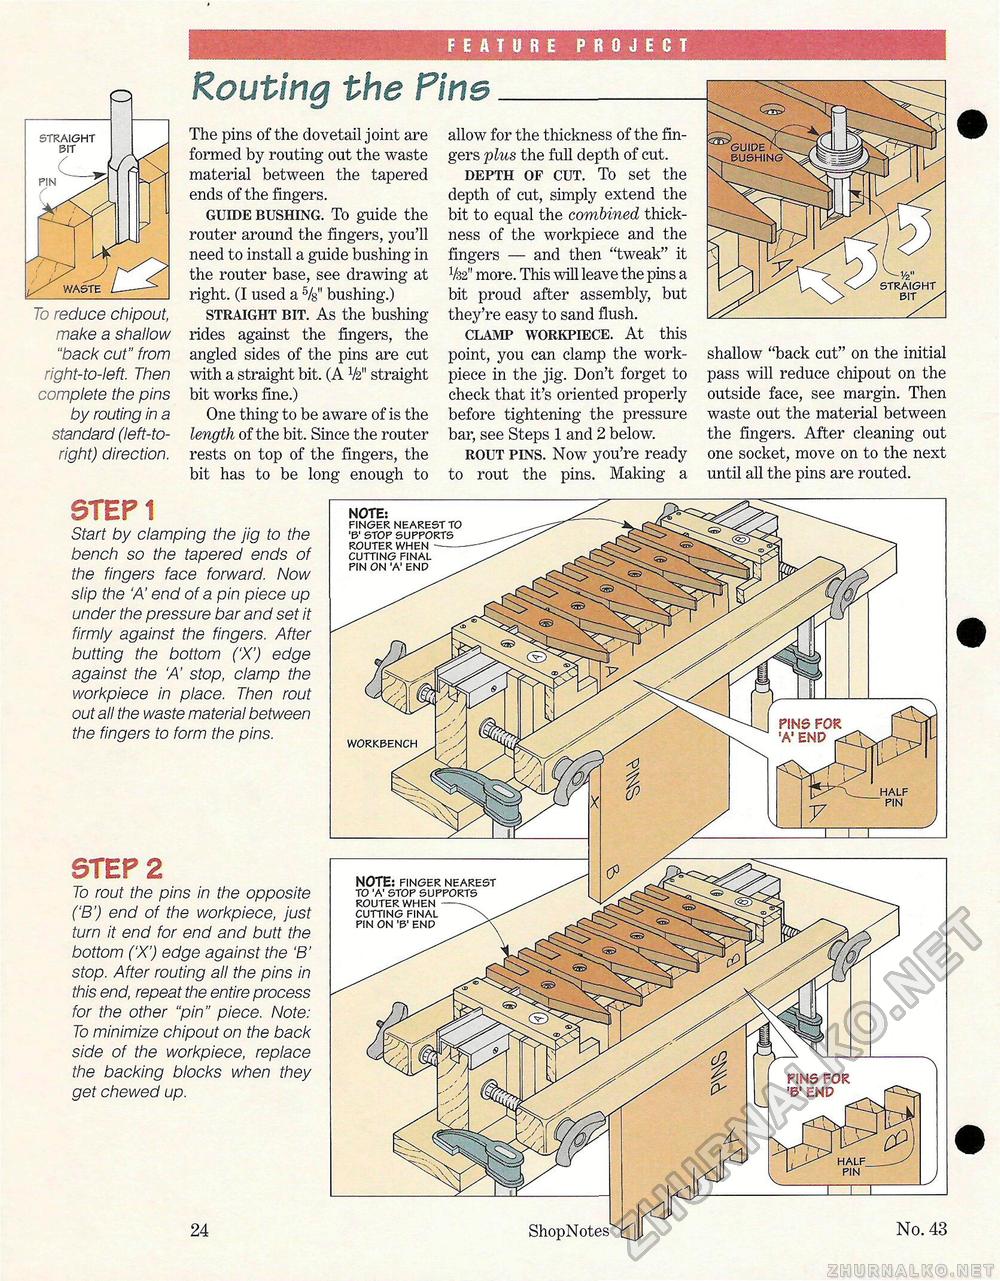
FEATURE PROJECT Routing the Pine To reduce chipout, make a shallow "back cut" from right-to-left. Then complete the pins by routing in a standard (left-to-right) direction. The pins of the dovetail joint are formed by routing out the waste material between the tapered ends of the fingers. guide bushing. To guide the router around the fingers, you'll need to install a guide bushing in the router base, see drawing at right. (I used a 5/8" bushing.) straight bit. As the bushing rides against the fingers, the angled sides of the pins are cut with a straight bit. (A V211 straight bit works fine.) One thing to be aware of is the length of the bit. Since the router rests on top of the fingers, the bit has to be long enough to STEP 1 Start by clamping the jig to the bench so the tapered ends of the fingers face forward. Now slip the A' end of a pin piece up under the pressure bar and set it firmly against the fingers. After butting the bottom ('X') edge against the 'A stop, clamp the workpiece in place. Then rout out all the waste material between the fingers to form the pins. allow for the thickness of the fingers plus the full depth of cut. depth of cut. To set the depth of cut, simply extend the bit to equal the combined thickness of the workpiece and the fingers — and then "tweak" it V32" more. This will leave the pins a bit proud after assembly, but they're easy to sand flush. clamp workpiece. At this point, you can clamp the work-piece in the jig. Don't forget to check that it's oriented properly before tightening the pressure bar, see Steps 1 and 2 below. rout pins. Now you're ready to rout the pins. Making a shallow "back cut" on the initial pass will reduce chipout on the outside face, see margin. Then waste out the material between the fingers. After cleaning out one socket, move on to the next until all the pins are routed. STEP 2 To rout the pins in the opposite ('B') end of the workpiece, just turn it end for end and butt the bottom ('X') edge against the B' stop. After routing all the pins in this end, repeat the entire process for the other "pin" piece. Note: To minimize chipout on the back side of the workpiece, replace the backing blocks when they get chewed up. 24 ^GUIDE V2" STRAIGHT BIT / ShopNotes xj NOTE: FINGER NEAREST TO 'A' STOP SUPPORTS ROUTER WHEN CUTTING FINAL PIN ON '3' END NOTE: FINGER NEAREST TO '& STOP SUPPORTS ROUTER WHEN CUTTING FINAL PIN ON 'A' END HALF y No. 43 WORKBENCH pme for '3' END |


