43 - Build Your Own Dovetail Jig, страница 25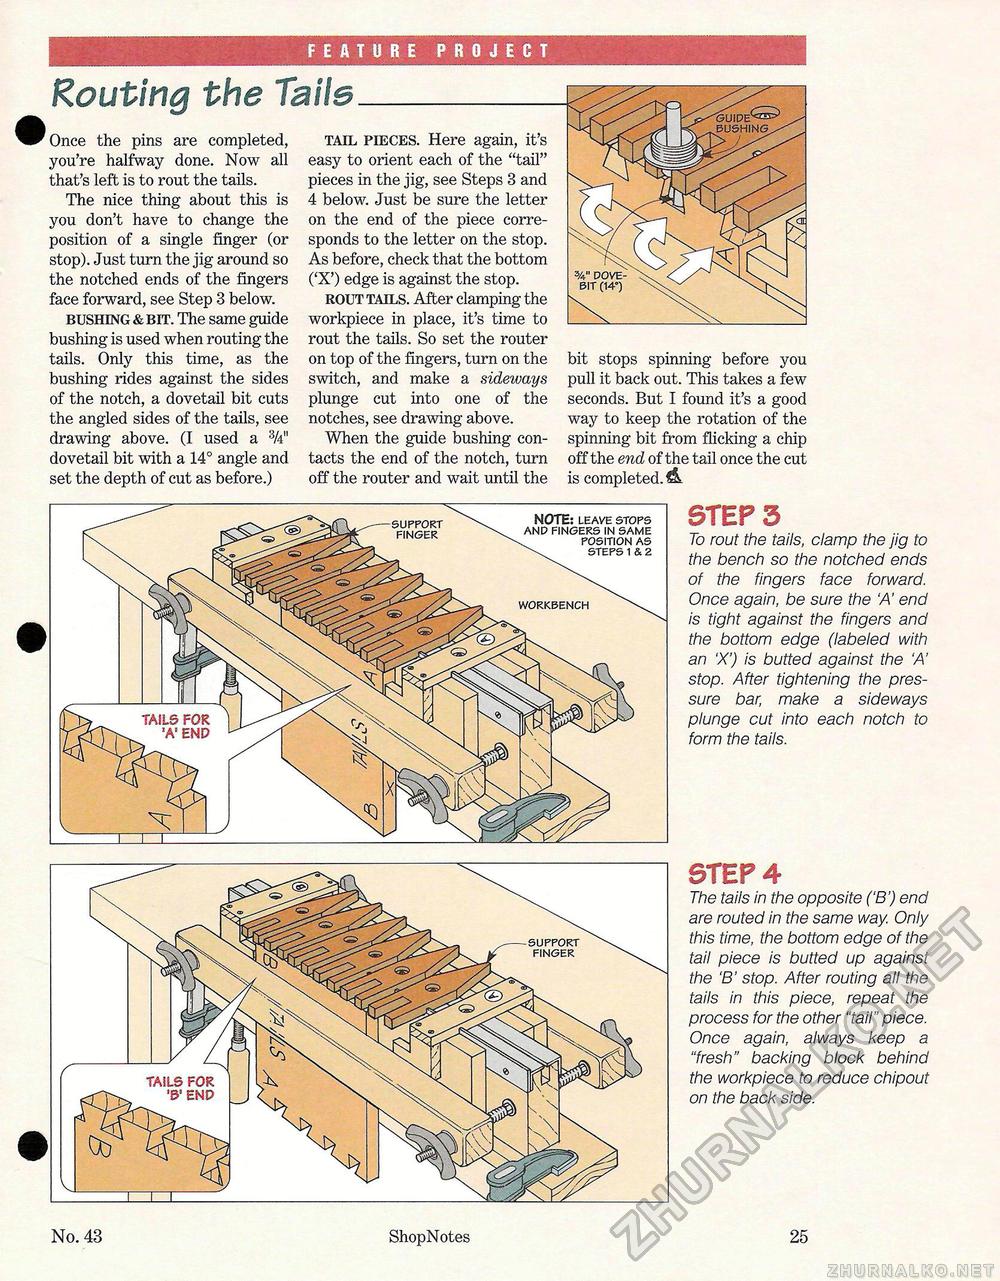
FEATURE PROJECT Routing the Tails Once the pins are completed, you're halfway done. Now all that's left is to rout the tails. The nice thing about this is you don't have to change the position of a single finger (or stop). Just turn the jig around so the notched ends of the fingers face forward, see Step 3 below. BUSHING & BIT. The same guide bushing is used when routing the tails. Only this time, as the bushing rides against the sides of the notch, a dovetail bit cuts the angled sides of the tails, see drawing above. (I used a dovetail bit with a 14° angle and set the depth of cut as before.) TAIL PIECES. Here again, it's easy to orient each of the "tail" pieces in the jig, see Steps 3 and 4 below. Just be sure the letter on the end of the piece corresponds to the letter on the stop. As before, check that the bottom ('X') edge is against the stop. ROUT TAILS. After clamping the workpiece in place, it's time to rout the tails. So set the router on top of the fingers, turn on the switch, and make a sideways plunge cut into one of the notches, see drawing above. When the guide bushing contacts the end of the notch, turn off the router and wait until the bit stops spinning before you pull it back out. This takes a few seconds. But I found it's a good way to keep the rotation of the spinning bit from flicking a chip off the end of the tail once the cut is completed. NOTE: LEAVE STOPS AND FINGERS IN SAME POSITION AS STEPS 1 & 2 SUPPORT FINGER WORKBENCH tails for 'a' end STEP 3 To rout the tails, clamp the jig to the bench so the notched ends of the fingers face forward. Once again, be sure the 'A' end is tight against the fingers and the bottom edge (labeled with an 'X') is butted against the 'A' stop. After tightening the pressure bar, make a sideways plunge cut into each notch to form the tails. SUPPORT FINGER tails for end STEP 4 The tails in the opposite ('B') end are routed in the same way. Only this time, the bottom edge of the tail piece is butted up against the 'B' stop. After routing all the tails in this piece, repeat the process for the other "tail" piece. Once again, always keep a "fresh" backing block behind the workpiece to reduce chipout on the back side. No. 43 ShopNotes 25 |


