43 - Build Your Own Dovetail Jig, страница 22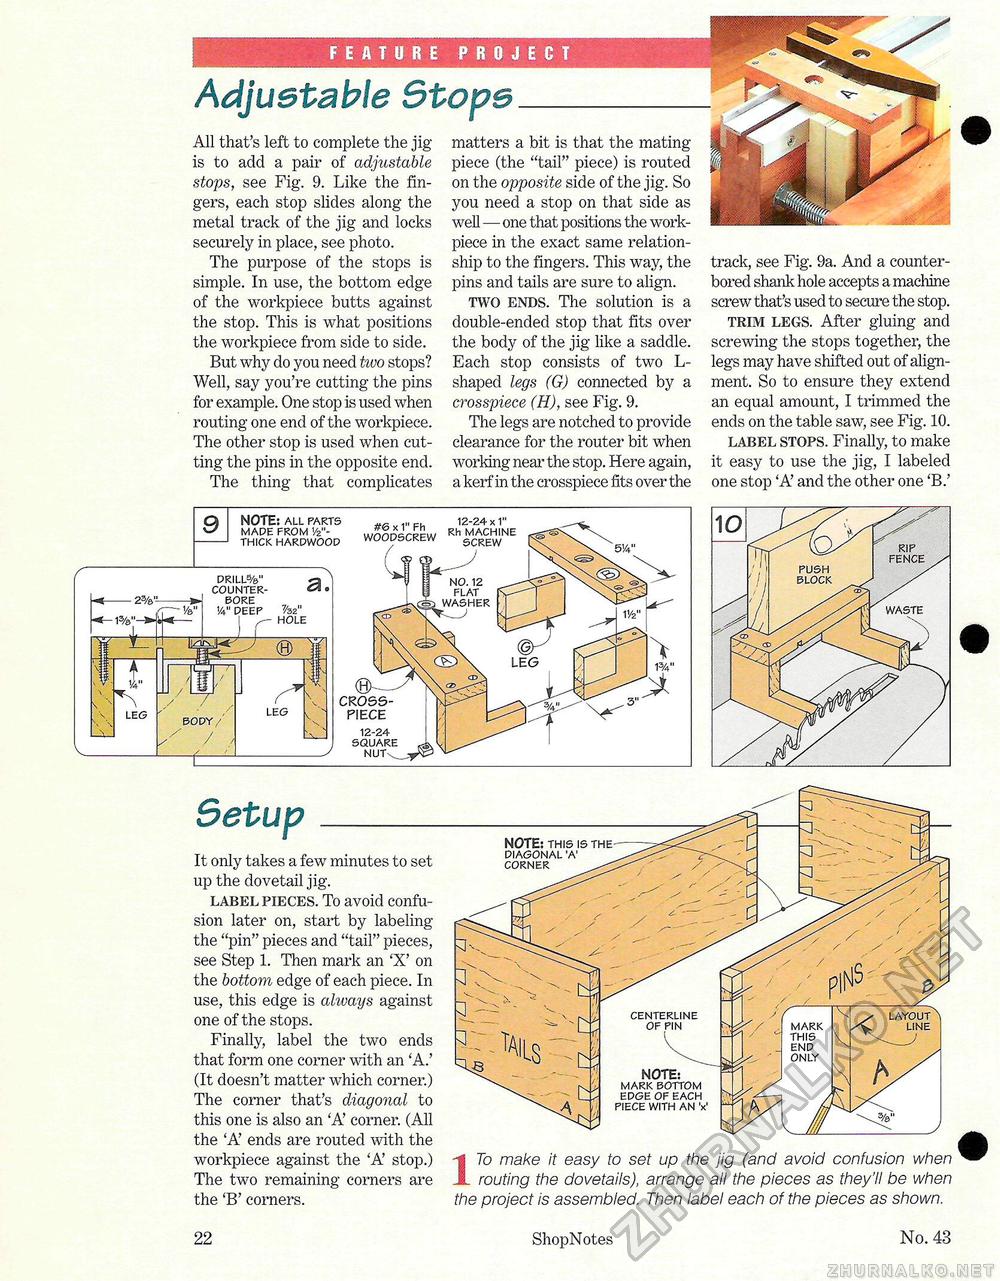
FEATURE PROJECT Adjustable Stops All that's left to complete the jig-is to add a pair of adjustable stops, see Fig. 9. Like the fingers, each stop slides along the metal track of the jig and locks securely in place, see photo. The purpose of the stops is simple. In use, the bottom edge of the workpiece butts against the stop. This is what positions the workpiece from side to side. But why do you need two stops? Well, say you're cutting the pins for example. One stop is used when routing one end of the workpiece. The other stop is used when cutting the pins in the opposite end. The thing that complicates matters a bit is that the mating piece (the "tail" piece) is routed on the opposite side of the jig. So you need a stop on that side as well — one that positions the work-piece in the exact same relationship to the fingers. This way, the pins and tails are sure to align. two ends. The solution is a double-ended stop that fits over the body of the jig like a saddle. Each stop consists of two reshaped legs (G) connected by a crosspiece (H), see Fig. 9. The legs are notched to provide clearance for the router bit when working near the stop. Here again, a kerf in the crosspiece fits over the track, see Fig. 9a. And a counter-bored shank hole accepts a machine screw that's used to secure the stop. trim legs. After gluing and screwing the stops together, the legs may have shifted out of alignment. So to ensure they extend an equal amount, I trimmed the ends on the table saw, see Fig. 10. label stops. Finally, to make it easy to use the jig, I labeled one stop 'A' and the other one 'B.' SetupIt only takes a few minutes to set up the dovetail jig. label pieces. To avoid confusion later on, start by labeling the "pin" pieces and "tail" pieces, see Step 1. Then mark an 'X' on the bottom edge of each piece. In use, this edge is always against one of the stops. Finally, label the two ends that form one corner with an 'A.' (It doesn't matter which corner.) The corner that's diagonal to this one is also an 'A' corner. (All the 'A' ends are routed with the workpiece against the 'A' stop.) The two remaining corners are the 'B' corners. NOTE: this is the diagonal 'a' corner 17o make it easy to set up the jig (and avoid confusion when routing the dovetails), arrange all the pieces as they'll be when the project is assembled. Then label each of the pieces as shown. drill5/©" <s counter- «° bore deep %2" hole body, 9 NOTE: all parts made from 1/2"-thick hardwood #6 x 1" Fh woodscrew 12-24 x 1" rh machine firt>c«/ 22 ShopNotes xj No. 43 |


