50 - Table Saw Workstation, страница 10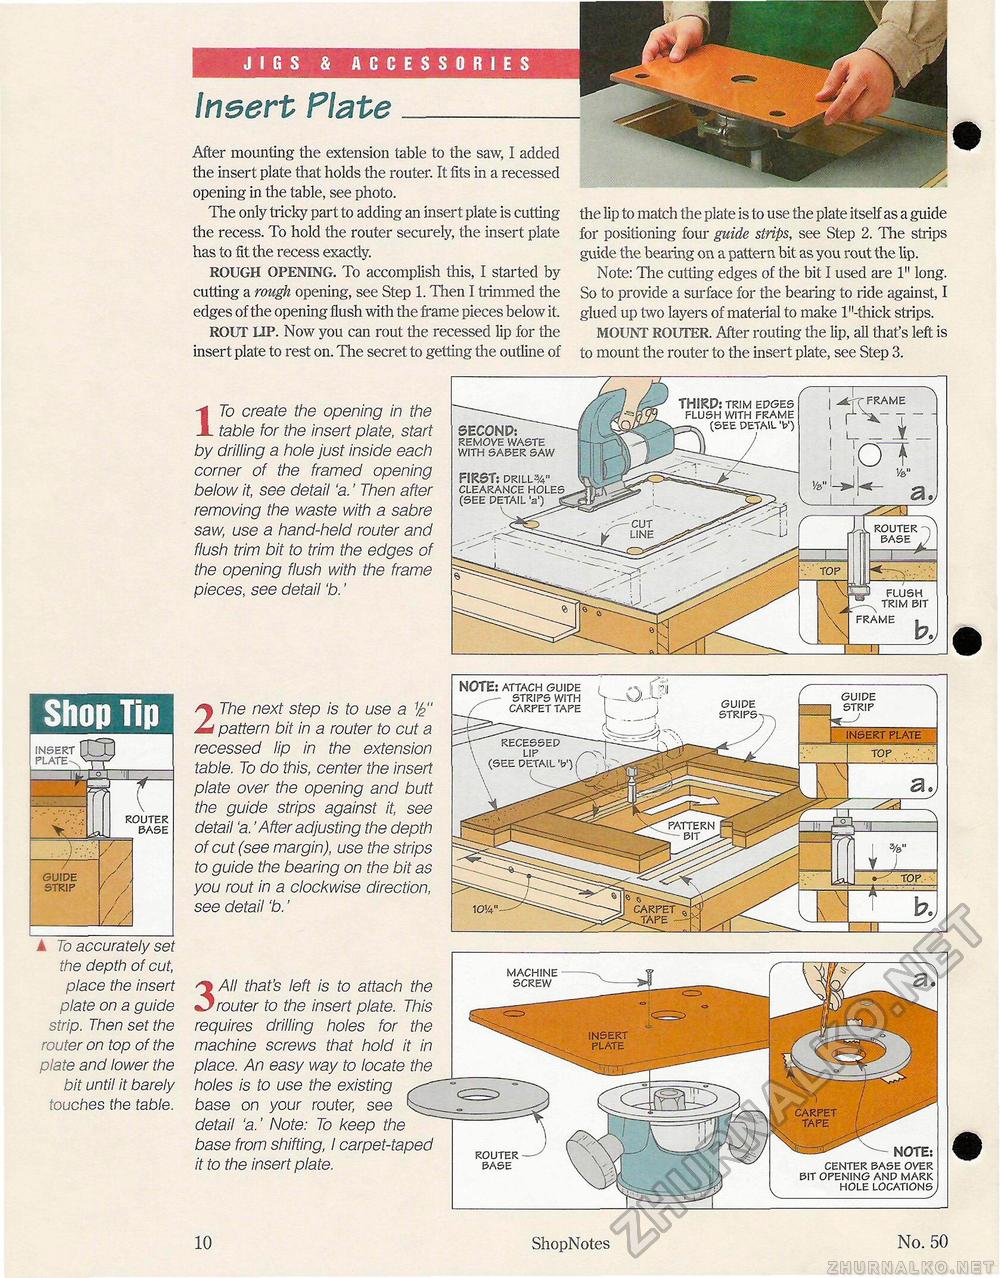
JIGS & ACCESSORIES Insert Flate After mounting the extension table to the saw, I added the insert plate that holds the router. It fits in a recessed opening in the table, see photo. The only tricky part to adding an insert plate is cutting the recess. To hold the router securely, the insert plate has to fit the recess exactly. ROUGH OPENING. To accomplish this, I started by cutting a rough opening, see Step 1. Then I trimmed the edges of the opening flush with the frame pieces below it. ROUT LIP. Now you can rout the recessed lip for the insert plate to rest on. The secret to getting the outline of the lip to match the plate is to use the plate itself as a guide for positioning four guide strips, see Step 2. The strips guide the bearing on a pattern bit as you rout the lip. Note: The cutting edges of the bit I used are 1" long. So to provide a surface for the bearing to ride against, I glued up two layers of material to make 1 "-thick strips. MOUNT ROUTER. After routing the lip, all that's left is to mount the router to the insert plate, see Step 3. 17o create the opening in the table for the insert plate, start by drilling a hole just inside each corner of the framed opening below it, see detail 'a.' Then after removing the waste with a sabre saw, use a hand-held router and flush trim bit to trim the edges of the opening flush with the frame pieces, see detail 'b.' SECOND: REMOVE WASTE WITH SABER SAW FIRST: DRILL3/4" CLEARANCE HOLES (SEE DETAIL 'a') THIRD: TRIM EDGES FLUSH WITH FRAME (SEE DETAIL V) FRAME
▲ To accurately set the depth of cut, place the insert plate on a guide strip. Then set the router on top of the plate and lower the bit until it barely touches the table. 2 The next step is to use a V2" pattern bit in a router to cut a recessed lip in the extension table. To do this, center the insert plate over the opening and butt the guide strips against it, see detail 'a.'After adjusting the depth of cut (see margin), use the strips to guide the bearing on the bit as you rout in a clockwise direction, see detail 'b.' 3 All that's left is to attach the router to the insert plate. This requires drilling holes for the machine screws that hold it in place. An easy way to locate the holes is to use the existing base on your router, see detail 'a.' Note: To keep the base from shifting, I carpet-taped it to the insert plate. NOTE: ATTACH GUIDE ■ STRIPS WITH /' CARPET TAPE
10 ShopNotes No. 50 |
||||||||||||||||||||||||||||


