50 - Table Saw Workstation, страница 13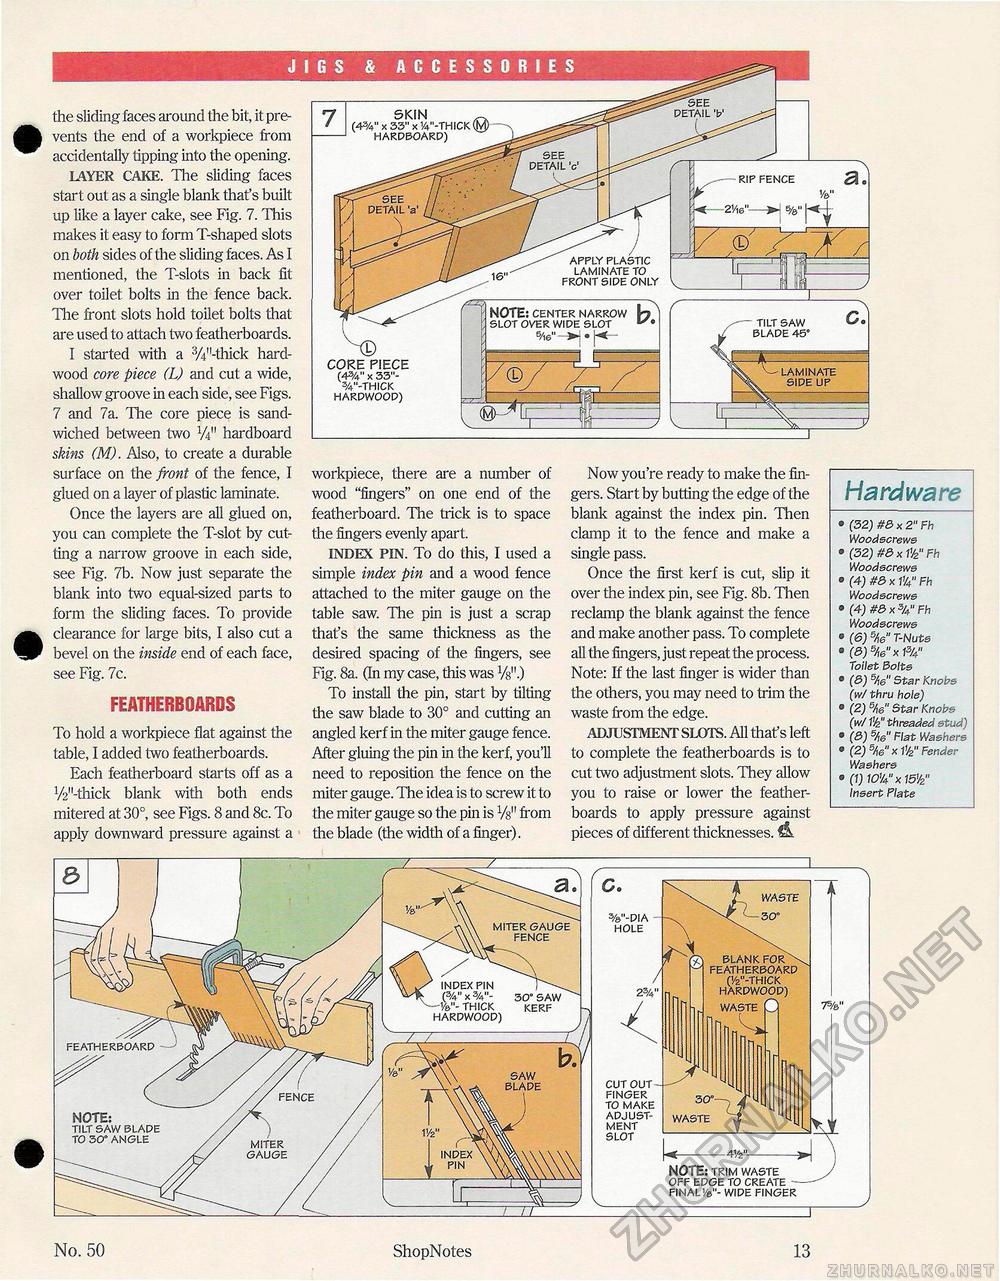
' SEE DETAIL V SEE DETAIL •c' SEE DETAIL 'a' Hardware • (32) #8 x 2" Fh lYoodscreivs • (32) x t^" Fh IVoo^scretvs 0 (4) #8 x IV Fh Woodscrews • (4) #8x3/4" Fh Woodscrews s (6) 5/ie" T-Nuts 8 (3) 5/i6" x 13/4" Toilet Bolts • Star Knobs (w/ thru hole) ° (2) 5/,6" Star Knobs (w/ W threaded stud) • (8) 5/w" Flat Washers • (2) 5/w" x 11/2" Fender Washers • (1) 10%" x 15V2" Insert Plate CESSORIES FEATHERBOARDS To hold a workpiece flat against the table, I added two featherboards. Each featherboard starts off as a V21'-thick blank with both ends mitered at 30°, see Figs. 8 and 8c. To apply downward pressure against a workpiece, there are a number of wood "fingers" on one end of the featherboard. The trick is to space the fingers evenly apart. INDEX PIN. To do this, I used a simple index pin and a wood fence attached to the miter gauge on the table saw. The pin is just a scrap that's the same thickness as the desired spacing of the fingers, see Fig. 8a. (In my case, this was Vs".) To install the pin, start by tilting the saw blade to 30° and cutting an angled kerf in the miter gauge fence. After gluing the pin in the kerf, you'll need to reposition the fence on the miter gauge. The idea is to screw it to the miter gauge so the pin is Vs" from the blade (the width of a finger). Now you're ready to make the fingers. Start by butting the edge of the blank against the index pin. Then clamp it to the fence and make a single pass. Once the first kerf is cut, slip it over the index pin, see Fig. 8b. Then reclamp the blank against the fence and make another pass. To complete all the fingers, just repeat the process. Note: If the last finger is wider than the others, you may need to trim the waste from the edge. ADJUSTMENT SLOTS. All that's left to complete the featherboards is to cut two adjustment slots. They allow you to raise or lower the featherboards to apply pressure against pieces of different thicknesses. NOTE: CENTER NARROW SLOT OVER WIDE SLOT S/16" the sliding faces around the bit, it prevents the end of a workpiece from accidentally tipping into the opening. LAYER CAKE. The sliding faces start out as a single blank that's built up like a layer cake, see Fig. 7. This makes it easy to form T-shaped slots on both sides of the sliding faces. As I mentioned, the T-slots in back fit over toilet bolts in the fence back. The front slots hold toilet bolts that are used to attach two featherboards. I started with a %"-thick hardwood core piece (L) and cut a wide, shallow groove in each side, see Figs. 7 and 7a. The core piece is sandwiched between two W hardboard skins (M). Also, to create a durable surface on the front of the fence, I glued on a layer of plastic laminate. Once the layers are all glued on, you can complete the T-slot by cutting a narrow groove in each side, see Fig. 7b. Now just separate the blank into two equal-sized parts to form the sliding faces. To provide clearance for large bits, I also cut a bevel on the inside end of each face, see Fig. 7c. Ne> CORE PIECE (4%" x 33"-W-THICK HARDWOOD) SKIN (4%" x 33" x 1/4"-THICK< HARDBOARD) APPLY PLASTIC LAMINATE TO FRONT SIDE ONLY k1 — RIP FENCE Y W —21/,6 3"- f1 J _ LAMINATE SIDE UP TILT SAW BLADE 45" WASTE %"-DIA HOLE MITER GAUGE FENCE BLANK FOR \ FEATHERBOARD (1/2"-THICK HARDWOOD) WASTE C INDEX PIN J\ (%" x %"- 30° SAW -'/»"- THICK KERF HARDWOOD) SAW BLADE CUT OUT -FINGER TO MAKE ADJUSTMENT SLOT NOTE: TILT SAW BLADE TO 30° ANGLE WASTE MITER GAUGE <-41/2"-; NOTE: TRIM WASTE OFF EDGE TO CREATE -FINAL 1/e"- WIDE FINGER INDEX PIN J No. 50 ShopNotes 13 |


