50 - Table Saw Workstation, страница 12
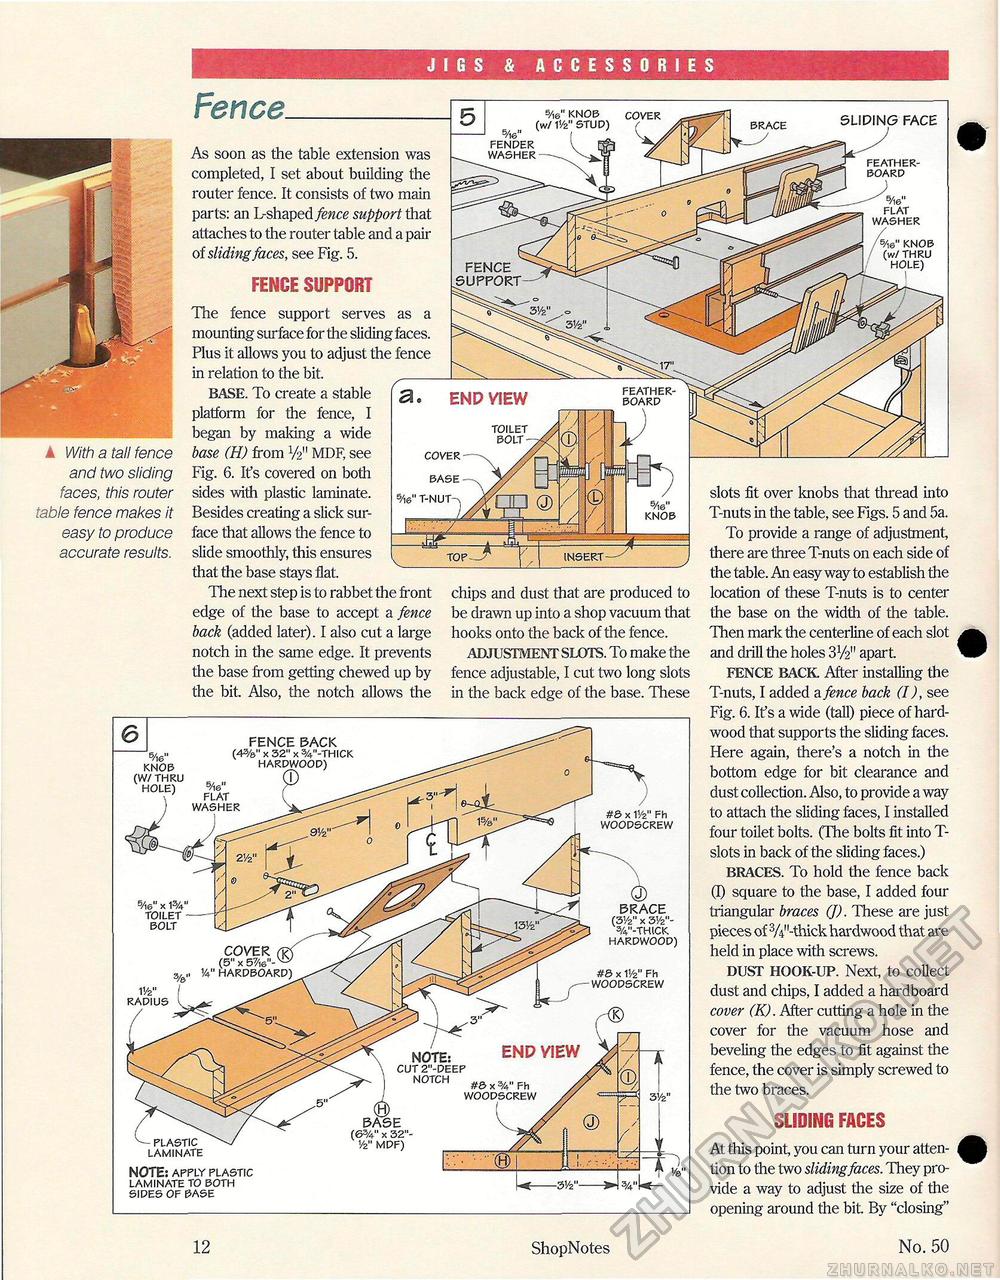
JIBS 4 ACCESSORIES Fence. k With a tall fence and two sliding faces, this router table fence makes it easy to produce accurate results. As soon as the table extension was completed, I set about building the router fence. It consists of two main parts: an L-shaped fence support that attaches to the router table and a pair of sliding faces, see Fig. 5. FENCE SUPPORT The fence support serves as a mounting surface for the sliding faces. Plus it allows you to adjust the fence in relation to the bit. BASE. To create a stable platform for the fence, I began by making a wide base (H) from V2" MDF, see Fig. 6. Ifs covered on both sides with plastic laminate. Besides creating a slick surface that allows the fence to slide smoothly, this ensures that the base stays flat. The next step is to rabbet the front edge of the base to accept a fence back (added later). I also cut a large notch in the same edge. It prevents the base from getting chewed up by the bit. Also, the notch allows the chips and dust that are produced to be drawn up into a shop vacuum that hooks onto the back of the fence. ADJUSTMENT SLOTS. To make the fence adjustable, I cut two long slots in the back edge of the base. These S/l6" KNOB (W/THRU HOLE) 5/ie" \ ' FLAT ' IAMC5HPP FENCE BACK (4%" x 32" x V-THICK HARDWOOD) 9> PLASTIC LAMINATE NOTE: APPLY PLASTIC LAMINATE TO BOTH SIDES OF BASE slots fit over knobs that thread into T-nuts in the table, see Figs. 5 and 5a. To provide a range of adjustment, there are three T-nuts on each side of the table. An easy way to establish the location of these T-nuts is to center the base on the width of the table. Then mark the centerline of each slot and drill the holes 3V2" apart FENCE BACK After installing the T-nuts, I added a fence back (I), see Fig. 6. It's a wide (tall) piece of hardwood that supports the sliding faces. Here again, there's a notch in the bottom edge for bit clearance and dust collection. Also, to provide a way to attach the sliding faces, I installed four toilet bolts. (The bolts fit into T-slots in back of the sliding faces.) BRACES. To hold the fence back (I) square to the base, I added four triangular braces (J). These are just pieces of 3/4"-thick hardwood that are held in place with screws. DUST HOOK-UP. Next, to collect dust and chips, I added a hardboard cover (K). After cutting a hole in the cover for the vacuum hose and beveling the edges to fit against the fence, the cover is simply screwed to the two braces. SLIDING FACES At this point you can turn your attention to the two sliding faces. They provide a way to adjust the size of the opening around the bit. By "closing" 12 ShopNotes No. 50 |


