50 - Table Saw Workstation, страница 15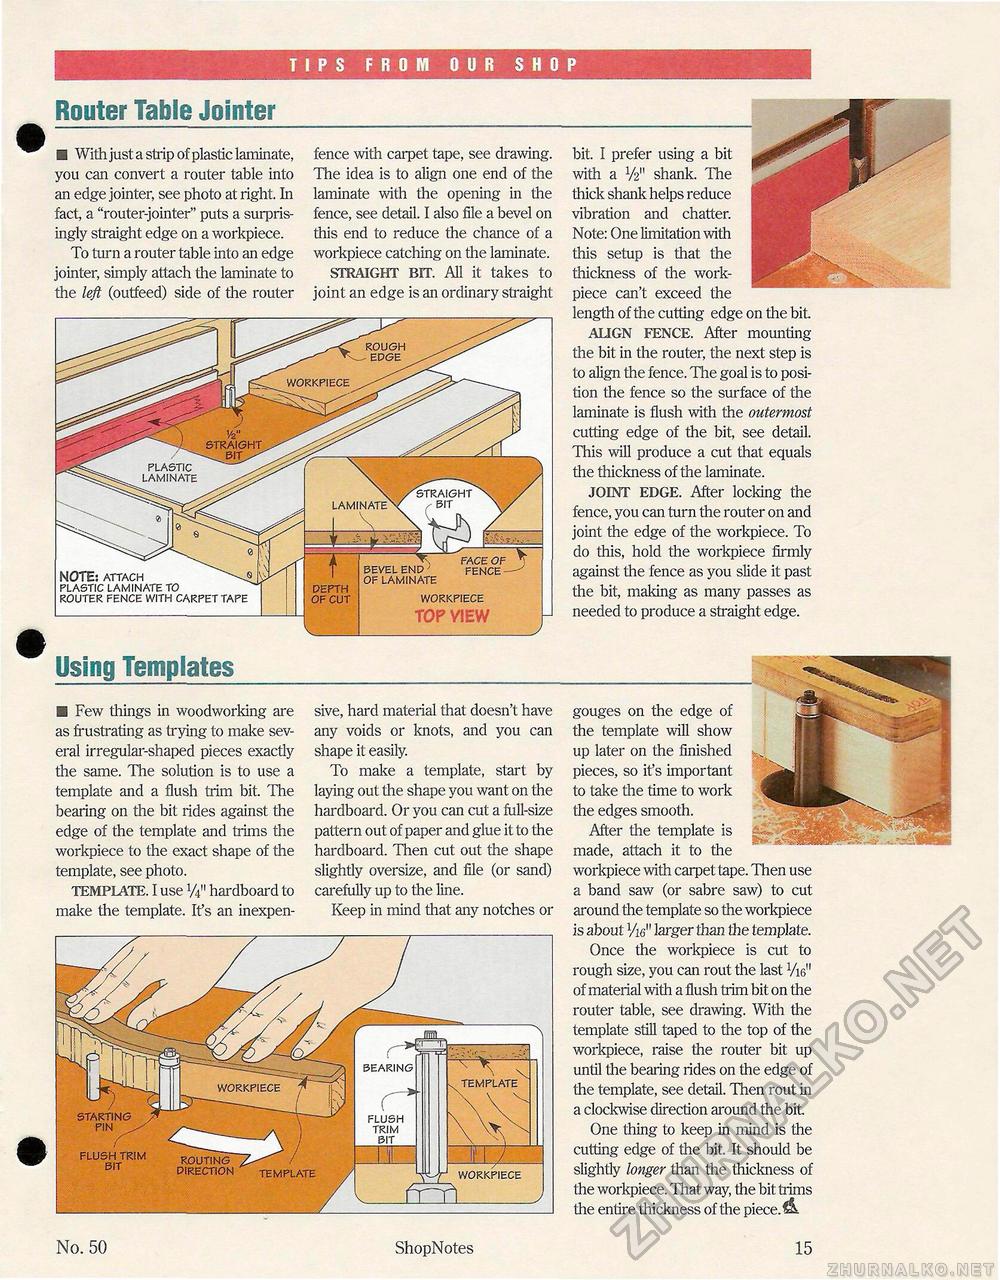
TIPS FROM OUR SHOP Router Table Jointer■ With just a strip of plastic laminate, you can convert a router table into an edge jointer, see photo at right. In fact, a "router-jointer" puts a surprisingly straight edge on a workpiece. To turn a router table into an edge jointer, simply attach the laminate to the left (outfeed) side of the router fence with carpet tape, see drawing. The idea is to align one end of the laminate with the opening in the fence, see detail. I also file a bevel on this end to reduce the chance of a workpiece catching on the laminate. STRAIGHT BIT. All it takes to joint an edge is an ordinary straight NOTE: attach plastic laminate to router fence with carpet tape Using Templatesbit. I prefer using a bit with a y2n shank. The thick shank helps reduce vibration and chatter. Note: One limitation with this setup is that the thickness of the work-piece can't exceed the length of the cutting edge on the bit ALIGN FENCE. After mounting the bit in the router, the next step is to align the fence. The goal is to position the fence so the surface of the laminate is flush with the outermost cutting edge of the bit, see detail. This will produce a cut that equals the thickness of the laminate. JOINT EDGE. After locking the fence, you can turn the router on and joint the edge of the workpiece. To do this, hold the workpiece firmly against the fence as you slide it past the bit, making as many passes as needed to produce a straight edge. S3 Few things in woodworking are as frustrating as trying to make several irregular-shaped pieces exactly the same. The solution is to use a template and a flush trim bit. The bearing on the bit rides against the edge of the template and trims the workpiece to the exact shape of the template, see photo. TEMPLATE. I use lA" hardboard to make the template. It's an inexpen sive, hard material that doesn't have any voids or knots, and you can shape it easily. To make a template, start by laying out the shape you want on the hardboard. Or you can cut a fall-size pattern out of paper and glue it to the hardboard. Then cut out the shape slightly oversize, and file (or sand) carefully up to the line. Keep in mind that any notches or template /f^ workpiece frr\_ gouges on the edge of the template will show up later on the finished pieces, so it's important to take the time to work the edges smooth. After the template is made, attach it to the workpiece with carpet tape. Then use a band saw (or sabre saw) to cut around the template so the workpiece is about Vie" larger than the template. Once the workpiece is cut to rough size, you can rout the last VW1 of material with a flush trim bit on the router table, see drawing. With the template still taped to the top of the workpiece, raise the router bit up until the bearing rides on the edge of the template, see detail. Then rout in a clockwise direction around the bit One thing to keep in mind is the cutting edge of the bit. It should be slightly longer than the thickness of the workpiece. That way, the bit trims the entire thickness of the piece. No. 50 ShopNotes 15 |


