50 - Table Saw Workstation, страница 18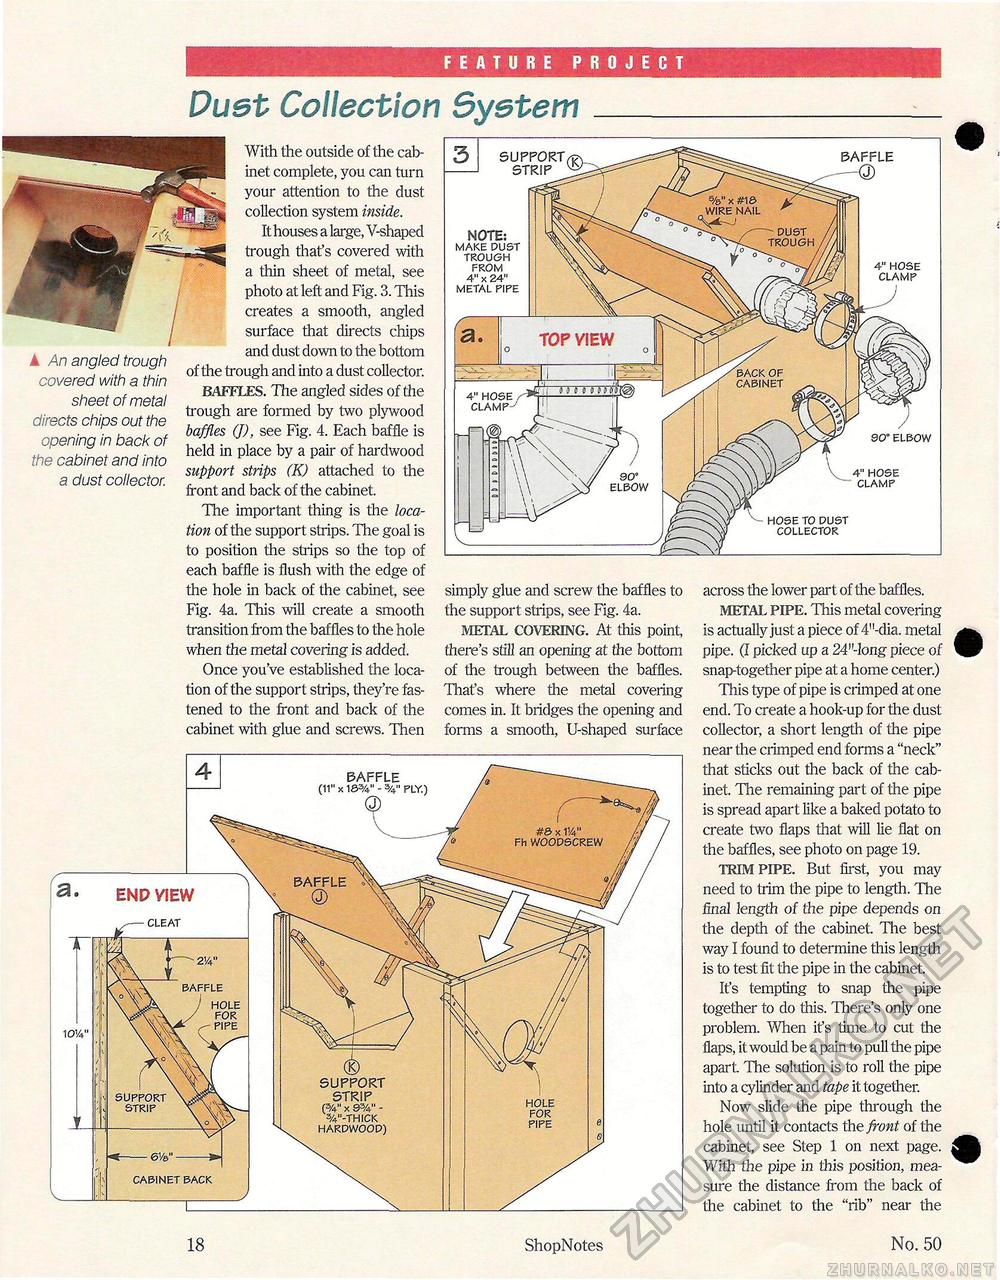
FEATURE PROJECT Dust Collection SystemWith the outside of the cab-gSgSSi inet complete, you can turn your attention to the dust ffl ill collection system inside. It houses a large, V-shaped -^TB* trough that's covered with a thin sheet of metal, see photo at left and Fig. 3. This creates a smooth, angled surface that directs chips and dust down to the bottom of the trough and into a dust collector. BAFFLES. The angled sides of the trough are formed by two plywood baffles (J), see Fig. 4. Each baffle is held in place by a pair of hardwood support strips (K) attached to the front and back of the cabinet. The important thing is the location of the support strips. The goal is to position the ships so the top of each baffle is flush with the edge of the hole in back of the cabinet, see Fig. 4a. This will create a smooth transition from the baffles to the hole when the metal covering is added. Once you've established the location of the support strips, they're fastened to the front and back of the cabinet with glue and screws. Then ▲ An angled trough covered with a thin sheet of metal directs chips out the opening in back of the cabinet and into a dust collector. across the lower part of the baffles. METAL PIPE. This metal covering is actually just a piece of 4"-dia. metal pipe. (I picked up a 24"-long piece of snap-together pipe at a home center.) This type of pipe is crimped at one end. To create a hook-up for the dust collector, a short length of the pipe near the crimped end forms a "neck" that sticks out the back of the cabinet. The remaining part of the pipe is spread apart like a baked potato to create two flaps that will lie flat on the baffles, see photo on page 19. TRIM PIPE. But first, you may need to trim the pipe to length. The final length of the pipe depends on the depth of the cabinet. The best way I found to determine this length is to test fit the pipe in the cabinet. It's tempting to snap the pipe together to do this. There's only one problem. When it's time to cut the flaps, it would be a pain to pull the pipe apart The solution is to roll the pipe into a cylinder and tape it together. Now slide the pipe through the hole until it contacts the front of the cabinet, see Step 1 on next page. With the pipe in this position, measure the distance from the back of the cabinet to the "rib" near the simply glue and screw the baffles to the support strips, see Fig. 4a. METAL COVERING. At this point, there's still an opening at the bottom of the trough between the baffles. That's where the metal covering comes in. It bridges the opening and forms a smooth, U-shaped surface #8> x VA" Fh WOODSCREW CLEAT HOLE FOR PIPE SUPPORT STRIP (%" x 93A" -3/4"-THICK HARDWOOD) SUPPORT STRIP HOLE FOR PIPE CABINET BACK 4" HOSE CLAMP 90° ELBOW 4" HOSE CLAMP HOSE TO DUST COLLECTOR TOP VIEW 5 SUPPORT STRIP NOTE: MAKE DUST TROUGH FROM 4" x 24" METAL PIPE 18 ShopNotes No. 50 |


