50 - Table Saw Workstation, страница 19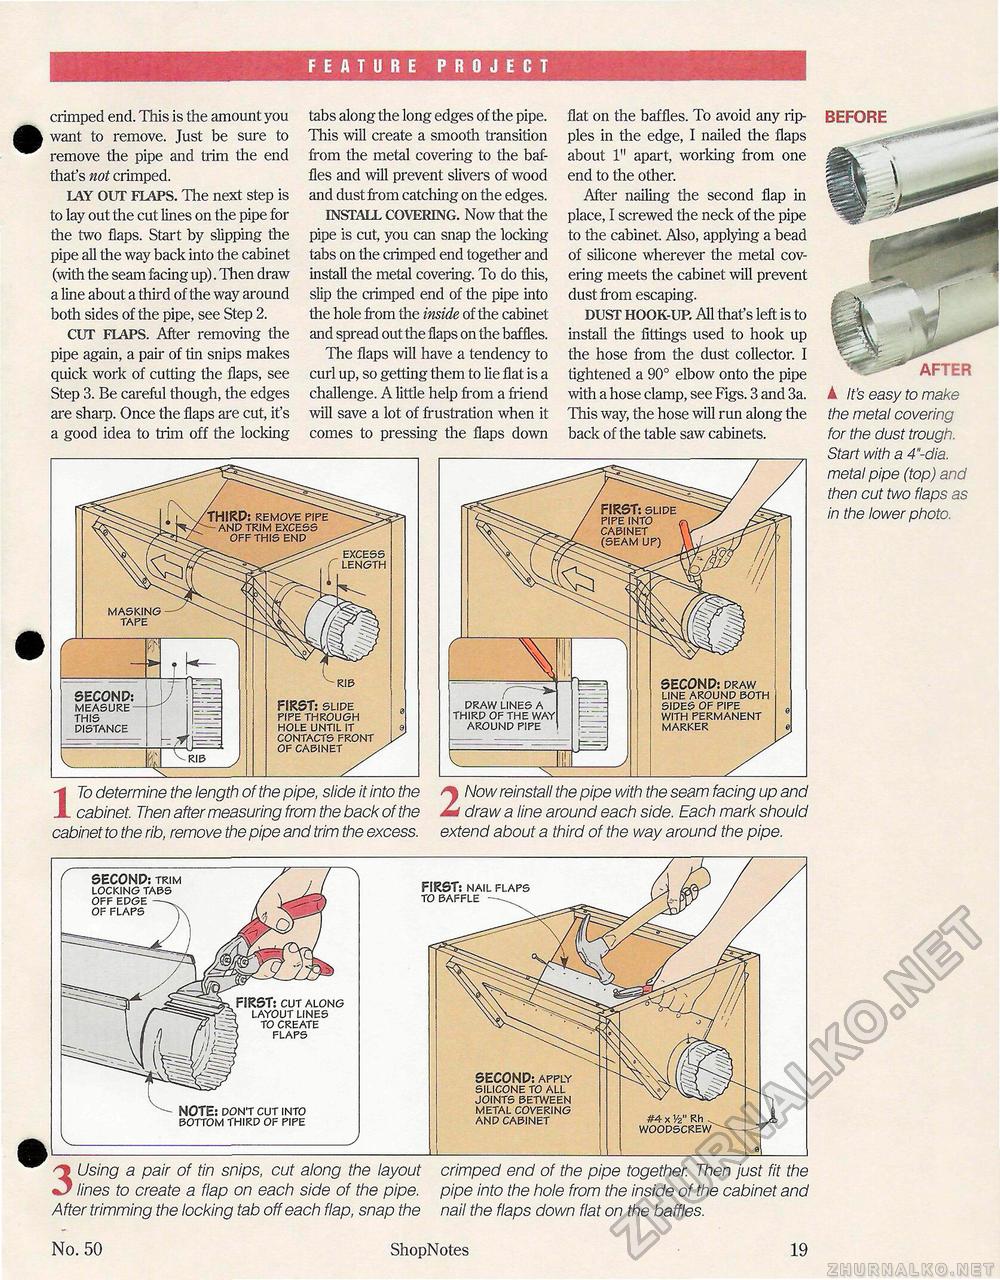
FEATURE PROJECT crimped end. This is the amount you ^^ want to remove. Just be sure to ^^ remove the pipe and trim the end that's not crimped. LAY OUT FLAPS. The next step is to lay out the cut lines on the pipe for the two flaps. Start by slipping the pipe all the way back into the cabinet (with the seam facing up). Then draw a line about a third of the way around both sides of the pipe, see Step 2. CUT FLAPS. After removing the pipe again, a pair of tin snips makes quick work of cutting the flaps, see Step 3. Be careful though, the edges are sharp. Once the flaps are cut, it's a good idea to trim off the locking tabs along the long edges of the pipe. This will create a smooth transition from the metal covering to the baffles and will prevent slivers of wood and dust from catching on the edges. INSTALL COVERING. Now that the pipe is cut, you can snap the locking tabs on the crimped end together and install the metal covering. To do this, slip the crimped end of the pipe into the hole from the inside of the cabinet and spread out the flaps on the baffles. The flaps will have a tendency to curl up, so getting them to lie flat is a challenge. A little help from a friend will save a lot of frustration when it comes to pressing the flaps down flat on the baffles. To avoid any ripples in the edge, I nailed the flaps about 1" apart, working from one end to the other. After nailing the second flap in place, I screwed the neck of the pipe to the cabinet. Also, applying a bead of silicone wherever the metal covering meets the cabinet will prevent dust from escaping. DUST HOOK-UP. All that's left is to install the fittings used to hook up the hose from the dust collector. I tightened a 90° elbow onto the pipe with a hose clamp, see Figs. 3 and 3a. This way, the hose will run along the back of the table saw cabinets. ITo determine the length of the pipe, slide it into the Now reinstall the pipe with the seam facing up and cabinet. Then after measuring from the back of the Ad draw a line around each side. Each mark should cabinet to the rib, remove the pipe and trim the excess, extend about a third of the way around the pipe. k It's easy to make the metal covering for the dust trough. Start with a 4"-dia. metal pipe (top) and then cut two flaps as in the lower photo. SECONP: measure this distance masking tape excess f length FIRST: slide pipe through hole until it contacts front of cabinet SECONP: draw line around both sides of pipe with permanent marker draw lines a third of the around pipe NOTE: don't cut into bottom third of pipe 3 Using a pair of tin snips, cut along the layout lines to create a flap on each side of the pipe. After trimming the locking tab off each flap, snap the crimped end of the pipe together. Then just fit the pipe into the hole from the inside of the cabinet and nail the flaps down flat on the baffles. FIRST: cut along layout lines to create flaps FIRST: nail flaps to baffle SECONP: apply silicone to all joints between metal covering and cabinet SECONP: trim locking tabs off edge of flaps No. 50 ShopNotes 19 |


