50 - Table Saw Workstation, страница 16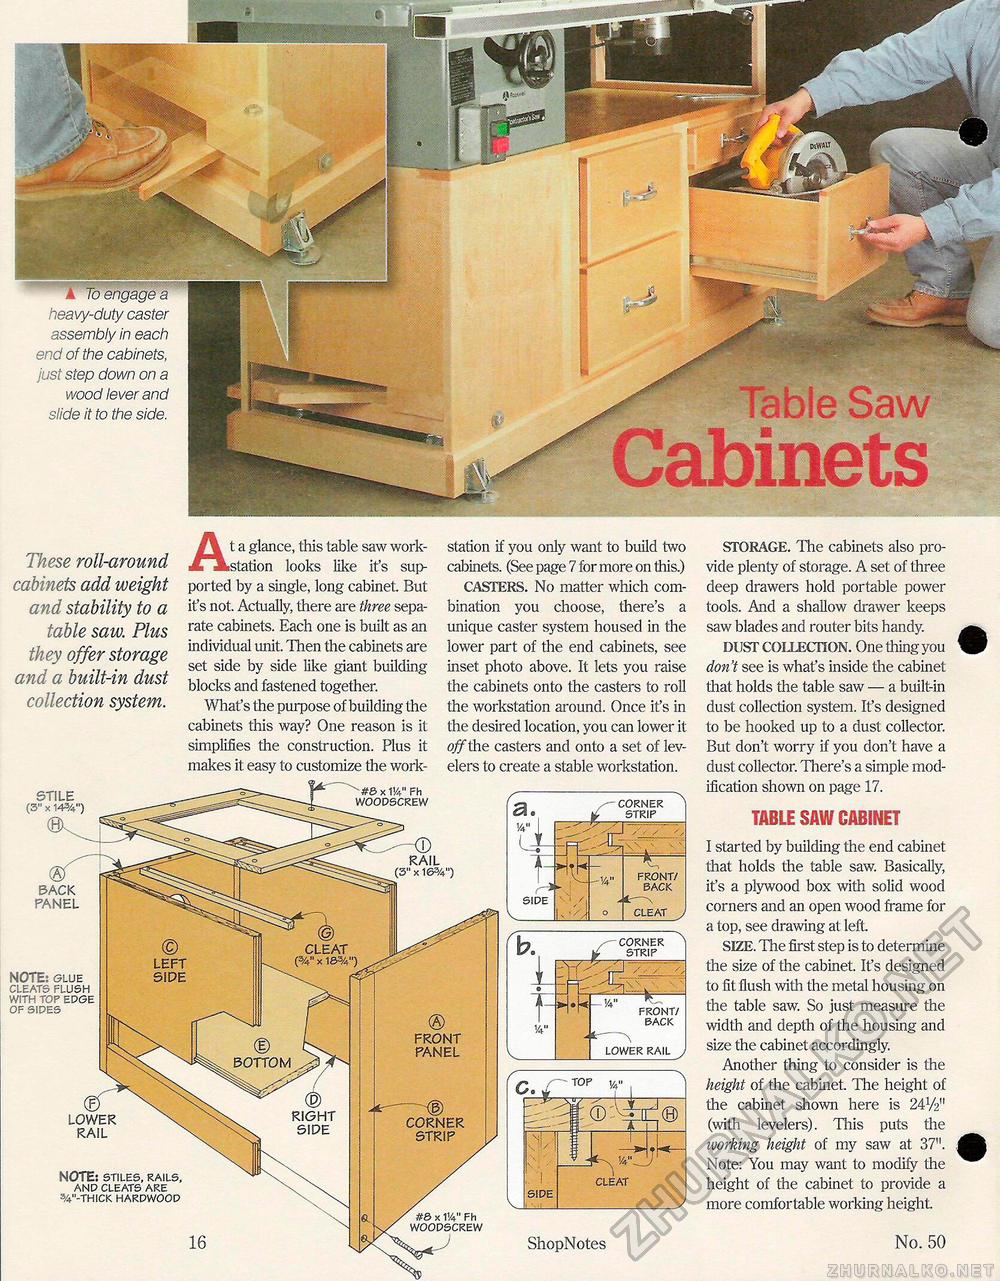
A To engage heavy-duty caster assembly in each end of the cabinets, just step down on a wood lever and slide it to the side. These roll-around cabinets add weight and stability to a table saw. Plus they offer storage and a built-in dust collection system. At a glance, this table saw workstation looks like it's supported by a single, long cabinet. But it's not. Actually, there are three separate cabinets. Each one is built as an individual unit. Then the cabinets are set side by side like giant building blocks and fastened together. What's the purpose of building the cabinets this way? One reason is it simplifies the construction. Plus it makes it easy to customize the work station if you only want to build two cabinets. (See page 7 for more on this.) CASTERS. No matter which combination you choose, there's a unique caster system housed in the lower part of the end cabinets, see inset photo above. It lets you raise the cabinets onto the casters to roll the workstation around. Once it's in the desired location, you can lower it o#the casters and onto a set of lev-elers to create a stable workstation. V4" front/ back -- lower rail , STORAGE. The cabinets also provide plenty of storage. A set of three deep drawers hold portable power tools. And a shallow drawer keeps saw blades and router bits handy. DUST COLLECTION. One thing you don't see is what's inside the cabinet that holds the table saw — a built-in dust collection system. It's designed to be hooked up to a dust collector. But don't worry if you don't have a dust collector. There's a simple modification shown on page 17. TABLE SAW CABINET I started by building the end cabinet that holds the table saw. Basically, it's a plywood box with solid wood corners and an open wood frame for a top, see drawing at left. SIZE. The first step is to determine the size of the cabinet. It's designed to fit flush with the metal housing on the table saw. So just measure the width and depth of the housing and size the cabinet accordingly. Another thing to consider is the height of the cabinet. The height of the cabinet shown here is 24V2" (with levelers). This puts the working height of my saw at 37". Note: You may want to modify the height of the cabinet to provide a more comfortable working height. 16 ShopNotes No. 50 STILE (3" x 14%") BACK PANEL ® FRONT PANEL #6 x VA" Fh woodscrew NOTE: glue cleats flush with top edge of sides © LEFT SIDE NOTE: stiles, rails, and cleats are 34"-thick hardwood LOWER RAIL #& x VA" Fh woodscrew |


