50 - Table Saw Workstation, страница 17
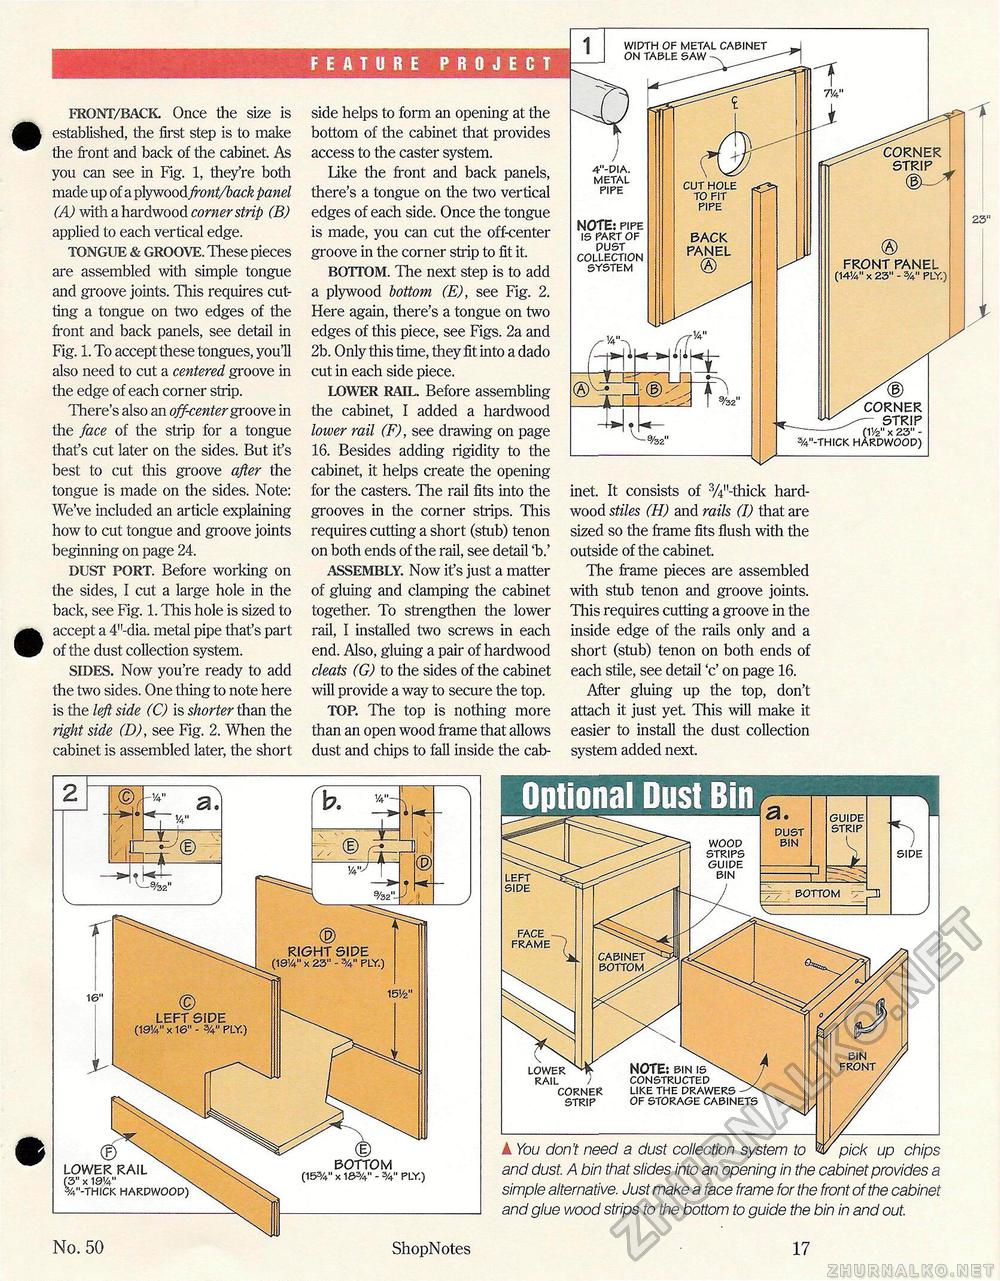
FRONT/BACK. Once the size is established, the first step is to make the front and back of the cabinet. As you can see in Fig. 1, they're both made up of a plywood front/back panel (A) with a hardwood corner strip (B) applied to each vertical edge. TONGUE & GROOVE. These pieces are assembled with simple tongue and groove joints. This requires cutting a tongue on two edges of the front and back panels, see detail in Fig. 1. To accept these tongues, you'll also need to cut a centered groove in the edge of each corner strip. There's also an off-center groove in the face of the strip for a tongue that's cut later on the sides. But it's best to cut this groove after the tongue is made on the sides. Note: We've included an article explaining how to cut tongue and groove joints beginning on page 24. DUST PORT. Before working on the sides, I cut a large hole in the back, see Fig. 1. This hole is sized to accept a 4"-dia. metal pipe that's part of the dust collection system. SIDES. Now you're ready to add the two sides. One thing to note here is the left side (C) is shorter than the right side (D), see Fig. 2. When the cabinet is assembled later, the short FEATURE PROJECT side helps to form an opening at the bottom of the cabinet that provides access to the caster system. Like the front and back panels, there's a tongue on the two vertical edges of each side. Once the tongue is made, you can cut the off-center groove in the corner strip to fit it. BOTTOM. The next step is to add a plywood bottom (E), see Fig. 2. Here again, there's a tongue on two edges of this piece, see Figs. 2a and 2b. Only this time, they fit into a dado cut in each side piece. LOWER RAIL. Before assembling the cabinet, I added a hardwood lower rail (F), see drawing on page 16. Besides adding rigidity to the cabinet, it helps create the opening for the casters. The rail fits into the grooves in the corner strips. This requires cutting a short (stub) tenon on both ends of the rail, see detail 'b.' ASSEMBLY. Now it's just a matter of gluing and clamping the cabinet together. To strengthen the lower rail, I installed two screws in each end. Also, gluing a pair of hardwood cleats (G) to the sides of the cabinet will provide a way to secure the top. TOP. The top is nothing more than an open wood frame that allows dust and chips to fall inside the cab © CL a- r 16" ® RIGHT SIDE (1914" x 23" - V PLY.) © LEFT SIDE (1914" x 16" - 3/4" PLY.) 15'/z" LOWER RAIL (3" x 19V W'-THiCK HARDWOOD) No. 50 inet. It consists of 3/4,Lthick hardwood stiles (H) and rails (I) that are sized so the frame fits flush with the outside of the cabinet. The frame pieces are assembled with stub tenon and groove joints. This requires cutting a groove in the inside edge of the rails only and a short (stub) tenon on both ends of each stile, see detail 'c' on page 16. After gluing up the top, don't attach it just yet. This will make it easier to install the dust collection system added next. ShopNotes 17 A You don't need a dust collection system to W pick up chips and dust. A bin that slides into an opening in the cabinet provides a simple alternative. Just make a face frame for the front of the cabinet and glue wood strips to the bottom to guide the bin in and out. LOWER RAIL CORNER STRIP LIKE THE DRAWERS OF STORAGE CABINETS BOTTOM DUST BIN GUIDE STRIP / SIDE |


