57 - A Shop-Built Pin Router, страница 23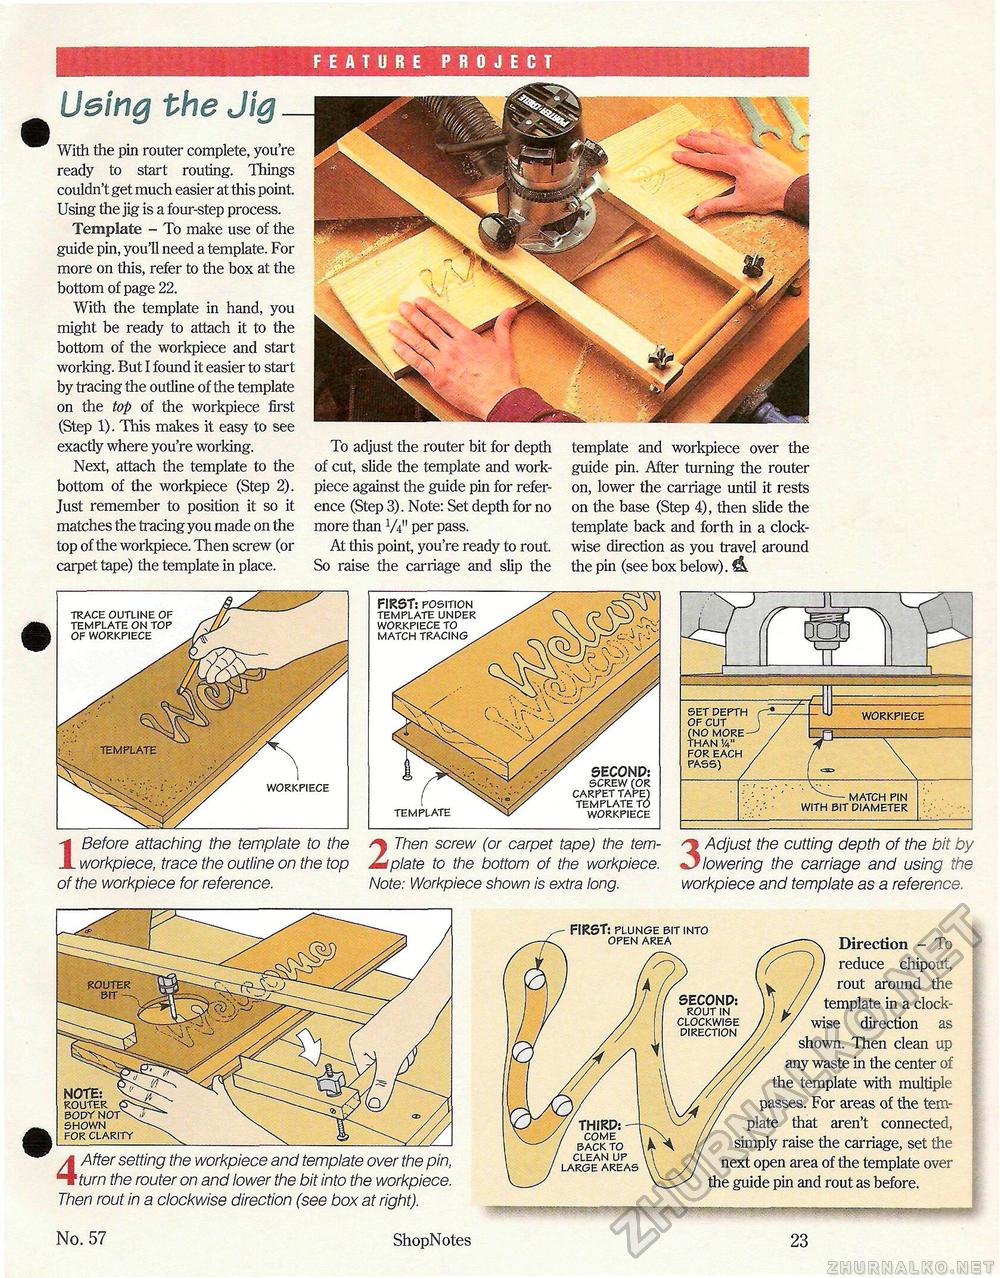
FEATURE PROJECT 1 Before attaching the template to the workpiece, trace the outline on the top of the workpiece for reference. 2 Then screw (or carpet tape) the template to the bottom of the workpiece. Note: Workpiece shown is extra long. 3 Adjust the cutting depth of the bit by lowering the carriage and using the workpiece and template as a reference. Using the Jig _With the pin router complete, you're ready to start routing. Things couldn't get much easier at this point. Using the jig is a four-step process. Template - To make use of the guide pin, you'll need a template. For more on this, refer to the box at the bottom of page 22. With the template in hand, you might be ready to attach it to the bottom of the workpiece and start working. But I found it easier to start by tracing the outline of the template on the top of the workpiece first (Step 1). This makes it easy to see exactly where you're working. Next, attach the template to the bottom of the workpiece (Step 2). Just remember to position it so it matches the tracing you made on the top of the workpiece. Then screw (or carpet tape) the template in place. To adjust the router bit for depth of cut, slide the template and work-piece against the guide pin for reference (Step 3). Note: Set depth for no more than VV1 per pass. At this point, you're ready to rout. So raise the carriage and slip the template and workpiece over the guide pin. After turning the router on, lower the carriage until it rests on the base (Step 4), then slide the template back and forth in a clockwise direction as you travel around the pin (see box below). trace outline of template on top of workpiece workpiece FIRST: position template un per workpiece to match tracing template SECOND: screw (or carpet tape) template to workpiece set dep7 of cut (no mor than !4" for eacf pass) workpiece match pin with bit diameter 4 After setting the workpiece and template over the pin, turn the router on and lower the bit into the workpiece. Then rout in a clockwise direction (see box at right). router shown for clarity SECONP: rout in clockwise direction v THIRD: — / come ' ' back to clean up large areas FIRST: plunge bit into open area Direction - To reduce chipout, rout around the template in a clockwise direction as shown. Then clean up any waste in the center of the template with multiple passes. For areas of the template that aren't connected, simply raise the carriage, set the next open area of the template over the guide pin and rout as before. No. 57 ShopNotes 23 |


