84, страница 14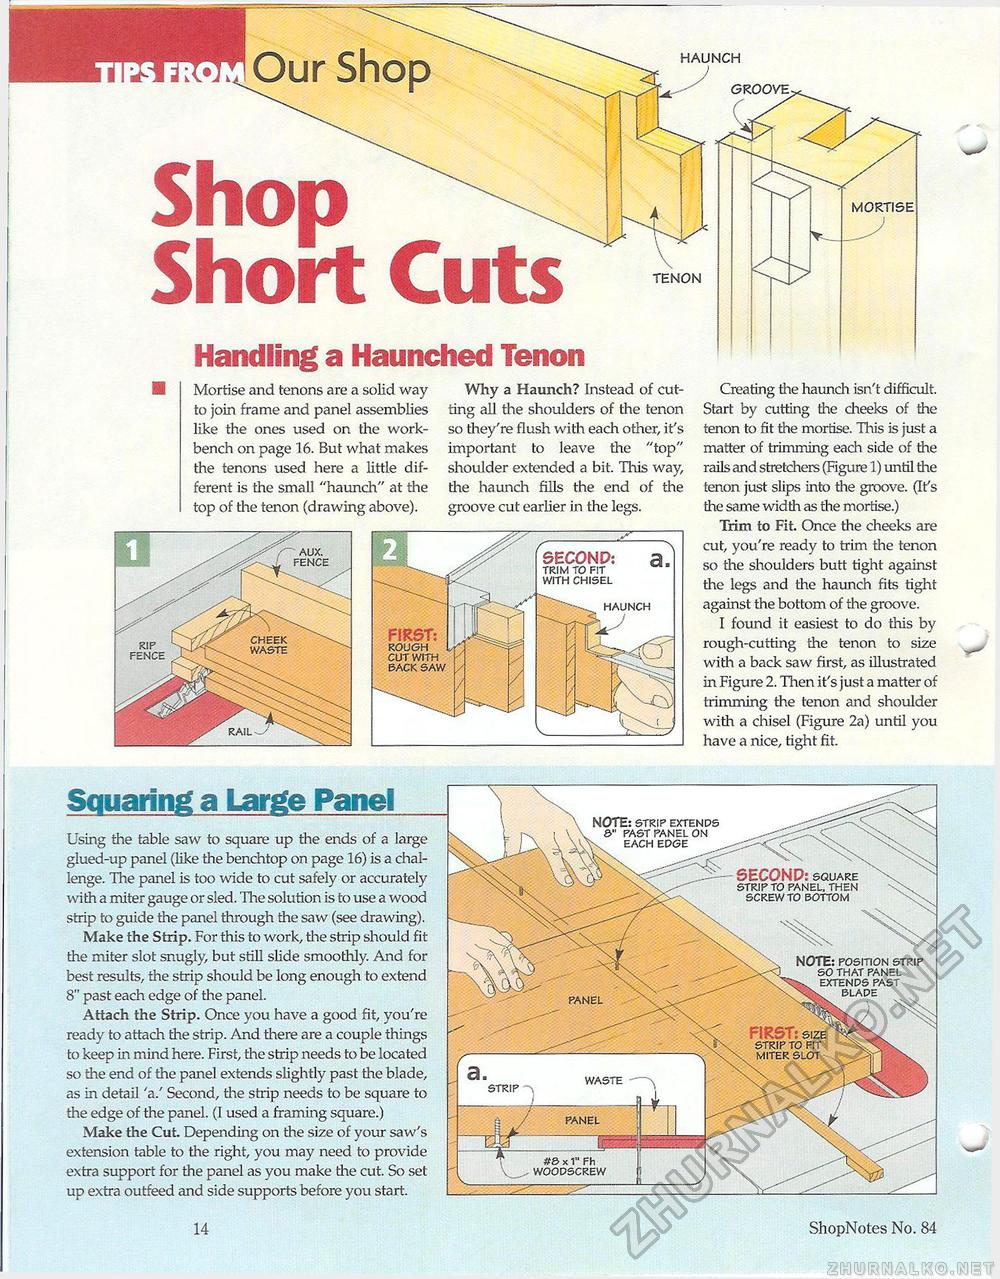
ShopShort CutsHandling a Haunched Tenon Mortise and tenons are a solid way to join frame and panel assemblies like the ones used on tire workbench on page 16. But what makes the tenons used here a little different is the small "haunch" at the top of the tenon (drawing above). Why a Haunch? Instead of cutting all the shoulders of the tenon so they're flush with each other, it's important to leave die "top" shoulder extended a bit. This way, the haunch fills the end of the groove cut earlier in the legs. Creating the haunch isn't difficult. Start by cutting the cheeks of the tenon to fit the mortise. This is just a matter of trimming each side of the rails and stretchers (Figure 1) until the tenon just slips into the groove. (It's the same width as the mortise.) Trim to Fit. Once the cheeks are cut, you're ready to trim the tenon so the shoulders butt tight against the legs and the haunch fits tight against the bottom of the groove. I found it easiest to do this by rough-cutting the tenon to size with a back saw first, as illustrated in Figure 2. Then it's just a matter of trimming the tenon and shoulder with a chisel (Figure 2a) until you have a nice, tight fit. Squaring a Large Panel Using the table saw to square up the ends of a large glued-up panel (like the benchtop on page 16) is a challenge. The panel is too wide to cut safely or accurately with a miter gauge or sled. The solution is to use a wood strip to guide the panel through the saw (see drawing). Make the Strip. For this to work, the strip should fit the miter slot snugly, but still slide smoothly. And for best results, the strip should be long enough to extend 8" past each edge of the panel. Attach the Strip. Once you have a good fit, you're ready to attach the strip. And there are a couple things to keep in mind here. First, the strip needs to be located so the end of the panel extends slightly past the blade, as in detail 'a.' Second, the strip needs to be square to the edge of the panel. (I used a framing square.) Make the Cut Depending on the size of your saw's extension table to the right, you may need to provide extra support for the panel as you make the cut. So set up extra outfeed and side supports before you start. FIRST: rough cut with back saw SECOND: a. TRIM to FIT WITH CHISEL haunch NOTE: strip extends 8" past panel on fs. each edge panel FIRST: size strip to fit miter slot - SECOND: square strip to panel, then screw to bottom note: position strip so that panel extends past blade waste STRIP panel #S x 1" Fh V ^ WOODSCREW 14 ShopNotes No. 84 |


