84, страница 15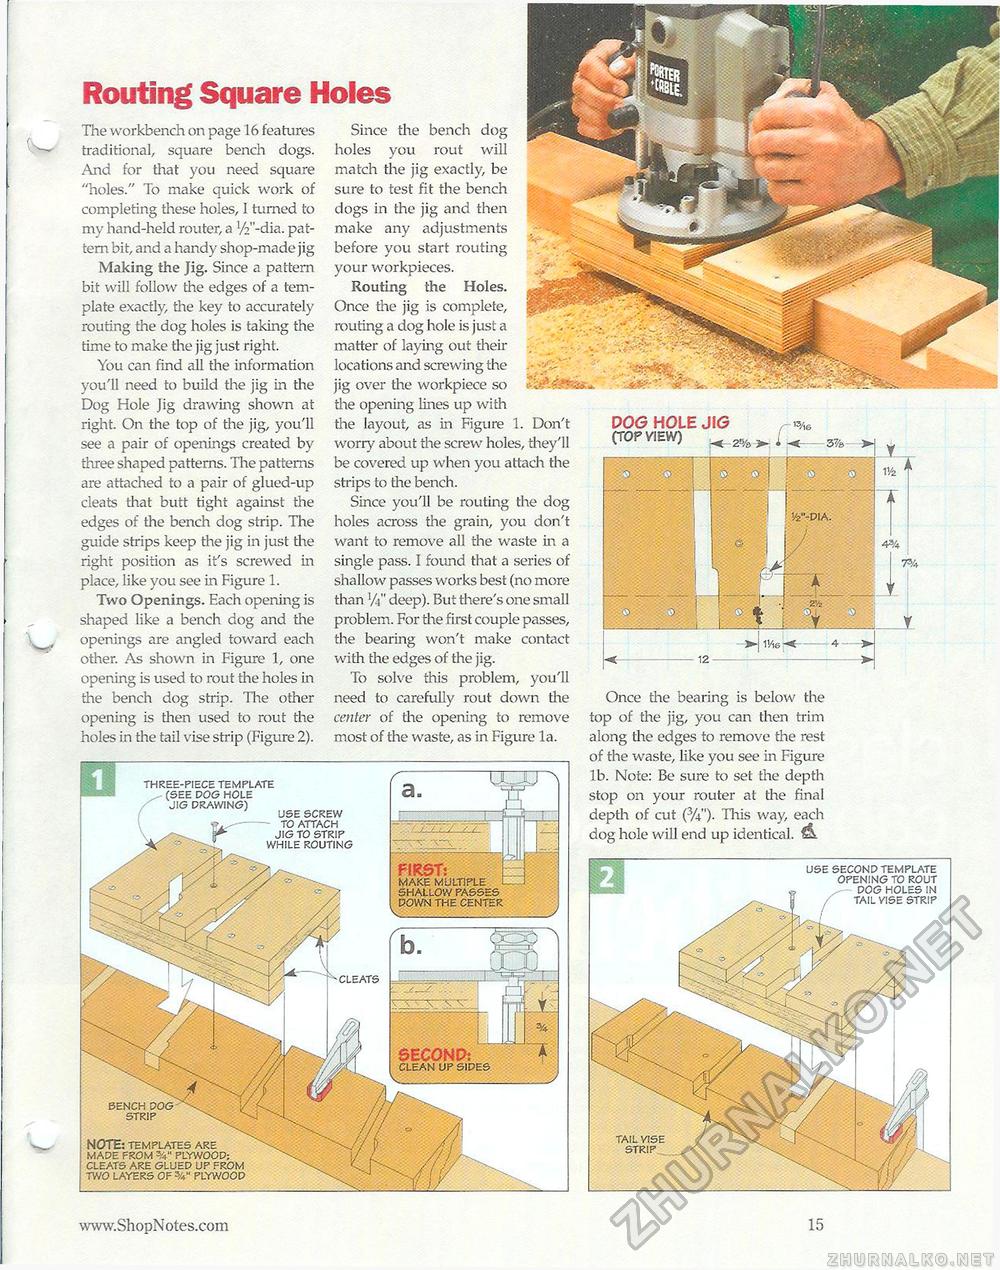
Routing Square Holes Since the bench dog holes you rout will match the jig exactly, be sure to test fit the bench dogs in the jig and then make any adjustments . .. before you start routing - ^ your workpieces. Routing the Holes. Once the jig is complete, gp^j routing a dog hole is just a matter of laying out their locations and screwing the ' jig over the workpiece so •••V!.-rV'«; the opening lines up with the layout, as in Figure 1. Don't worry about the screw holes, they'll be covered up when you attach the strips to the bench. Since you'll be routing the dog holes across the grain, you don't want to remove all the waste in a single pass. I found that a series of shallow passes works best (no more than '/)" deep). But there's one small problem. For the first couple passes, the bearing won't make contact with the edges of the jig. To solve this problem, you'll need to carefully rout down the center of the opening to remove most of the waste, as in Figure la. The workbench on page 16 features traditional, square bench dogs. And for that you need square "holes." To make quick work of completing these holes, I turned to my hand-held router, a '/V'-din. pattern bit, and a handy shop-made jig Making the Jig. Since a pattern bit will follow the edges of a template exactly; the key to accurately routing the dog holes is taking the time to make the jig just right. You can find all the information you'll need to build the jig in the Dog Hole Jig drawing shown at right. On the top of the jig, you'll see a pair of openings created by three shaped patterns. The patterns are attached to a pair of glued-up cleats that butt tight against the edges of the bench dog strip. The guide strips keep the jig in just the right position as it's screwed in place, like you see in Figure 1. Two Openings. Each opening is shaped like a bench dog and the openings are angled toward each other. As shown in Figure 1, one opening is used to rout the holes in the bench dog strip. The other opening is then used to rout the holes in the tail vise strip (Figure 2). DOG HOLE JIG (top view) Once the bearing is below the top of the jig, you can then trim along the edges to remove the rest of the waste, like you see in Figure lb. Note: Be sure to set the depth stop on your router at the final depth of cut (%")• This way, each dog hole will end up identical. THREE-PIECE TEMPLATE (SEE DOG HOLE ' ' JIG DRAWING) USE SCREW TO ATTACH JIG TO STRIP WHILE ROUTING FIRST: MAKE MULTIPLE SHALLOW PASSES DOWN THE CENTER USE SECOND TEMPLATE OPENING TO ROUT DOG HOLES IN TAIL VISE STRIP SECON ■ CLEAN UP SIDES BENCH DOG STRIP TAIL VISE STRIP note: TEMPLATES ARE MADE FROM V PLYWOOD; CLEATS ARE GLUED UP FROM TWO LAYERS OF PLYWOOD |


